Windows Phone 7 is deceptive in its simplicity - as demonstrated in this simple guide to setting up a new email account.
Using Windows Phone 7 is Easy
Windows Phone 7 features a range of integrated communication options, from built in support for Windows Live and Google Mail to Microsoft Exchange and pretty much any POP email system available.
Although there are some restrictions to how information is displayed by the various non-Microsoft email services – they won’t be integrated into the People hub for instance – you can nevertheless add a tile for your email account to the Home screen and be updated when new mail is received!
With email setup, you will of course be able to write and send messages as well as read them – so let’s take a look at how easy it is to use email with Windows Phone 7!
Setup Windows Phone 7 for Email
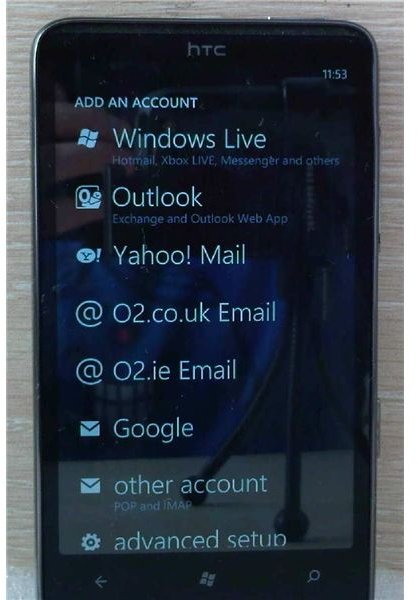
To get started with setting up your email account, click on the arrow on your Windows Phone home screen, then go to Settings and then to Email & Accounts. Click on the Add an Account option, and you will see a selection of email account types you can add – Windows Live, Outlook, Yahoo!, Google, and branded email options from your network provider might also be displayed. With the Other Account option, you can also set up email accounts for your own domain, for example, or for another web-based email system that isn’t listed here.
Use this last option to add your own POP or IMAP email – enter the email address and password to begin, and Windows Phone 7 will attempt to setup the account based on what it knows about your domain. If this fails, you will need to use the manual account setup feature, Advanced Setup. With this, you must again enter your email address and password, and then choose between an Exchange ActiveSync account and Internet Email Account. You will need all of the standard email account setup information to hand here, and once complete, the account will automatically be displayed as a tile on the home screen.
Reading Emails with Windows Phone 7
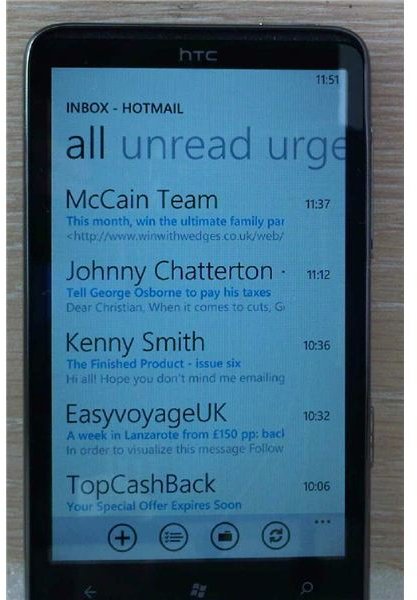
You can check emails instantly with Windows Phone 7 by simply tapping the tile for the appropriate email account. New messages will be displayed at the top, and you can scroll left/right to view unread and urgent emails. Using the menu at the bottom, you can start a new message, select messages to move, view your various mail folders (for Exchange and IMAP accounts) or synchronize your account.
Each of these options is available as icons, although dragging the menu up via the three ellipses will display labels for the icons. Also in this menu are options to add new email accounts and account settings for adding a signature and managing your sync options.
Writing and Sending Emails in Windows Phone 7
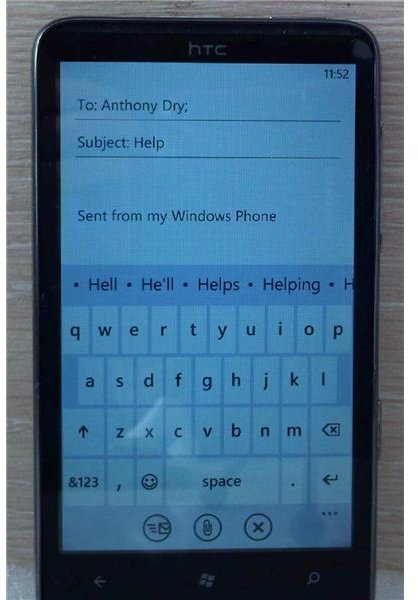
To write an email, open the account you wish to send from, and press the New email button (a + symbol). Enter an email address in the To: field, or use the small + symbol to choose from your list of contacts. If you have multiple email addresses listed for the recipient, you will need to select the appropriate one.
Enter a Subject: line, then start typing! Depending on your Windows Phone 7 version, you can type your email either via the software keyboard (which comes as default) or you might have a slide-out hardware keyboard.
Once you have written your email, click the paperclip icon to attach an image (no other attachments are permitted) or use the ellipses to access the Priority and Show CC & BCC menu items.
Finally, tap the Send icon (represented by an envelope and three lines) – and you’ve sent your first email from your Windows Phone 7!


