Windows Mobile effortlessly supports most IMAP email configurations, meaning you can easily synchronize mail folders - this guide shows you how to set up a connection.
Mail Folder Sync with IMAP on Windows Mobile
Using Outlook Mobile on your Windows Phone is a great way to access emails – it features an easy to use wizard that picks up your email settings based on just the minimum of details.
However, this automated access to your email accounts isn’t suitable for IMAP, something that has lead many users to believe that IMAP isn’t an option on Windows Mobile.
If you thought this, then you couldn’t be more wrong! An IMAP Windows Mobile email account is in fact simple to setup, and Outlook Mobile provides full support for the protocol, delivering access to all of your folders and thanks to the standard IMAP folder synchronization, it will even adhere to any server side rules you have in place!
Setting up IMAP Accounts
Before continuing, you’ll need to make sure you have your IMAP email account details to hand.
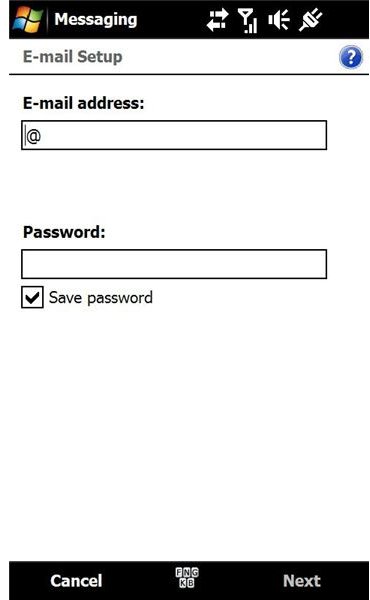
To setup an IMAP Windows Mobile account, go to Messaging on your phone and in the Menu go to Tools > New Account (this may differ if you’re using the TouchFLO 3D interface) to begin the wizard.
Where prompted, enter your E-mail Address and Password; by ticking or clearing the checkbox you can decide whether Outlook Mobile will retain your email password. To proceed, click Next.
The following screen will see Outlook Mobile attempt to connect to the Internet to get your settings for you. This rarely works for IMAP accounts, so clear the box labelled Try to get e-mail settings automatically from the Internet, and click Next.
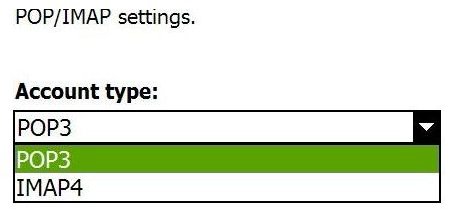
Next, you will be asked to enter the name of your Incoming mail server and select your Account type – this will of course need to be set to IMAP.
Click Next to continue, this time entering the Outgoing (SMTP) mail server as well as informing Outlook Mobile whether or not the Outgoing server requires authentication and if it should Use the same user name and password for sending e-mail.
(You may also need to adjust Advanced Server Settings via the link at the bottom of the screen, depending on your IMAP server.)
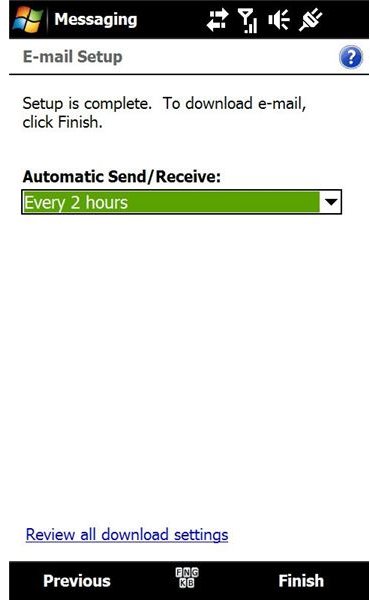
After this, it’s simply a case of setting your Automatic Send/Receive schedule and Message format preferences – your IMAP account is setup on your Windows Mobile phone!
Troubleshooting
If you know your server names and account credentials, you shouldn’t run into difficulty. However this isn’t necessarily the case.
For instance, if you’re trying to setup an IMAP connection to a Gmail/Google Mail account, Outlook Mobile often has difficulties with communicating with these types of account, whether your connection is IMAP or POP.
Another situation in which using IMAP through Outlook Mobile might prove difficult is when the server requires a particular type of secure connection. In most cases, via the Advanced Server Settings screen, you should be able to tell Outlook Mobile that the mail server requires a connection using the secure SSL method. In most situations this should be fine, but non-standard configurations will require an alternative.
To resolve either of these situations, Outlook Mobile will need to be discarded, and you might want to consider using QMAIL, a free to use alternative to the Outlook Mobile application included in Windows Mobile. QMAIL is not only free, it’s a lot happier handling various email formats that Outlook Mobile cannot – read this review for more information .


