With this versatile new Windows Phone 7 app, you need never be short of maps again!
Missing a Map? Try MapSnap?
There are many apps available for navigating your way around towns and cities with maps – but what if you don’t have a map?
With constant redevelopments taking place in industrialized countries, it is only a matter of time before your outdoor activities – from walking, running, cycling or even beach surfing – take you to a location that doesn’t have an accurate map available online with a service like Bing Maps .
Instead you might have to rely on an unwieldy paper map, something that might be a little difficult if you’re determined to complete the course or journey within a set time.
Thanks to MapSnap GPS, you can use your device camera to photograph a paper map and use it on your phone, marking off a location and using GPS to measure your current location!
Using MapSnap Safely
You can get your copy of MapSnap from the Zune Marketplace. The app is available as a free trial or to purchase for £2.49.
Upon launching MapSnap GPS you are able to either Photograph a map or Load a map that you might have already taken a snap of.
At its heart, MapSnap GPS is a tool to get you out of trouble when other maps have let you down. However, in light of recent occasions when people have found themselves lost in remote places using only a mobile device as a map – something that isn’t particularly wise given the battery requirements of a GPS device – we wouldn’t advise travelling without a physical map.
Instead, use MapSnap as a shortcut to getting the paper map out of your pocket, which you have already photographed.
Create Custom Windows Phone Maps
Before you get started with your map, drag up the ellipses […] and select Settings from the main menu. Use this screen to select your preferred unit of measurement, either miles or meters.
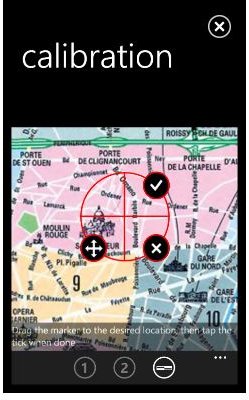
You can then snap or load a map from your phone, before calibrating the selected image. Drag the ellipses once again to select Calibrate, where you will begin by tapping the map to add the first marker. This might be where you currently are, or a major landmark. Drag the marker into position and tap the check to confirm.
The app will then ask you to enter GPS coordinates, Latitude and Longitude. If you don’t know these, the GPS approximation is displayed below the fields, and you can tap this to populate them. Tap the check to Save, and then tap the map again to add the second checkpoint.
If you choose only one marker, the next step would be to apply a Scale to the map, otherwise you’re ready to start using your MapSnap GPS map!
Using Your Custom Map
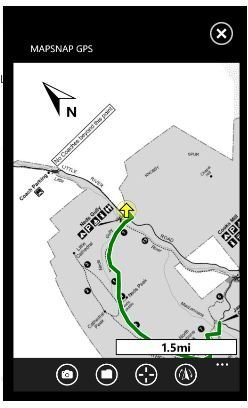
Tap the Back button on your WP7 device to start using the custom map, and the GPS data will update to display your current location. Note that this can be within several hundred meters depending on things like cloud cover or tree density, so be aware that the results might not be entirely accurate.
In open countryside, however, with a fully powered device the GPS and mobile mast triangulation used by your phone should deliver favourable results, and a handheld, custom map that you can view on your Windows Phone.
References
All references and screenshots from MapSnap for Windows Phone 7.


