Enjoy all the features of instant email notifications on your iPhone with push email. Using the free services offered by Google it is both possible and easy to turn your Gmail account into a push Gmail account.
About Push Email
Push email is one of the best advancements in email in recent years. Push email is particularly useful for smartphone owners and
enables users to have instant access to their email without wasting data or battery on their iPhone.
Traditionally the iPhone checks the server for email at a set interval. This action requires the iPhone to use both battery life and data from the iPhone’s data plan. Using push email it is possible to have instant access to email without having to waste data or battery on your iPhone.
Once an email arrives on the email server (in this case Google) it is “pushed” to the iPhone. The iPhone then alerts you that there is new mail available. Since the iPhone never has to “ask” the server for email, it does not expend battery life or data in checking for new mail. Push email is a great way to have instant notifications of new email which extend your iPhone’s battery life and get more out of your limited data plan.
Setup Push Email (Gmail)
Setting up Push email on the iPhone is actually an easy process. Google has enabled this service for all Gmail users via Google Sync. Essentially this means with a simple setup on your iPhone you can enjoy all the advantages of push email on your iPhone. Push email only works on iOS version 3.0 and above, at this point you should have upgraded.
-
**
 Advertisement
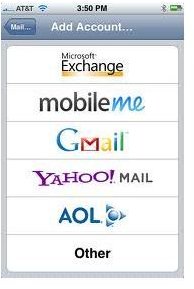
Open Mail Settings.** Click the gray “Settings” icon on your iPhone home screen. Tap “Mail, Contacts, Calendars” to open the mail settings screen.
-
Add a Microsoft Exchange account. Choose “Add Account” by tapping it. Select “Microsoft Exchange” as the account type.
Advertisement -
Introduce your credentials. Leave the domain field blank and enter your Gmail credentials. Place your Gmail username with the “@gmail.com” included in the username field. Enter your Gmail password into the password field. Tap “Next” in the top right of the screen.
-
Introduce server settings. Enter the server settings for Gmail to enable push email. Enter “m.google.com” into the server field. Tap “Next” in the top right of the screen.
Advertisement -
Select services. Choose which services to push to the iPhone. Leave the “Email” option set to on to enable push email. Optionally select calendar and contacts.
Google Sync is now successfully setup on your iPhone. Send yourself an email to test the service. Emails will automatically be pushed to your iPhone the instant they are received. Push email is one of the best ways to utilize your Gmail account and the best part is that it is absolutely free; just like Gmail.
Additional Help & Details
Push email on the iPhone requires version 3.0 of the iOS firmware. Take a look at this guide to learn how to Upgrade Your iPhone to 4.0.2 which will enable push email. Version 4.0 and above of the iOS enable support for multiple push email accounts.
If you are experiencing problems setting up push email or problems with Microsoft Exchange on iOS 4.0 take a look at this informative article to learn how to Fix Problems with ActiveSync in iOS 4.0 .
Screenshots provided by Google, Inc. for purposes of demonstration how to set up Google Sync on the iPhone.


