Want to show off a high score? Need to send someone a screen shot showing how something works or where something breaks? You have the ability to do that without adding any software.
I needed to take screen shots of an iPhone application that I was reviewing. I’ve done application reviews for years and always downloaded software to do this sort of thing. In searching the app store, I couldn’t find anything. So, I went to Google and couldn’t believe what I found.
Snap a Screen Shot
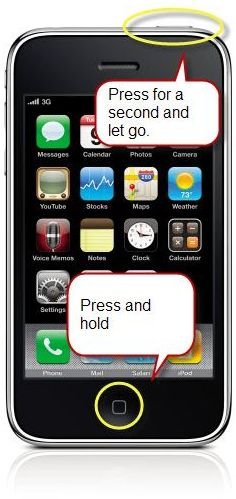
The answer was already in the iPhone. I didn’t have to download anything. All you have to do is press and hold the button at the bottom of the iPhone and then press the button at the top of the iPhone for a second. You should hear a snap sound and see the screen flicker.
You have your picture.
Find Your Screen Shot on the iPhone
Now you can find the photo by doing the following steps:
- Press button to return home.
- Tap Photos icon.
- Select Saved Photos.
That’s it. You took your screen shot and it’s available.
Take a Screen Shot
Send Your Screen Shot to Your PC
Next: How to send it to your computer. You have several options. The first is email it:
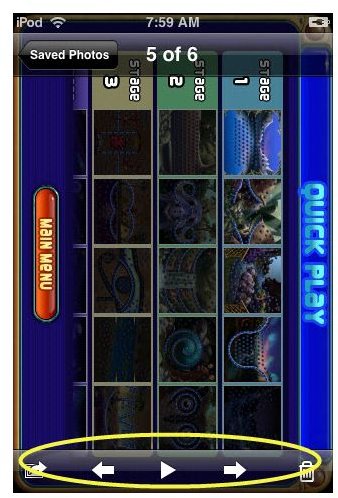
- Select the picture.
- Make sure you see options at the bottom of the picture (see photo below). If you do, skip to step 4.
- Tap the picture for the options at the bottom.
- Tap the first icon.
- Tap Email Photo.
- Send email as you normally do.
Options in Saved Photos
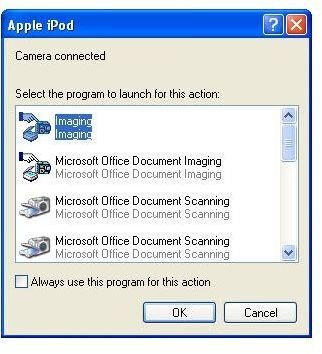
Unfortunately, you can’t access these photos through iTunes. So, the other option is to connect your iPhone to your computer. You can do this one of two ways. A pop up window appears when you connect your iPhone to your computer.
- Connect your iPhone to your computer with the USB cable.
- Look for a pop up window that indicates the camera is connected (see next screen shot).
- Click Scanner and Camera Wizard or another option if you prefer.
- Select the images you want to save or follow the directions on the screen.
Window Opens When Connecting iPhone
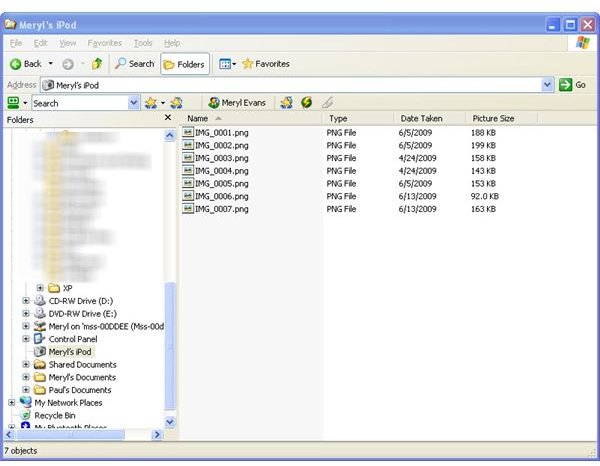
The second option is to use Windows Explorer.
- Open Windows Explorer by right-clicking Start > Explore.
- Navigate your way to see all of your folders and drives (see screen shot below).
- Select all files (click the first one, hold the Shift key and select the last one).
- Drag and drop the photos to a folder on your computer.
The photos are on your computer ready for sharing, editing or whatever.
Using Windows File Explorer
Screen shots from iPhone by Apple and Microsoft Windows XP by Microsoft.


