The “Android UI Elements” articles attempt to focus and analyze every single UI element in the Android programming environment on both sides: from the xml and from the Android code. In this case, we will start analyzing the most basis UI element: the TextView.
Introduction
I think it is a good idea to have specialized articles about single Android UI elements. These articles will be helpful for people who are starting to develop in the Android platform.
About the TextView, it is the basic element in all Android application, a label in your UI; it is a piece of text.
We can create TextViews in two ways, using the XML and using the Android code.
<TextView
android:layout_width=“fill_parent”
android:layout_height=“wrap_content”
android:text="@string/hello"
/>
in the Android code we can write the following:
TextView myTextView = new TextView(this);
“this” is the Context of the application.
Hint - >The Context class is an abstract interface that is provided by the Android system to give us access to system specific resources and classes. The Activity class is a subclass of Context, so that is why we put “this”.
TextView attributes
Every Android view element has to contain the android:layout_width and the android:layout_height attributes in the XML. The value of these attributes can be the following:
- fill_parent: with this value, the size (width or height) of the textView fill the parent that is containing it. If the parent is a LinearLayout that is filling the entire Android screen, the Textview will fill the screen.
- wrap_content: this is not such a possessive value as the “fill_parent” one; here the size of the TextView is fixed to the content. If you place a short text inside, the TextView itself will be short.
- numericalue + pixels: just that, the size numerical value of your TextView in pixels.
These are generic attributes, but let’s have a look at the specific ones.
Adding Text
android:text=”Here goes the text you want to write”
or
android:text=”@string/referente_to_text_in_strings”
Using Android code you can use the:
myTextView.setText(“ChaSequence of Text”);
or if you want to make reference to a string from the “string.xml” file you can do the following:
myTextView.setText(this.getString(R.string.hello));
“hello” is defined in string.xml. As you can see we use the “getString” method, this is an Activity method, related to the context I explained some lines above.
Once we have the text, we can shape it to whatever we want (inside of the platform limits, of course).
Here are some attributes related to the text customization:
Text Color
_android:textColo_r. You have to use a color value, in the form of “#rgb”, “#argb”, “#rrggbb”, or “#aarrggbb”. You can find more information about this kind of color values in the following link:
RGB to Color Name Mapping (Triplet and Hex)
Using the Android code:
myTextView.setTextColor(Color.BLACK);
or if you want to use a custom color:
myTextView.setTextColor(this.getResources().getColor(R.color.mycolor));
But, where is the resource “color”?
You have to create it in the values folder, inside resources.
Here you can place your custom colors.
Text Size
android:textSize: numeric value + dimension measure (It’s recommended to use “sp”, scaled-pixels, instead of “px” as measure)
in Android code
myTextView.setTextSize(TypedValue.COMPLEX_UNIT_SP, 12);
“setTextSize” is the Units of the text and the second attribute the value. The TypedValue class provides the dimension units.
Text Appearance
android:textStyle – Defines the style of the text. Here 3 values are allowed: bold, normal or italics.
android:typeface – Defines the typeface of the text. Here we have 4 values: monospace, serif, sans and normal.
In Android code it will be something like:
myTextView.setTypeface(Typeface.SERIF,Typeface.BOLD);
Here we define not only the style of the font (bold) but the typeface too. In this case we use a “Serif” typeface.
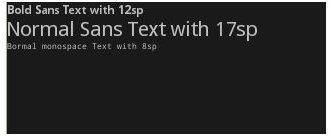
In this image you can see different texts with corresponding styles.
Ask, comment, interact!
Ask any question you have about the article, I will try to answer as fast as I can. Comment my code, my writing, maybe there is something that its missing or is not complete, just let me know!! In other words, interact!!
Follow up
If you want to know when new articles are released, subscribe yourself to the Google Android RSS Otherwise, you can follow my research, articles and work in my professional twitter: jbeerdev
This post is part of the series: Android UI Elements.
Series about UI xml Elements in Android.