A quick how to comparing two different ways of turning your Android phone into a wireless keyboard and mouse. The article compares two programs that are made for said task and these are: RemoteDroid and Gmote.
For Starters
Ever want to lie down and watch a movie in your bed and then turn your computer off without having to get up? Or just having a really lazy day and don’t want to move at all? Well luckily enough for you, you can use your Android device to do all of the work for you provided you have a few things:
- Wireless router
- Host software to link to your phone(either Gmote Server or RemoteDroid server )
- The Android application on your phone (either Gmote or RemoteDroid)
I have used both of these applications and both of them have their ups and downs, it really depends on what strengths you want in them. First lets discuss..
RemoteDroid Intro and Info
RemoteDroid was developed by Joshua Cera and works great as a wireless mouse and keyboard whether or not your Android device has a physical keyboard. RemoteDroid sections the touch screen on the phone into three sections, like a touch pad on a laptop. There is a big open area to use as a touch pad and then the bottom is two buttons representing the left and right mouse buttons. In between the mouse buttons if you don’t have a physical keyboard is a keyboard symbol to pull up the virtual keyboard and act as your computers keyboard. The trackball is also integrated well, it can be used to scroll down the page or if you click down on it it will change to being a trackball that controls the mouse on screen. If I just want to use the mouse/keyboard this is definitely my choice because it seems to flow more smoothly. Now for the step by step guide on how to install RemoteDroid how to use it. If you need RemoteDroid help, just follows the links to the server and that takes you to the developers website with lots of FAQ’s.
*Note: This program IS compatible with Windows, Linux and Mac as well. Actually OS that lets you run Java.
RemoteDroid Installation/Use
- Connect to your wireless internet from your phone(the computer that you want to connect to must be connected to this as well).

remotedroid server - Download both the RemoteDroid server (computer) and Application(phone) and install the application on your phone. The server is a Java application that needs no installation, just simply extracted to a folder and ran.
- Run both of the applications.
- The server will have what the IP address of the computer you want to link to is, type that IP address into the application on your phone when prompted.
- Click connect and you now have a wireless mouse & keyboard.
RemoteDroid keeps a list of your recently used IP’s now so it’s easy to change if your router likes to change the IP on your computer.
Gmote Intro and Info
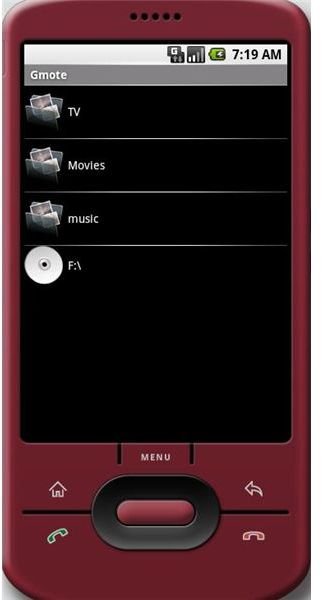
Gmote was developed by Marc Stogaitis and Mimi Sun and is a great application as well. However, its strengths are being able to connect to your media and act as a remote control to play videos, music, or even picture slideshows. Gmote also recently added the feature of being able to play some of that media directly on the phone as opposed to watching it on the computer. Gmote too has the ability to function as a wireless keyboard and mouse, but the mouse does not have the divided up touch pad screen. Also clicking and dragging to select or highlight text doesn’t work since clicking and holding down on the screen acts like a right click on the mouse. One tap is a left click and click + hold down is a right click. As well as with RemoteDroid, if you need any Gmote help or any questions, the link provided in this article will take you to the developers website where hopefully your questions will be answered. Now then, on to the step by step guide of installing and running Gmote!
*Note: This program has install files for Windows, Linux(but needs VLC player in /usr/bin/vlc) and Mac(Tiger, Leopard and Snow Leopard)
Gmote Installation/Use
- Connect to the wireless internet from your phone(your computer must be connected to this connection as well.
- Download both the Gmote Server (computer) and Application(phone) and install the programs. Gmote server has the standard straight forward set up that we have come to know. Verify where you want the program installed and then click Next until it is finished. You will also have the option to run Gmote every time the computer boots up, if you want to run it now, and also if you want to place a shortcut on your desktop.
- Run both programs. Don’t expect to see a window to pop up whenever you run Gmote server however, it runs down in the taskbar. To access it and make changes to the paths you want to share with your phone simply locate the Gmote icon down in the right hand corner of your desktop and right click on it. There you will find the options to change the program settings and paths shared.
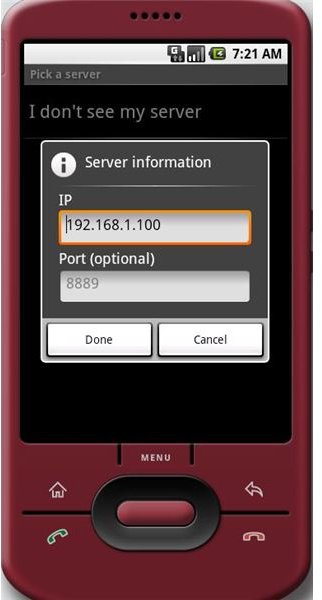
- On your PC when installing Gmote server you will also need to set up a name and password for your server. This allows your phone to search for the server much like it scans for wireless networks.
- On your phone start the Gmote client application. It will ask you what server you want to connect to and the password for that server. Connect and the screen will resemble a remote. Click the menu button on your phone and you can change to touch mode(which will be the wireless mouse/keyboard) and change other setting as well.
Wrap Up
Well, thats a quick rundown of two great programs for Android. Just figure out what you would primarily use the program for and get the one best suited for your needs or even do what I did and get both. I just switch back and forth depending on what I am doing at the time. Both of these are great programs and can both make your life a lot easier or lazier depending on how you want to look at it. Enjoy and long live Android!


