We are going to create an Android database in our application to store data. This is one of the multiple ways of using persistence in our system. Let’s take a look at the steps in Android databases development with SQLite3.
Introduction
As Android developers, sometimes we need to store persistence data in our application. Maybe we just need a Preferences System , but if the data we are going to store is a bit more complex than a vector of pair-values, we should use a database. There are some different ways of using databases; one of them is using Content Providers and the other one is going to be explained in this article.
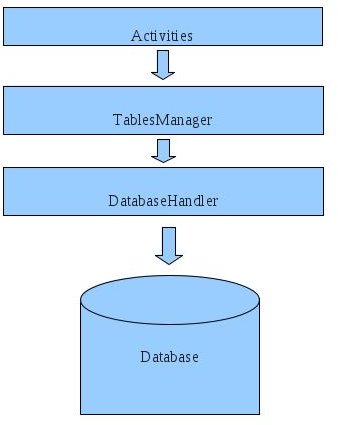
I think this approach is a bit “classical” and fits in the Model Controller View (MCV), but is very flexible and useful when we have in mind a complex system with lots of interconnected tables. I have been working this way in an Android application with 40 tables. The model I’m going to use is simply explained in the next image (click for a larger view).
From Activities we will access each table manager or table handler. The tables manager will contain methods to access the table it represents. Each of the table handlers uses the DatabaseHandler – this class is the one that manages the connection to the database and gives the functionality of storing, retrieving, deleting data to each table manager. We are going to start developing from bottom to top, so let’s define the “DatabaseHandler.”
Creating the Database Handler
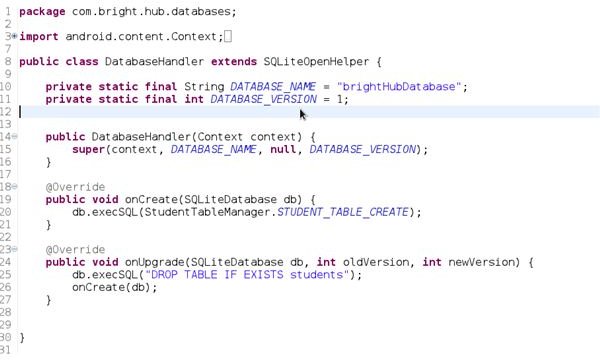
Our DatabaseHandler class will extend from SqliteOpenHelper, this is the Android class that will help us to create and manage databases. So we have the following piece of code:
public class DatabaseHandler extends SQLiteOpenHelper
Extending SqliteOpenHelper forces us to implement the
public void onCreate(SQLiteDatabase db)
and
public void onUpgrade(SQLiteDatabase db, int oldVersion, int newVersion)
methods.
The onCreate method is used when the database is created the first time. The onUpgrade method is used when a we have a new version of the database. You don’t have to use these methods explicitly.
In this class I use the following two attributes:
private static final String DATABASE_NAME = “brightHubDatabase”;
private static final int DATABASE_VERSION = 1;
The first one will be the database name and the second one is the actual version in code of this database.
So the full code of this class will be as follows:
I have added a constructor with the Android Context as input parameter.
public DatabaseHandler(Context context) {
super(context, DATABASE_NAME, null, DATABASE_VERSION);
}
Here I use the SqliteOpenHelper constructor for passing the context, and the database name and the database version as parameters, so we can have an instance of the Database to work with it. If the database doesn’t exist, create it.
As you can see in the onCreate method, I have added the following line:
db.execSQL(StudentTableManager.STUDENT_TABLE_CREATE);
The STUDENT_TABLE_CREATE is a constant that contains the “CREATE TABLE … “ SQL String that creates the “student” table. This will be explained in next section, just don’t forget that here is where I create the tables. Now we are using just one table, but imagine that you have 10 of them, so you can add one line per table. This way when the database is created, the structure of tables are created too.
I have added some code to the onUpgrade method, but it’s not very relevant. Imagine that you want to add a modification to your database, and your application is already deployed. You can increase the database version in your code and add it here. In this method, the changes you want to accomplish are: ¿Add new columns? ¿Add new tables? ¿Delete old tables? All this can be done here.
Creating the Table Manager
You can create a “table manager” for each table you have in your application. In this example we have only one table called “students”. So I have created a class called “StudentTableManager”; an ordinary class, with no extensions or implements.
Here are the variables and constants I like to place in this class:
private static final String STUDENTS_TABLE_NAME = “students”;
The name of the database
public static final String KEY_NAME = “name”;
public static final String KEY_ROWID = “_id”;
Here I add a constant for every column in the table. Our table has only 2 columns “name” and “_id”.
private DatabaseHandler mDbHelper;
private SQLiteDatabase mDb;
These objects will help us to manage the database. Notice that DatabaseHandler is the class we created before. The SQLiteDatabase is an object that represents the database itself.
public static final String STUDENT_TABLE_CREATE =
“create table students (_id integer primary key autoincrement, “
+ “name text not null);”;
This string is used to create the table at the very beginning of the DatabaseHandler onCreate method. As you can see, is just a “create table” SQL sentence.
private final Context mCtx;
We need the Android Context to create the database.
The basic methods I use to create this class are:
public StudentTableManager(Context ctx) {
this.mCtx = ctx;
}
The constructor with the Context is used as the input value, so we can initialize our class Context (mCtx).
public StudentTableManager open() throws SQLException {
mDbHelper = new DatabaseHandler(mCtx);
mDb = mDbHelper.getWritableDatabase();
return this;
}
Here I have created the “open” method. Maybe it’s not the best place to put this functionality but well, from here you can improve the design as you desire. Fine, here we initialize the DatabaseHandler and the SqliteDatabase object (mDb) using the “getWritableDatabase()” method.
Now we have all variables initialized, what can we do with them? We can use them to create a new row in the table:
public long createStudent(String title) {
ContentValues initialValues = new ContentValues();
initialValues.put(KEY_NAME, title);
return mDb.insert(STUDENTS_TABLE_NAME, null, initialValues);
}
Using the mDb (SqliteDatabase) object and the “insert” method, we add the new row to the table. Notice that we use the “ContentValues” object to store the key-values we are going to insert. Just create the ContentValue object, pair each value with its key and use it in the insert method. Now we have only one field, but if you have more, just add to the ContentValues object (imagine it as a vector).
initialValues.put(ONE_COLUMN_KEY, “WhatEver”);
initialValues.put(OTHER_COLUMN_KEY, “More here”);
initialValues.put(LAST_COLUMN_KEY, 5);
In the Git Repository you can find examples of how to delete, update, fetch data from databases, as well as the article code. Here I have given you some basis on Android databases development with SQLite3 so you can go it alone.
Using the library
And how do we use all this in our application? Here is the basic functionality that you have to place in your Activity:
StudentTableManager mDbHelper = new StudentTableManager(this);
mDbHelper.open();
mDbHelper.createStudent(“Student”);
We create the table manager, we open it and we use it! That simple.
References
Source: Author’s own experience.
SQLite Open Helper, https://developer.android.com/reference/android/database/sqlite/SQLiteOpenHelper.html
This post is part of the series: Android Persistence
A serie of articles with code and examples of how to use persistence in your android application.


