This Eclipse Android tutorial will show you, step by step, how to set up an Android development environment in Eclipse.
Introduction
Lot of changes have occurred since I wrote the Setting up the Android environment in Eclipse and Netbeans article. Now the method for installing the Android SDK is different so we need a new Eclipse Android tutorial. So let’s have a look at the changes and run through how to configure Eclipse with the latest Android SDK.
Components Needed
Maybe you have worked with Eclipse before and you have it installed on your computer with the plug-ins needed in your daily work. Python? Ruby? J2EE? Whatever you use I suggest you work in Android with a clean copy of Eclipse. Why use a clean copy of Eclipse to work with Android? The more plug-ins in Eclipse you have, the slower it will be in some cases… and Android can become a bit slow in certain circumstances, depending on your machine resources and your project size.
So, let’s download and install a new instance of Eclipse from the web page. Choose the operating system you work with and download the compressed file. On the Eclipse downloads web page you will find a lot of different configurations of Eclipse. Which one should you choose? You can choose the one you want, but I suggest downloading the Eclipse IDE for Java developers or the Eclipse Classic . I will download the Eclipse IDE for Java developers.
While you are downloading Eclipse, you can start downloading the Android SDK. On the Android developers page you will find the files you need. Select your platform and download the file. I have a Linux machine, so I will download the android-sdk_r09-linux_x86.tgz file.
Setting Up the Environment
Once you have downloaded the Android SDK and Eclipse, let’s uncompress the files and place them in a well known folder. Inside the Eclipse folder you will find the executable file to make it run. You don’t need to install it. On the other hand the Android file we have downloaded is like an “Android Manager”, where you can install, update new SDK elements and also create and run Emulator instances. Let’s check the Android SDK folder:
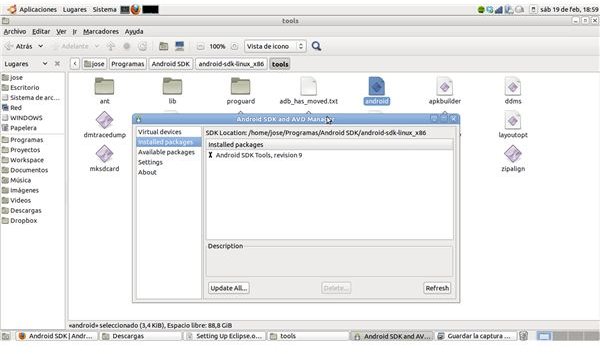
You will find three folders and a readme file. Inside the “tools” folder we have all the files we need to work with Android. Let’s execute the “android” file.
An application like the one in the image is shown:
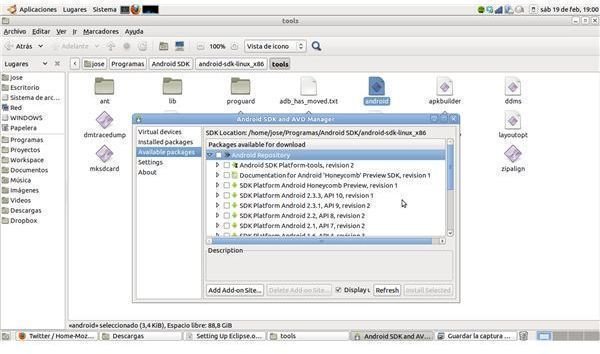
We are going to focus on installing the Android SDK we need, so select “Avaliable packages” and a list of Android SDK’s will be displayed. Choose one, the latest for example (at the time I’m writing this article, the latest Android SDK is the 2.3.3 (API 10) and the HoneyComb Preview (Android 3.0).
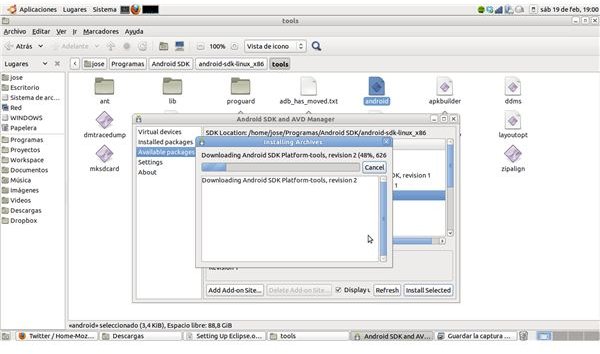
Download and install the components.
Once done, if you click on the “Installed packages” you will see the recently installed SDK components.
Now, let’s enter Eclipse and install the Android plugin (ADT).
In the “Help” menu, select “Install new software”
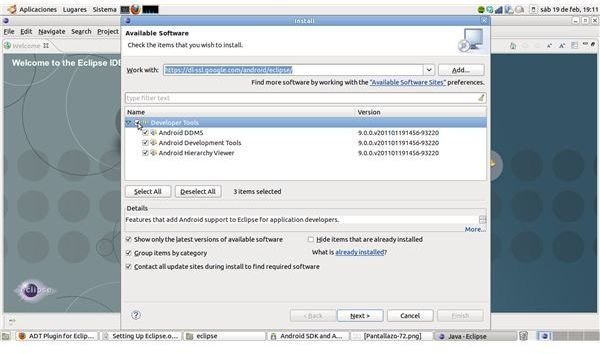
Add the following url to the top box:
https://dl-ssl.google.com/android/eclipse/
Wait until the content is loaded in the middle screen, select all the “Development” tree, follow the steps to install it. You will be asked to restart Eclipse. Do it.
Now, once restarted, click on Window → Preferences menu option. Click on the Android label. You will see a screen like this:
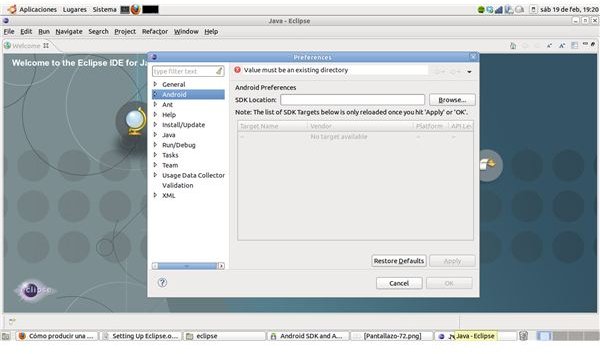
This is where we have to say to Eclipse where the Android SDK is. So browse through the folders and find it. Point to the base folder of your Android files (the one which contains the /platform folder).
Once done, you can create Android projects using the File → New → Other → Android Project.
So this is all. You have successfully set up Eclipse to work with Android.
References
Source: author’s own experience.
Android developers web page, https://developer.android.com/index.html
Screenshots by author.


