One of the very first things you’re probably going to do once you get your BlackBerry is to configure your email accounts so that you can access your messages when on the go; hence this guide, which defines and illustrates the various steps to configure your email settings on your BlackBerry device.
Introduction
One of the very first things you’re probably going to do once you get your BlackBerry is to configure your email accounts so that you can access your messages when you’re on the go so as not to miss anything particularly important whenever you are unable to reach your computer system for any reason. Even if you only use personal mailbox accounts on your device, it’s still beneficial to have your mailbox accounts within your reach if you frequently send email messages over the reaches of cyberspace. Hence this guide, which defines and illustrates the various steps in configuring one of your email accounts on your BlackBerry device for access wherever you are.
Oh, but please wait a minute as I do have a few small notes before we get started. First off, this guide assumes BlackBerry OS 5.0 or newer, Additionally, I developed this guide while using the BlackBerry Curve 8530 so please adjust based on your particular model. And two last things to start with: my smartphone is configured with a modified home screen layout – and some of the icons are carrier-specific (Verizon Wireless, in my case) so yeah, this definitely necessitates you to adjust portions of your configuration process accordingly.
With that bit of hard stuff outta the way, it’s about time we got started. So hold on for the ride, and let us begin the BlackBerry email setup!
Starting the Process
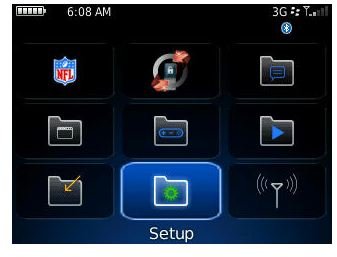
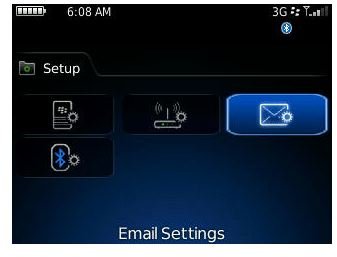
The first order of business is to access the BlackBerry setup area. To do this, press the menu button on your smartphone (the one next to the trackball/trackpad) and scroll to the Setup icon. Now click the ball/pad and scroll to the Email Settings, then click again. The image to the left shows you the appearance of the Setup icon, while the right image shows you the Email Settings icon.
Next, we are going to select the hosting provider for our email account. (Don’t worry about getting any of my crazy stuff, though. I already censor-pixeled the other addresses set up on my phone as if I had a few dirty insults to pull on someone. As you can probably guess, having done this will allow me to keep a level of privacy for myself.) The account for the mailbox I will be setting up is maintained with Google, so we are going to select the Gmail acount type as described below.
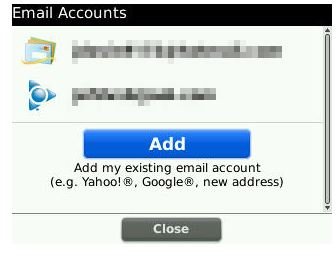
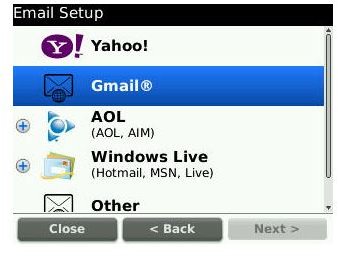
Now obviously you’re going to want to select another option for entering your mailbox information if your provider differs from what I am configuring access for. Either way, the BlackBerry email setup procedure is much the same as what I am doing for this guide so don’t worry about that. Again, I am going to use the left and right images approach to highlight the next two steps – which are selecting the Add command and the Gmail account type, respectively. As before, you want to scroll to the command in question and click the ball/pad for each one as pictured.
Providing the Mailbox Information
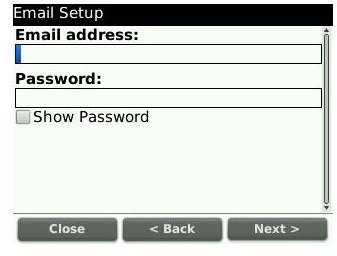
The next step, of course, is to provide the necessary credentials in order to even use the mailbox. Obviously enough, this means specifying the mailbox address and login code (read: account password) in order for your BlackBerry to actually be able to even download your messages, so make sure you enter your information exactly right (case correct, that is: such information usually is case sensitive, after all).
The image to the left shows you what the login specifications page looks like. I left the form entirely blank during the metaphorical “Kodak Moment” so I could once again protect my ever-so-important right to my own privacy, but you really do need to specify your information before you can proceed (like, duh!) You really, truly, honestly can not wait until a later time if you’re going to do this, lest you’re insistent on starting the process all over again. Oh yeah, and be sure to highlight the Next command before you even click to proceed – think installer wizard and you’ve got the idea.
Finishing the Process
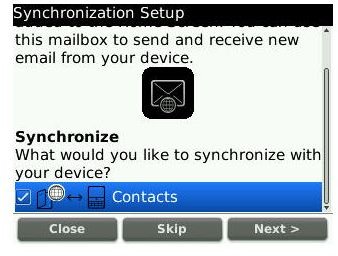
We only have a few small things left to go, and then we’re all done with our BlackBerry email setup. Depending on your mailbox provider, you may be asked to set up extra options for account synchronization. Gmail just happens to be one such provider, so we actually get to demonstrate this; however, not all mailbox providers will give you this option, and even then making any of these selections is entirely optional.
As there are about two or three different screens you will see when finishing up your mailbox configuration – depending on the mailbox provider, that is – this order of business will call in the left-right illustration method from much earlier to show you what can be expected at this point. Simply choose whether or not to synchronize any of the extra stuff as shown on the left side (just click the ball/pad to specify whether or not to include something whenever your mailbox enters synchronization mode) and then select and click on the Next command as you did in the prior step.
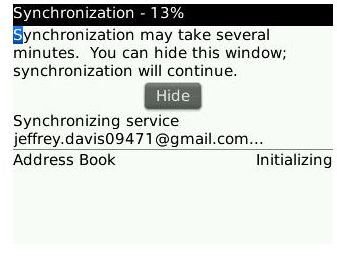
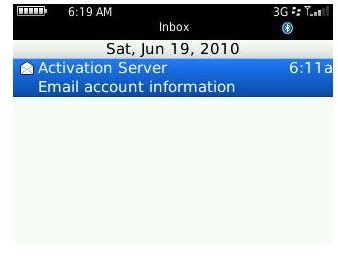
You will now see one or two screens as your BlackBerry configures your email account, depending on the options selected. The first one goes a bit too fast so I don’t even have a screenshot to illustrate that portion of the configuration process, but rest assured that it correlates to the actual mailbox configuration process. That said, I expect the display to look somewhat close to what is shown on the right side, which illustrates the configuration progress relating to the extra options (if any) that you may have selected just one minute ago. Once everything is complete, you’ll see the contents of your mailbox – along with the presence of an extra message confirming the successful configuration of your mailbox as shown below:
And that’s a wrap! Everything is ready to go, and you’re done with this process. If my email configuration guide was helpful for you, then be sure to check out any of the other how-to guides that we have available for whatever needs you may have. Until next time…


