In this article, we will learn Object Oriented Programming in Objective C i.e. we will learn how to specify a class, what is the role of its interface and implementation sections, how methods of a class are declared and finally how the class is instantiated.
Objective C programming is popularly used in iPhone programming. For more details on this application, please see A Brief Guide to Software Designed to Help You Develop iPhone Apps.
Specifying a Class
Classes as we know by now is a structure that contains methods and variables. Objective C divides the body of a class into two sections - the instance variables and methods of the class are declared in one section and the code of the methods (that does actual processing) is contained in other section. The two sections are named as :
- @interface section
- @implementation section
The @interface Section
The @interface section includes the class declaration, its instance variables, and its methods. The interface is the description of the features provided by a class. The interface is stored in a file with extension .h
The @implementation Section
The @implementation section contains the actual code that implements the methods of the class i.e. it contains the code that makes the interface work. The implementation is stored with extension .m
Start Xcode, from the File menu, select New Project. A window will then appear displaying a list of various kinds of projects that can be created. On Left hand side, under the Mac OS X section, select Application and from the list of project templates, select, Command Line Tool. From the Type drop down list, select the Foundation option and click Choose button. We will be prompted for the name of the project. Let’s assign the name as project1.
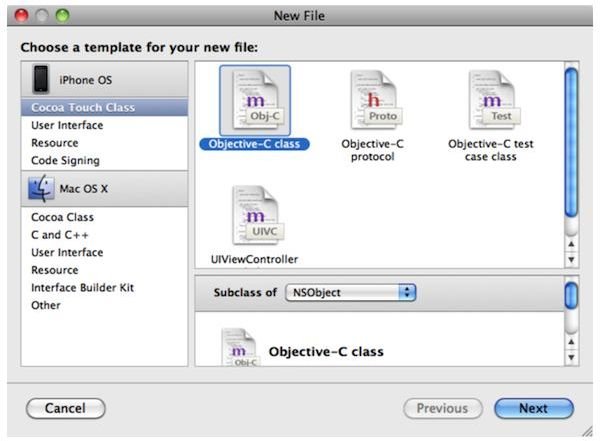
To add a class to our project1 application, right click the project1 folder in the Xcode Project window and select Add->New File option. We get a screen to select template for the new file. On Left hand side, under the iPhone OS section, select Cocoa Touch Class and Objective-C class from the right hand side. Keeping the value of the “Subclass of” dropdown to its default value: “NSObject”, click Next button as shown in Figure 1.
We will be asked to specify the name and location of the new class. Let us assign the name of the class as: rect.m. We keep the checkbox: Also create “rect.h” selected and leave the Location field as such to display the default location for creating the class file and select Finish button.
On selecting Finish button, we find two files: rect.h and rect.m (interface and implementation files respectively) be created under folder: Products in Xcode Project window. Let us double click the rect.h file to open and modify its contents to appear as shown below :
Coding in Interface and Implementation files
// rect.h
// project1
#import <Foundation/Foundation.h>
@interface rect : NSObject {
int l,b,a;
}
-(void)setLength:(int) x;
-(void) setBreadth:(int) y;
-(int) rectarea;
@end
The @interface directive is used to define interface section of the class. We can see that the interface section provides information about the class i.e. about its instance variables and the prototype of the methods that the class is supposed to contain.
NSObject in the @interface line tells the compiler that the rect class is based on the NSObject class and will inherit all the behaviors that are defined by class NSObject.
The instance variables between the curly braces specify that all the objects of rect class will consists of three instance variables : l, b and a. The closing brace tells the compiler we are over with specifying of the instance variables for rect class.
After instance variables, the interface section contains method prototypes or method declarations.
The method declarations consists of the name of each method, its return type, and its arguments (if any). The leading dash in method declaration signals that it is an instance method (not a class method). Following the dash is the return type for the method enclosed in parentheses. Since our method setLength() will not return anything hence void is used to indicate that there’s no return value. An Objective-C method can return standard types (int, float and char), pointers, object references, and structures. To pass data to the method (also known as arguments), the method name is followed by a colon, the data type in parentheses and name of the argument. So, in the setLength method declaration, x is the name of the argument that is passed to the method and it is of integer data type.
Similarly, the setBreadth is also declared as an instance method that will not return anything and an argument of integer data type can be passed to it. The last method: rectarea will return a value of integer data type and does not need any argument to be passed to it
Coding of Implementation section
Double click the file rect.m from Products folder to write implementation code for our class. Let us and modify its contents to show the code as shown below :
// rect.m
// project1
#import “rect.h”
@implementation rect
-(void)setLength:(int) x{
l=x;
}
-(void)setBreadth:(int) y{
b=y;
}
-(int) rectarea{
a=l*b;
return a;
}
@end
The @implementation directive is used to define implementation section of the class.
-(void)setLength:(int) x{
l=x;
}
Instantiating the class
Above statements define the instance method : setLength of the class that will accept an argument of integer data type. The integer value passed while calling the method will be assigned to the argument named: x. The value assigned to argument x will then be assigned to the instance variable of the class : l (for length of the rectangle). On the same pattern, another method: setBreadth is defined that will accept an integer value (while being called) which will be assigned to its argument: y. Finally, the value assigned to argument y will be assigned to the instance variable: b. The last method defined in the implementation section is rectarea which computes area of rectangle by multiplying the values assigned to l and b instance variables (for length and breadth respectively) and the result (area of rectangle) is returned
The @end symbol declares the end of implementation section.
Program section to instantiate the class
Since the class rect is created by defining its interface and implementation section, its time to create instance of the rect class and calculate area of rectangle by invoking the respective instance methods. We create instance of the class in the main function of our project1.m file. So, in the Xcode project window, from the “Source” folder, double click the project1.m file to open it and write the following code in it to create instance of the rect class
1. #import <Foundation/Foundation.h>
2. #import “rect.h”
3. int main (int argc, const char * argv[]) {
4. rect *rec=[[rect alloc] init];
5. [rec setLength: 50];
6. [rec setBreadth: 8];
7. NSLog(@“Area of rectangle is %d”,[rec rectarea]);
8. [rec release];
9. return 0;
10. }
In statement 2, the rect.h header file is imported in the project1.m file to access the class declaration written in its interface section
In statement 4, we create a variable rec to store reference to the class instance and allocate memory for creation of class instance). The alloc method is a class method inherited from the parent NSObject class and is used for allocation of memory). The init is the instance method used to initialize the class instance: rec. In short, the statement 4, allocates memory and instantiates the object: rec
The statement 5 calls the method setLength of the rect class. Calling a method is also known as messaging an object and a message is an action that an instance can perform.
Let’s save the program by selecting File->Save option. To compile and run the program, from the Run menu select Console option to open the Debugger Console window and finally, select Build and Run icon from the toolbar to see the output of the program. The output that we will get in Console window is :
Area of rectangle is 400


