Learn what’s involved with manually creating HTML email. Knowledge of the code behind what’s seen in a browser allows you the freedom to author web pages with nothing but the simplest text editor if that’s all you have at your disposal.
The Advantages of Manually Creating HTML Email
Although I’ll refer to the process of “manually creating HTML email,” I’m actually referring to extensible hypertext mark-up language (XHTML) which has replaced hypertext mark-up language (HTML) in modern web development. The most significant advantage of knowing how to code manually is the freedom to be able to author web pages without the use of software that can be expensive, buggy or simply unavailable at a given time. Also, the serious web developer knows (X)HTML. I’ll cover the steps for manually creating HTML email; it’s a very simple form with which you can start and go from there.
Those who are new to web development might have an idea of what (X)HTML can accomplish, but not what its limits are. You can easily learn what’s needed for manually creating HTML email because all code is written in HTML, or I should say (X)HTML, when strictly speaking of the form that will be visible to the visitor. However, all you will have is a form; someone can fill it out; but, it can’t actually be sent to you as an email without some kind of script or “handler” to process it for the creation and delivery of a real email message. Learning how to write what are known as client side and server side scripts for functions such as email is a necessary part of real web development.
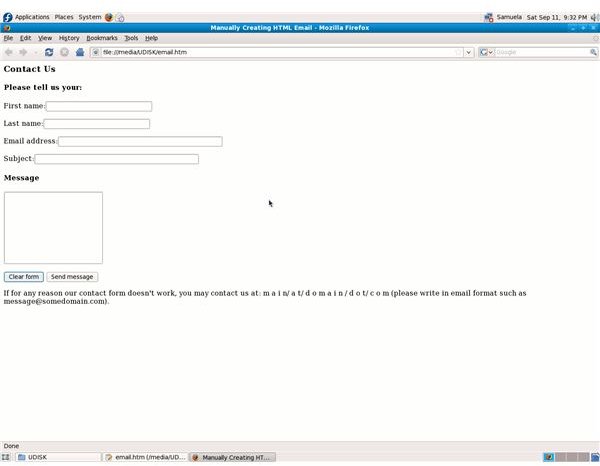
Clicking on the screen shot below will display the code behind the form shown at the end of the article (in the final screen shot). Following is an explanation of the code. You should have a good grasp of at least the very basics of XHTML coding before attempting to author email forms.
Explanation of the XHTML Code Behind the Form
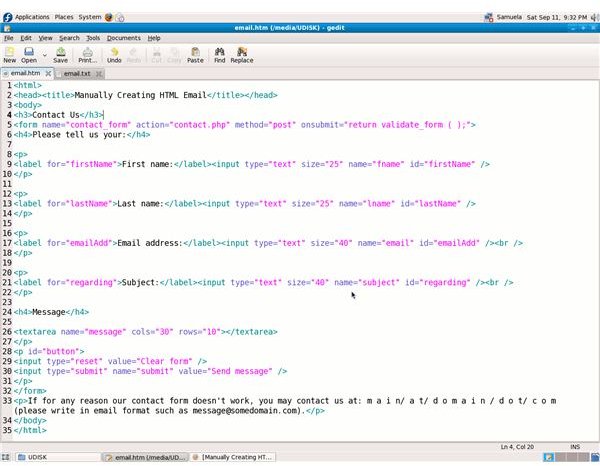
The first lines consist of basic XHTML tags: head, title, body, etc. Next, you see: . You’ll want to name the entire form; you don’t have to use “contact_form” like I have. The action equals the name of the script (handler) responsible for processing the form on the server so an actual email is created when someone clicks on “Send message.” The method is “post;” I used JavaScript for validation of this form using an external script. You don’t have to use an external script as I did or even to do form validation at all; but, I strongly recommend that you do.
We then see text boxes for the visitor’s first and last name, email address, and subject. Notice that I’ve used labels for this form to allow for text to be associated with the control. In other words, the visitor doesn’t have to click directly in the input box in order to “control” cursor access in the box. You don’t have to use labels, but if you do, remember to use the for attribute and to uniquely identify the element by assigning an id to it. You must also name your elements because the name is part of the name=value pair that comes into play when sending the data to the web server to be handled to produce an email message. A good practice is to use the same “title” for the for attribute and the id, and use a unique name to name the element. This will make more sense if you learn to write scripts to handle email forms.
We then come to the text area where the visitor can type in his message. Control of how large the “box” appears is achieved by setting columns (cols) and rows (rows). Finally, we create a couple of “buttons,” one to allow the visitor to clear out everything he has typed into the form and another to allow him to send the message. Of course, you can change the text used to indicate these buttons to have them read how you want. For example, you could say, “Erase form” instead of “Clear form” or “Send email” instead of “Send message.” This control is accomplished by modifying the value. These are the basics of manually creating HTML email.