In this two-part tutorial I’m going to show my readers how to create a story or photo blog with nice, big pictures. This tutorial is intended for the experienced blogger who isn’t afraid to experiment a little. Part one discusses how to set up your new blog.
Introduction
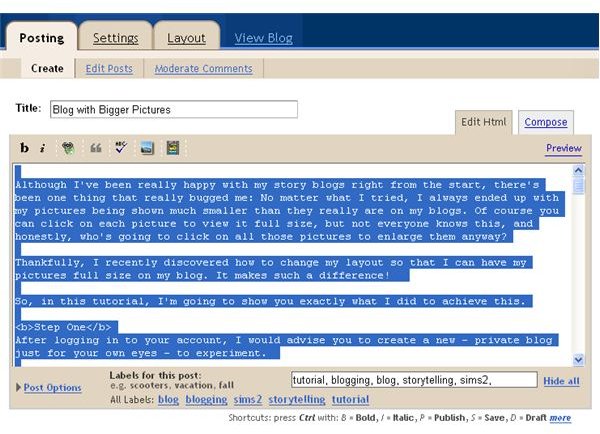
Although as a fiction writer, I’ve been really happy with my story blogs right from the start, there’s been one thing that really bugged me: No matter what I tried, I always ended up with my pictures being shown much smaller than they really are on my blogs. Of course you can click on each picture to view it full size, but not everyone knows this, and honestly, who’s going to click on all those pictures to enlarge them anyway?
Thankfully, after playing around with my blogs for a while, I discovered how to change my layout so that I can have my pictures full size on my blog. It makes such a difference!
So, in this tutorial I’m going to show you exactly what I did to achieve this.
Step One – a new blog
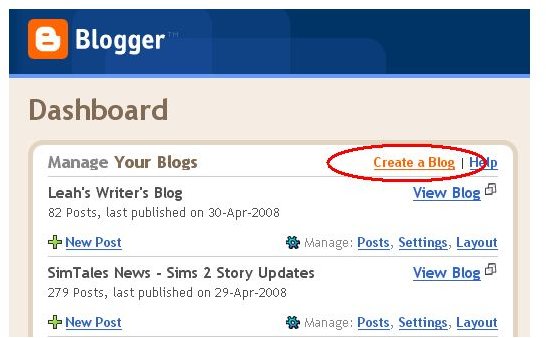
After logging in to your account, I would advise you to create a new - private blog just for your own eyes - to experiment. (Picture 1)
That way, if things go wrong, no damage is done to your story blog, and you can continue playing around with your settings until you’ve got everything just right.
Then, when you’re happy with the results, all you have to do is “copy” the same settings to your story blog.
Step Two – a new template
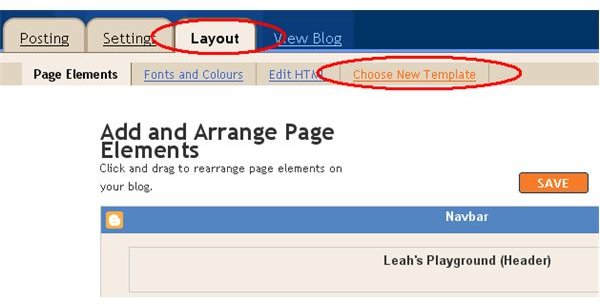
In the Layout Tab of your Blog’s Dashboard, click Choose New Template. (Picture 2)
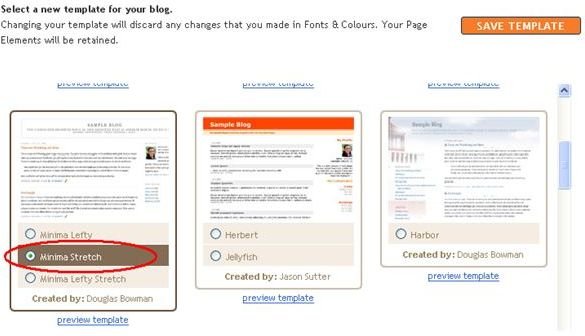
I used minima stretch. But minima lefty stretch might work too.(Picture 3)
Step Three – fonts and colours
Minima stretch doesn’t look very interesting at all, so we’ll have to jazz it up a bit. I want my blog to be black, e.g., so I clicked the Fonts and Colours Tab. (Picture 4)
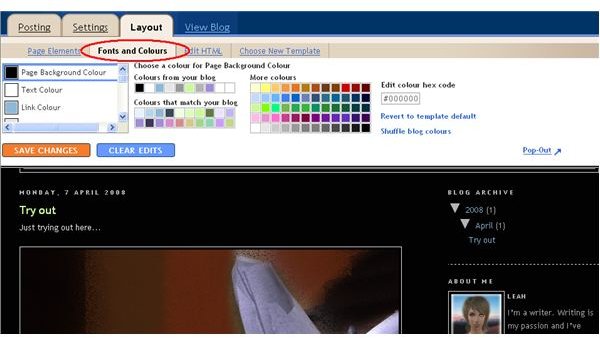
What’s really nice here, is that you get a real time preview of what your blog will look like once you apply the changes you made. Also, note that if you want to choose colours that aren’t in the palette, you can even edit the colour hex code. Sadly, that feature somehow didn’t work for me, but if you really want to, there’s a work-around for that problem too. I’ll come back to that in a minute.
I chose black for the background, a very light shade of grey for the blog title colour and border colour and white for the text. Other pastels for the links etc. It’s really up to you which you choose.You’ll most likely want to stay close to the original colours of your existing blog. When you’re happy with the colours you chose, click the “save” button.
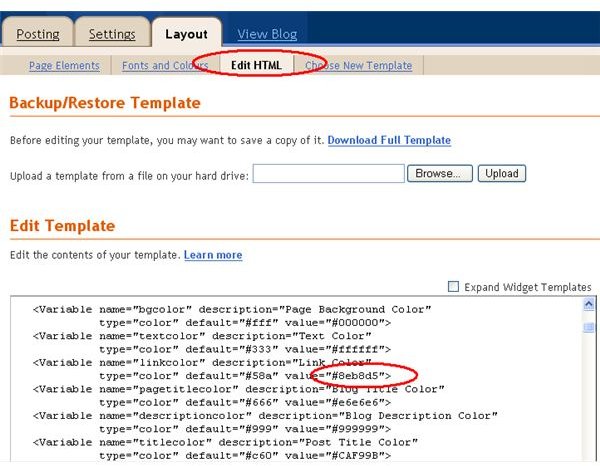
Since the colour hex code editor failed to save the colours I chose, I clicked the Edit HTML tab, and copied the hex code of the colour I wanted for my links into the value-code for the link colour, which now had the following values: Variable name=“linkcolor” description=“Link Color” type=“color” default="#58a" value="#8eb8d5"
It’s the last of all these values that I changed, as shown in picture 5.
You can change the colour hex code for all the other variables here too, if you want to. And since you’re still working on your private, experimental blog, you don’t have to be afraid to mess up either. None of the changes you make here, will affect your story blog.
Step Four – a new header
A nice new layout for my blog also means I want to have a new header.I created and uploaded a new header that nicely fills the width of the page, and fits the atmosphere of the story without giving away too much.Be careful not to make your header too large, or it will “walk” off your screen. Keep in mind that most people nowadays probably use a screen resolution of 1024 x 768.A size of 810/850 x 250/310 pixels fits the bill quite nicely.
Step Five – the transition
Once you’re happy with the results, you can just carry them over to your existing story blog, knowing exactly what to do, and what not to do.
Step Six – big pictures
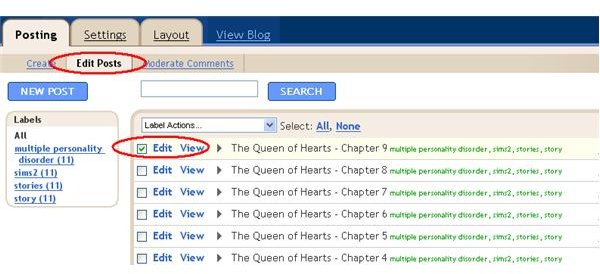
To make your existing pictures show up full size on your blog, you’ll need to edit all your existing posts. Click Edit Posts and select which post to edit first.(Picture 6)
Now, you’ll have to go into “edit html” mode and edit the codes of all your uploaded pictures.
Below is a picture of what you need to look for. (Picture 7)
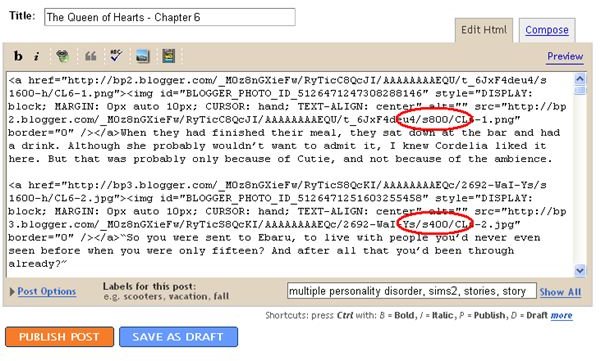
I circled two pieces of code with red. The first one is the altered code, the second one the original.
You need to change the S400 into S800 in the HTML code of all your pictures. That’s quite a bit of work, but that will do the trick - in most cases.
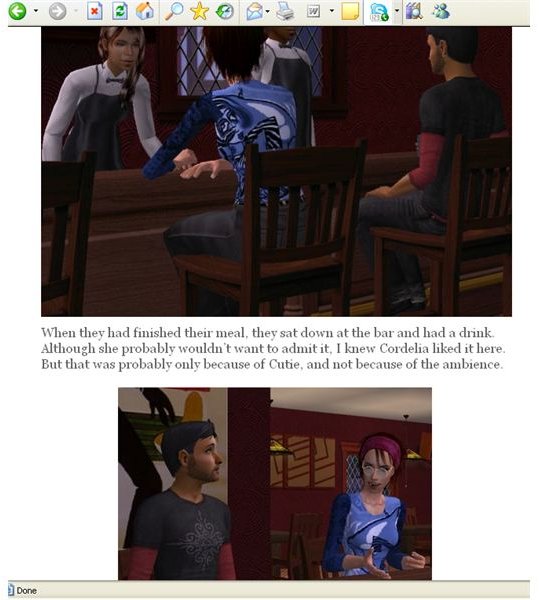
Our next picture is a screen shot of the preview, so you can see the difference!(Picture 8)
You can, of course change all these codes manually, but if you’ve got MS Word installed on your computer, there’s a much quicker and easier way to do this.
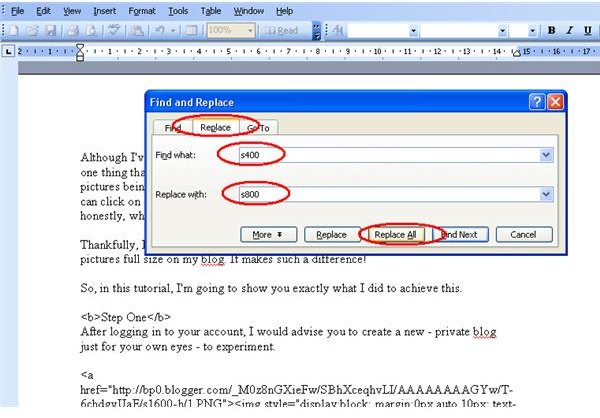
When you go into html view, copy and paste everything into Word. Place the cursor somewhere in the post field and press the “Ctrl” and “A” button, thus selecting everything within this field. (Picture 9)
Press “Ctrl” and “C” to copy the contents of your post, and paste it into a new Word Document using “Ctrl” and “V”.Then hit Crtl + F and select the tab “replace"In the “Find what” field, type in s400and in the Replace with field: s800Then click replace all. (Picture 10)
After that, copy and paste your edited Word document into the HTML field of your blog post and hit publish.
Now, some of your pictures might actually be too big to fit your blog, but don’t worry. All you need to do to get those pictures fit into your blog nicely again, is copy and paste the following piece of code into the HTML-code of those pictures:_width=“600” height=“450”_as shown in picture 11.
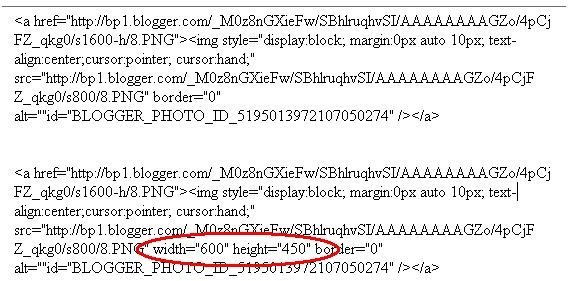
The value that’s most important here, is the width=“600”. You will need to calculate the height of your picture accordingly (or let your picture editing program do that for you and just copy and paste the values it gives you) or simply leave out the values for height. Either way works.
Finally
For future chapters, you have two choices: Either you upload your pictures to Photobucket and copy and paste the html code they give you into your post (make sure you’re in html-mode), or you upload to blogger/picasa and adjust the html-code the way I showed you.
Good Luck!
To see an example of a blog with big pictures, you can visit one of the following blogs:
The Queen of Hearts - by Leah (https://leahsimstories.blogspot.com )
Priest Cutie - by Leah (https://priestcutiestory.blogspot.com )
© 2008, Leah Witmond
This post is part of the series: A Blog with Bigger Pictures
In this two-part tutorial I’m going to show my readers how to create a story or photo blog at Blogger with nice, big pictures. This tutorial is intended for the experienced blogger who isn’t afraid to experiment a little.


