Web pages with interactivity and animation, if not overdone, using Javascript are more effective and attractive to visitors. Unless you are well versed in Javascript, creating these pages involves a lot of work. Dreamweaver CS4 incorporates dozens of generated Javascript using “Behaviors.”
All of the Behaviors in Dreamweaver involve two elements—events and actions. Every defined event will trigger some action. An event can be many different things such as a mouse rollover, a click, or even printing a page. Examples of actions image swaps, opening a new browser page, or effects like causes text to disappear and reappear.
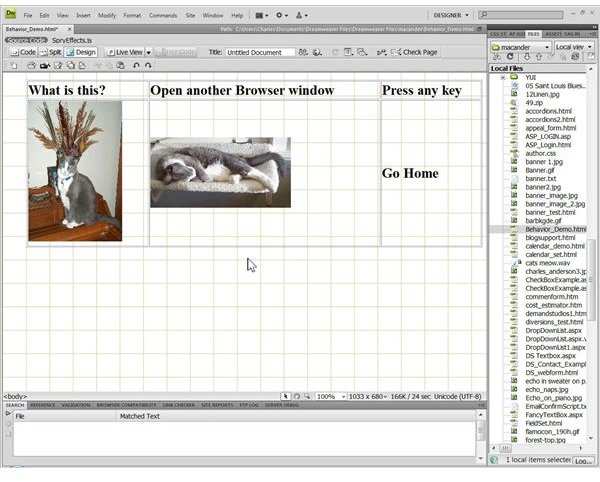
Experiment with Dreamweaver CS4 Behaviors by creating a new HTML page in Dreamweaver and saving it as “Behavior_Demo.html.” Add a simple table by clicking on “Insert” and selecting “Table” from the drop down menu. As a shortcut, do this by pressing “Ctrl+Alt+T.” Within the Table properties box that pops up, change the “Rows” setting to 2 and the columns to 3. Change the table width to 100 percent. Leave everything else as it is and click “OK.”
Set Up the Web Page
Review the list of behaviors available by clicking on “Window” and “Behaviors” or press “Shift+F4.” Besides the 34 listed, if you click on the “+” sign (“Add Behaviors”) and select the link to get more behaviors, you can visit an Adobe site to add more Javascript behaviors. For now, populate the table created above with different text and image entries that will link to specific behaviors. Starting with the top left cell and working across, then down to the second row, enter the following:
- What is this?
- Open another Browser window
- Press any key
- [insert an image of your own here by clicking “Insert,” “Image”]
- [insert an image of your own here by clicking “Insert,” “Image”]]
- Go Home
Your Web page should look like the attached image at this point.
Add Behaviors

The image here shows an abbreviated list of the Behavior events.
Highlight the top cell on the left on the Web page table. Click on the “+” sign in the Behaviors panel. Select “Popup Message” from the drop down list. Type some content into the Popup Message box that appears such as this: “This displays a popup message of explanation.” Click “OK.” Select the onMouseOver event from the list of Behaviors. Select the second cell in the top row of the table. Add a new Behavior with the same method, but this time select “Open Another Browser Window.” In the properties window that opens, type this in the URL to display box: https://www.brighthub.com and make the window width and height 300. Check some of the attributes as desired, such as the “location toolbar” and the “scrollbars as needed.” Give the window a name like “BrightHub2.” Select “onDblClick” for the event.
Follow the same process for the remaining cells using these actions and events:
- Cell 3: Press any key—Action: Effects/Appear/Fade (check “Toggle Effect”). Event:
- Cell 4: Click “insert/image” and add an image of your own —Action: Effects/Shake. Event: onClick
- Cell 5: Click “insert/image” and add an image of your own. Action: Swap Image. Event: onFocus
- Cell 6: Go Home—Action: Go to URL/https://www.fsu.edu. Event: onMouseDown
Tips
The triggering events can be any that are available in the list of behaviors. View the code in Dreamweaver to see how much Javascript coding has been done for you. This simple table with actions consumes 90+ lines of code.
In order to make this work on a server, you will need to upload any associated files you created as well as the HTML page.
It is easy to get some of the Event selectors wrong or set more than you want. You can check this by changing to the Code view in Dreamweaver and comparing the patterns in the Actions/Events that are working correctly to the problem areas. Using Dreamweaver’s Live View and Live Code is a good way to do this.


