ASP.NET includes several data source Web controls to display and edit data retrieved from a database. Besides these simple controls ASP.NET also includes specialized view controls such as GridView, DetailsView, ListView and FormView. GridView is particularly useful with dynamic Web displays.
To use the Gridview control you will need to set up a database as described in Use Visual Web Developer and ASP.NET for Database Creation . The necessary Microsoft software is downloadable free from the URL in the Resource section below. You also need the free SQL Server 2008 Express Edition if you proceed to test out SQL search capabilities.
Setting Up a Table for Gridview
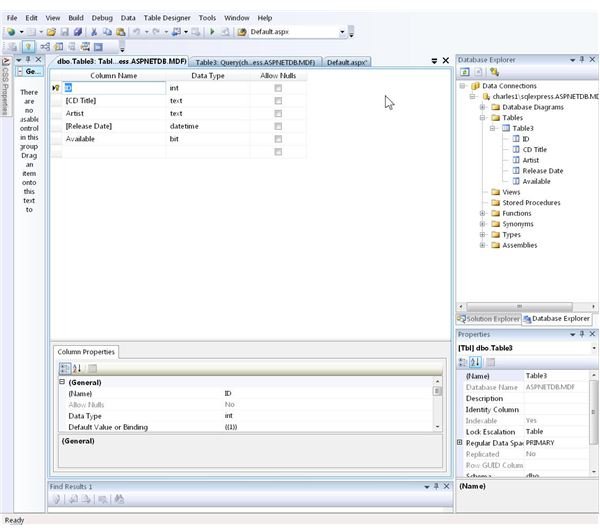
Building on the example in the linked article above, create a database and table with four columns: ID, CDTitle, Artist, Release_Date, and Available. The first column uses integer data, the second and third are text, and the fourth is datetime format. The fifth, “Available” type is set to “bit.” Uncheck the “Allow nulls” box. In the “General” section for this box at the bottom of the screen, opposite the “Default value or binding,” enter a zero. Compare the result to the image. If it matches, then save this table by clicking on “File,” “Save Table1.” Provide a different name if desired. Enter some data by clicking on “Table,” “Show table data” in the Database explorer.
Create an ASP.NET Page to Display the Data in a GridView.
Click “File,” “New File,” and select “Web Form” from the list of templates displayed. Double-click the “GridView” tool in the Data section of the Toolbox shown on the left to place the control on the Web page.
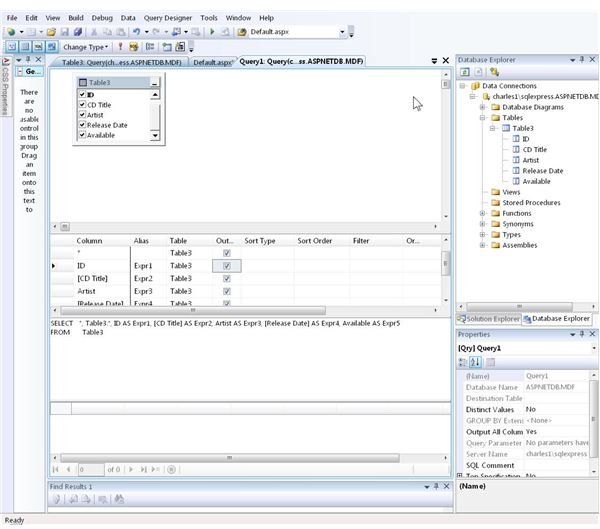
At the top right of the new GridView box is a right-pointing arrow. Click on this to display the GridView tasks where you set the database connection, configure it, and can edit and perform other operations on the columns. The only thing necessary at this point is to follow the directions regarding connecting to the database (choosing the data source) and configuring the data source. Unless the setup departed from this example, it is OK to accept the default data source, which should be SqlDataSource1. The connection string should look something like this: “Data Source=[UserName]\SQLEXPRESS;Initial Catalog=ASPNETDB.MDF;Integrated Security=True.” Clicking on “Next” will then move on to a configuration screen for the SQL statement. To display all the fields, select the button for “Specify columns from a table or view.”Check all the columns to get a full display. It is also possible here to develop SQL queries to retrieve information based on one column such as availability. Moving on with the “Next” button again loads a screen with the opportunity to test the display. The image here shows the result.
Customizing the GridView
The above steps created a plain vanilla display. The “Properties” window of the GridView offers multiple ways to dress up the appearance of the information in the database. Including fonts, colors, borders, even ways to have some columns or rows display differently depending on the contents. An alternative is to use the “Auto Format” option from the GridView settings, which offers a multitude of themes. One example is shown in the image.

Further uses of the GridView involve setting up SQL Queries and adding them to the database so that users can search on specific items, display results in various sort orders, and link to URLs. These actions involve a more detailed understanding of the SQL Server operations than can be covered in this article. For additional information checkout the Video tutorial in the Resources section.
Resources
ASP.NET Essential Downloads https://www.asp.net/downloads/essential/
SQL Server 2008 Express Edition https://www.microsoft.com/downloads/details.aspx?displaylang=en&FamilyID=7522a683-4cb2-454e-b908-e805e9bd4e28
SQL Server Express Video Tutorial https://www.asp.net/learn/sql-videos/video-110.aspx


