Anyone who designs their own web pages at some point probably will want to go beyond simple, default banners supplied by others. This can be done with software such as Adobe Photoshop or other graphics editing software. Read how to make an HTML banner with Photoshop here.
Layout the Format of a Banner
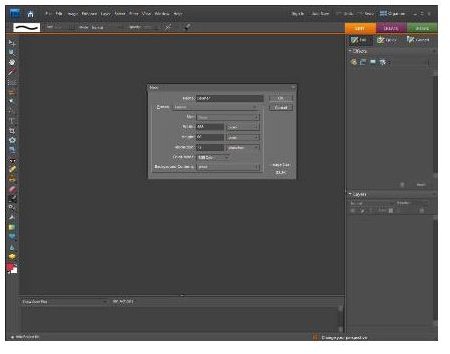
Begin creating the banner by opening Photoshop Elements. Chose File/New from the top menu. When the file creation dialog opens, select the file name and parameters for your banner. A good size is 468 pixels wide by 60 pixels high, but any size as long as it doesn’t consume too much space will work. Use the default settings for the screen resolution (72 pixels/inch), the mode (RGB Color) and the contents (White). Click OK when the selections are finished. A blank rectangle will appear that provides the working screen for the new banner.
(Note: This example was created using Photoshop Elements 7, but the same process can be followed for Photoshop.)
Create the Text for the Banner

For the next step, select the text tool from the toolbox—the one with a large T icon. When you click on this, you should see some new options appear across the top of the screen relating to text font, size, and other choices. Leave the font name at the default, but increase the font size to 30 pt. Chose a color size for the banner text from the color choices on that same options list. Move the cursor over to the banner and click, then start typing whatever text you want to appear in the banner. In this case the title will just be “Creating a Banner in Photoshop.” You also can use any of the available Photoshop text or image editing options such as outline the text letters, changing the style, blurring the letters and many other features.
To reposition the text, chose the “Move” tool, the topmost choice in the tool box. A large box should then appear surrounding the text. You can move the text or make it wider or taller by clicking and dragging one of the very small boxes on the selection box. When satisfied, click the ESC key to be sure you are free of any editing tools. Then choose File/Save for Web. This action brings up a preview screen with choices about format. For this simple text banner, GIF format is fine so leave everything as it is and chose “OK.”
Spruce Up the Banner

This is a very plain banner, so to liven things up, add an image background to the text. Do this by using the File/Open command to find an image, perhaps a photograph with complementary colors. Once selected and opened, both the banner itself with text and the image should both be visible in the same window. Use the Move tool again to drag the photo on to the text banner. The text now should be superimposed on the photo. Save this now as a jpg file.
Write the HTML Code
The final step is to create a new or edit an existing HTML file to provide a location for the banner. This is done either through simple HTML coding in a text editor or with webpage creation software such as Adobe Dreamweaver or Microsoft Expressions. In Adobe Dreamweaver, create a new HTML page. Chose Insert from the menu, find the final banner jpeg image and insert it at the top of the web page. Save the webpage and you have your new banner ready to be uploaded to your web server. The basic HTML code to create the web page follows. (Note: Due to display limitations, the normal Left and Right Brackets < > placed around HTML tags have to be omitted here or else the code would try to execute on this screen.)
head
meta http-equiv=“Content-Type” content=“text/html; charset=utf-8” /
titleSample Banner/title
style type=“text/css”
!–
body {
background-image: url(12Linen.jpg);
}
--
/style/head
body
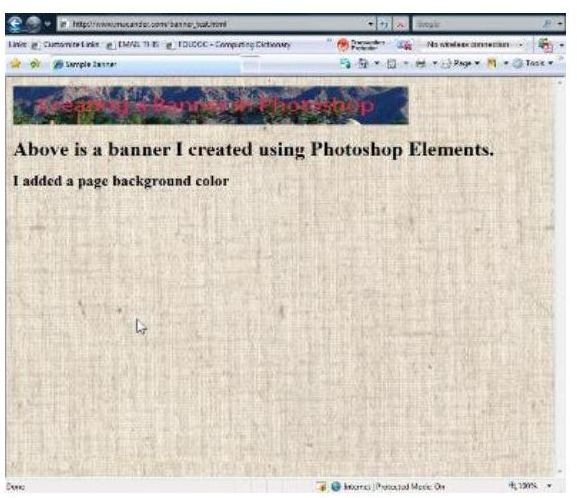
pimg src=“banner_image_2.jpg” width=“616” height=“60” //p
h1Above is a banner I created using Photoshop Elements./h1
h2I added a page background color/h2
/body
/html
How the Banner Appears in a Browser
Credits
All images courtesy of Charles R. Anderson


