Need a Marquee Scroller? Have WYSIWYG Web Builder? Then you can create a marquee in a few simple steps. You do not have to know code to create this marquee.
With WYSIWYG Web Builder you can create your own marquees. You do not have to use any scripts or codes. You can create it right in Web Builder and save it. The marquee is customizable. You decide the size of the marquee, the color of the marquee, and all of the other properties. This tutorial will show you step by step how to create a marquee for your website in WYSIWYG Web Builder.
Open your program and create a new document to work on or open one of your pages that you have already created. In the panel on the left, you will see the Marquee button. Click that button and create a box on your document using your mouse. You can resize the box by clicking the box and dragging the points.
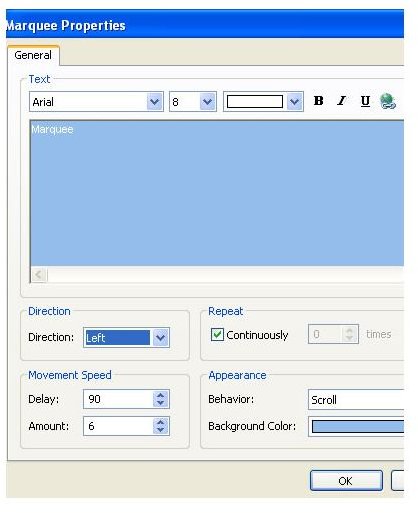
Now, you can edit the marquee. Right click on the box that you just created. In the drop down box you will need to click the Properties link. That will open the General Properties box for the marquee. In this box you can type your message, change the text, and more. Let’s walk through the properties box.
The top row of fields is where you customize your text. Select your font style, size, and color. The next box is the text box. This is where you will enter your message. Type what you want the marquee to display in this box. Make sure that you delete the word “Marquee” out of it.
The Direction field determines from which direction the marquee will scroll. Drop that box down and make your selection. The Repeat field allows the marquee to scroll all of the time. If you do not want it to scroll repeatedly, untick the box and enter how many times you want the message to scroll.
The movement speed section determines at what rate the marquee will scroll. This is a fairly nice speed, so you can leave these two fields as they are or you can change them if you want too. The last section is the Appearance section. In this section you can change the behavior by dropping the box down. You can choose to have the message scroll, slide, or alternate. The last option is the background color option. Click the background color and select the color of your choice. Click the OK button to create the marquee.
You can adjust the size of the box if you need too. You can also move the box around the page by clicking it and dragging it. To preview the marquee, save your page and preview it in a browser. Click File > Preview in Browser > and select the browser. The browser will open and you will see the marquee.
This post is part of the series: WYSIWYG Web Builder
WYSIWYG Web Builder is a program for designing websites. In this series you will learn how to use Web Builder and how to create the different things in Web Builder.
- How to Create Status Messages in WYSIWYG Web Builder
- Add a Photo Slideshow to Your Website Using WYSIWYG Web Builder
- Add Free Java Clocks to a Website
- How to Use the Free Rollover Buttons in WYSIWYG Web Builder
- Creating a Marquee for Your Website With WYSIWYG Web Builder
- WYSIWYG Web Builder: Creating your Own Paypal Buttons for your Website
- How to Create a Glass Button Menu in WYSIWYG Web Builder


