This tutorial will show you how to use Web Builder to add a photo slideshow to your website.
Photo Slideshows are very popular among web designers. They are a great way to display your photos. With the WYSIWYG Web Builder program, you can quickly create a photo slideshow for your website. This is a basic photo slideshow. You can add the photos that you want, change the speed, and change the effect. This tutorial will show you how to add a photo slideshow to your website using WYSIWYG Web Builder.
**
Create a Photo Slideshow
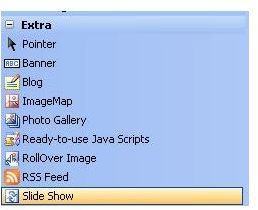
To begin, it is probably best that you create a new folder to store the photos in that you want to use for the photo slideshow. That way you will have all of your photos in one folder. Then you can select the slideshow tool from the toolbox in Web Builder. The slideshow tool is located under the Extra panel. Click the button and draw a box on your page.
When you draw the box, a window will open and you will need to click the first photo that you want to add to the slideshow. Click the photo and click Open. You will see the photo in the box on your page. Now you can add your other photos. Right click on the photo and click Properties in the menu that drops down.
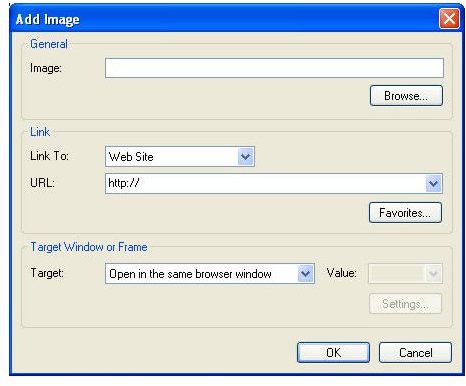
Click the Add button in the box that you are looking at. Another box will open and you will need to locate the photo that you want to add to the slideshow. Click the photo and click Open. You can link this photo if you want too. To link it, enter the URL in the URL field. Click OK to close this box. Click the Add button again and follow the above steps to add your other photos. You will have to add each photo the same way.
To edit a photo in the slideshow, click the name of the photo and click the Edit button. The box will open with the properties of the photo and you can make your changes and then click OK. At the bottom of the slideshow properties box you will see the Effects box. You only have one effect to choose from and that is Fade. If you want the photos to fade in, drop that box down and select Fade or leave the effect on None. The box below that determines how long each photo will be displayed. Enter the number of seconds in this box. Once you have finished, click the OK button.
You will be carried back to your page and you will see the first photo in the slideshow. To open the properties box again and edit the slideshow, right click on the photo and click Properties. That will open the properties box. You can now preview your slideshow in a browser.
This post is part of the series: WYSIWYG Web Builder
WYSIWYG Web Builder is a program for designing websites. In this series you will learn how to use Web Builder and how to create the different things in Web Builder.
- How to Create Status Messages in WYSIWYG Web Builder
- Add a Photo Slideshow to Your Website Using WYSIWYG Web Builder
- Add Free Java Clocks to a Website
- How to Use the Free Rollover Buttons in WYSIWYG Web Builder
- Creating a Marquee for Your Website With WYSIWYG Web Builder
- WYSIWYG Web Builder: Creating your Own Paypal Buttons for your Website
- How to Create a Glass Button Menu in WYSIWYG Web Builder


