
In this tutorial you will learn how to create a scribble menu with arrows in Adobe Illustrator CS3.
Getting Started
This tutorial will show you how to create a scribble menu. The background part of the menu has a gray scribble texture applied to it. Then the links and arrows are black. This is a cool menu that can be used on any website. I will show you step by step how to create this black and gray scribble arrows menu. Open Illustrator CS3 and create a new document to work on.
Step One – Drawing the Rectangle and Opening the Scribble Box
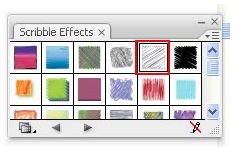
In step one, we will draw the rectangle and open the scribble box. Grab your rectangle tool and draw a rectangle on the document. Then go to the top of your program and click Window > Graphic Style Libraries > Scribble Effects. Click the rectangle to select it. Then locate the Scribble 5 effect and click it to apply it.
Step Two – Changing the Stroke and Transparency of the Rectangle
You will need to change the stroke size to 2pt. You can change the stroke size in the stroke panel on the right. Simply drop the box down and select 2pt. Then you will need to drop the transparency down. In that same box you will see the transparency tab. Click that tab and drop the transparency down to 70. Next, you will need to change the stroke color. Double click the stroke color box in the toolbar. Change the color of the stroke to black.
Step Three – Opening the Arrows and Adding the Arrows
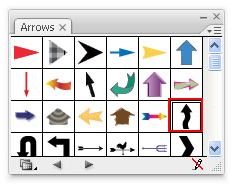
The third step is to open the Arrows box and add the arrows to the menu. Go to the top of your program and click Window > Symbol Libraries > Arrows. When the arrow box opens, you will need to find the Arrow 18. Placing your mouse over the arrows will display the names for the arrows. Click the arrow and drag it to your menu.
You will need to rotate the arrow and resize it. Click the arrow to select it. Place your mouse below the corner and the mouse will turn into a half circle. Click and rotate the arrow. Now, drag the corner inward to size the arrow down. Place the arrow on the edge of the menu to make it look like it is coming off of the border. See the finished image of this menu to get a visual. To create the other arrows, copy and paste the original arrow.
Step Four – Adding the Links
Now, you are ready to add the text to your menu to create your links. Grab your text tool and type your links on the menu. Change the font color, style, and size to what you want. Place an arrow beside each link. Once you have finished creating the menu, you can export it.
This post is part of the series: Adobe Illustrator CS3 Menus
In this series, you will learn how to create different types of menus in Adobe Illustrator CS3.
- Adobe Illustrator CS3 Menu: Rose Gradient Drop Shadow Menu
- Adobe Illustrator CS3 Menus: Mirror Menu
- Adobe Illustrator CS3 Menus: Sapphire Beveled Arch Menu
- Adobe Illustrator CS3 Menus: Black and Gray Scribble Arrows Menu
- Create a Gold and Purple Floral Border Menu in Illustrator
- Adobe Illustrator CS3 Menu: Blue Gradient Snowflakes Menu


