
Learn how to create gradient buttons in Adobe Illustrator with this tutorial.
Gradient Buttons in Illustrator
This tutorial will show you how to create a basic green gradient button using Adobe Illustrator. You can create these buttons to place on your website. You can go ahead and create all of the buttons that you need and then add the text or you could create one button in Adobe Illustrator and use it as a background in Dreamweaver. Either way you want to do it is fine. I will just show you how to create the basic button.
Creating a New Document
You will need to start off by creating a new document to work on. Create the document the size you want it. Click OK to create it.
Drawing the Rectangle
Next, you will need to grab the rectangle tool from your toolbar in Adobe Illustrator. Draw a rectangle on your document. Draw the rectangle the size you want the button to be. You can adjust the size of the button by using the transform tool in your toolbar.
Applying the Gradient
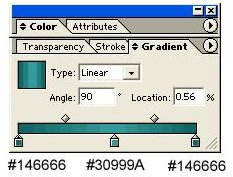
Next, we will apply the gradient fill to the button. Locate the gradient box. If the gradient box is not opened, click Window > Gradient. Click the bottom bar of the gradient to apply it. Make sure Linear is selected for type. Change the angle to 90. With the linear, you will have two sliders. You need to add a third slider. Click in the middle of the sliders to add a new slider.
Changing the Color of the Gradients
Now we will change the color of the gradients in Adobe Illustrator. To change the color, you will need to double click the slide you are changing and then double click the color fill panel in the toolbar. Change the two end sliders to #146666. Then change the middle slider to #30999A. If your angle changed back to 0, change it back to 90. Sometimes the angle will change when you change the gradient colors.
Applying the Border
The last step is to apply the border to the button. Click the button to select it. Double click the stroke fill box in the toolbar. When it opens, change the color to #155966. Click OK on the box to apply it.
Now you have your basic green gradient button. You can now export your button out of Adobe Illustrator. If you are going to add the text to the buttons in Adobe Illustrator, go ahead and do that before exporting it. It is a good idea to save the button as an .ai file before going any further. That way you will not lose the button and have to start over.
This post is part of the series: Adobe Illustrator Tutorials
Adobe Illustrator is simple enough for the novice web designer and complex enough for the professional. These tutorials will help the beginner achieve new heights with Adobe Illustrator.