Using IMAP with a Gmail account is possibly the best way to get the most from the popular browser-based free email system from Google. Read on for instructions on its benefits, and how to set it up.
Benefits of IMAP
IMAP is a great system for managing you emails across a range of devices – rather than having your PC or mobile mail client engage in a send and receive procedure as you might with POP3 mail, IMAP synchronizes email folders on all configured devices. The advantage here is that when you delete or move an email on PC, the same will be true when you next login to your email account on a different computer, something that isn’t possible with POP and is less flexible with Exchange email.
Gmail is most often used as a browser-based email application, but more and more people are starting to make use of it within their traditional mail clients. Gmail has great support for IMAP, which means receiving instantly synched messages from a Google email account can be achieved with just a few moments setting up.
Setup Your Gmail Account for IMAP
Before starting, you might wish to setup a Gmail account. See our guide How to Setup a Gmail Account for more information.
To be able to access your Google email messages from your mail client, you will need to activate IMAP on your Gmail account.
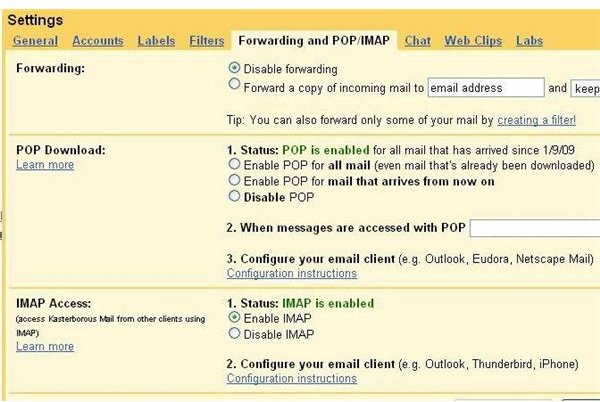
This can be done by logging in to Gmail, and clicking Settings. On the settings page you can activate IMAP from the Forwarding and POP/IMAP tab. Look for the section labelled IMAP Access. The default status is “IMAP is disabled” – you can change this by selecting Enable IMAP and then clicking the Save Changes button.
Once saved, you will be ready to setup your Gmail IMAP settings in your PC email client.
Configuring Your Gmail IMAP Settings
To access a Gmail IMAP account in Outlook, open the software, then go to Tools > E-mail Accounts > Add a new email account. Enter the required information (name, email address, password) - depending on your Outlook version, you will need to skip the automatic setup by ticking the Manually configure… option in order to proceed to the manual settings.
The next screen requires the following information:
Incoming mail server: imap.gmail.com
Outgoing mail server: smtp.gmail.com
The logon information requires your full Gmail email address and password – however, before you can Test Account Settings, click More Settings… in order to set the advanced options for sending and receiving.
On the Outgoing Server tab, ensure that My outgoing server requires authentication is ticked and that the option Use same settings as my incoming mail server is selected.
Next, go to Advanced, and set the port number of your Incoming server to 993 using SSL encryption; the Outgoing server should be set to use port 587 and TLS encryption.
There is little difference between the setup of IMAP accounts across the various email clients on PCs and mobiles – however a full list of configuration instructions for pretty much all desktop email clients and mobile devices can be found at mail.google.com/support .


