This article takes readers on a tour of Sketchup’s essential features, include the user interface, and tools like Push/Pull and Rotate.
Google Sketchup is an application for designing three dimensional objects. You can use Sketchup for any kind of structure, though it’s often used for designing houses and other architectural structures. A skill that’s vital to using Sketchup is being able to see and navigate through 3D space, while working in a 2D environment (your computer monitor). If you don’t yet have this skill, tutorials for Sketchup, including this Sketchup user guide, will help you get it. In general, to use Sketchup effectively, turn to Sketchup tutorials.
An abundance of models
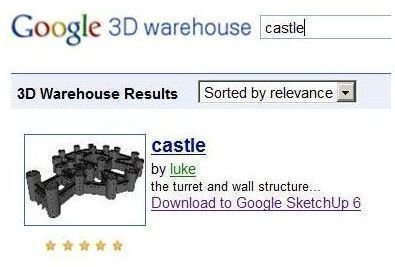
Find your first model for viewing in Sketchup: surf to Google’s 3D Warehouse . Type the name of an object or building in the search engine, then select one of the resulting download links for a particular model. Double-click the downloaded file to load it into Sketchup.
The 3d warehouse search engine
Pan, zoom, and orbit
Moving around Sketchup’s 3d space is your first task when learning Sketchup. After you’ve loaded in your model, zoom the view toward it by pressing the magnifying glass on the Sketchup toolbar; then, click any area of the main window and drag. Sketchup will shrink or expand your object’s image in the viewport.
Press the hand-shaped icon to move up, down, left, or right across your model. And press the helix with the arrow–the “Orbit” tool–to walk around your model.
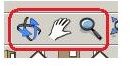
The Orbit, Pan, and Zoom tools
Learn more about navigating in Sketchup’s 3d space here.
Drawing surfaces in Sketchup
Drawing surfaces in Sketchup is easy and intuitive to a degree you won’t find in other design apps–even costly ones.
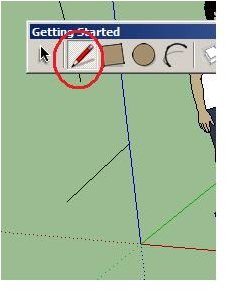
You can begin creating surfaces (and then objects from those surfaces) by clicking the pencil tool on the main toolbar. After selecting the pencil, drag it over the main window, and watch carefully how the line segment you’re forming takes on different colors. These colors represent parallel alignment with the x, y, or z (width, length and height) reference axis. Notice also how the segment snaps to the axis.
Drawing edges in Sketchup
To create an object from edges, first form a plane, AKA “surface,” made of a series of line segments, whose last segment connects with the first. Sketchup confirms that you’ve made a valid plane by shading the plane. After you’ve made a plane, select the “Push/Pull” tool, then click the plane and drag a line perpendicular to it, to pull (AKA extrude), the plane into a three dimensional shape.
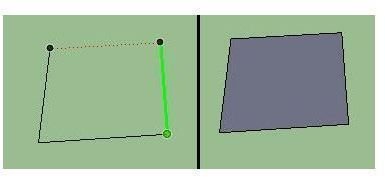
Before and after: Sketchup confirming successful plane creation
Tip: Sketchup makes it easy to create planes whose sides are of equal length (parallelograms) by using invisible grids that your pointer snaps to. Draw two sides of a rectangle, and then begin drawing the third side. As you trace the side, Sketchup will highlight where the endpoint of the segment should go.
Learn to infer
The same process used to create lines can be used to align an object’s surfaces with each other. Sketchup documentation refers to this process as “inferring.” Create two objects in Sketchup, one next to the other. Click the push/pull tool, then click the top surface of the shorter object to begin raising it. Hover the mouse over the top surface of the other object, then wait for the cyan dot to appear. When it does, click the mouse a final time, to make the height of the second object equal to that of the first.
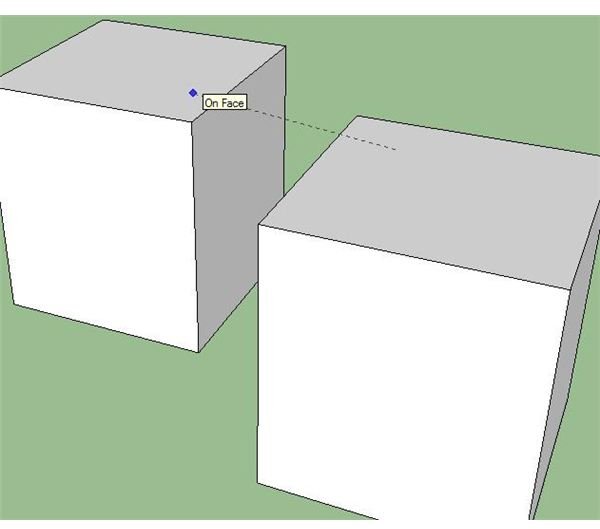
Inferring one box’s height from another’s
Read more about inference here .
Moving objects and elements
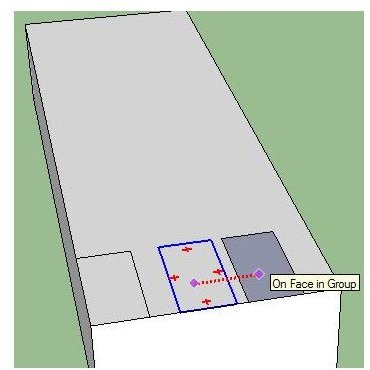
Select the cross-shaped move tool to move any element in Sketchup. Move individual edges or whole objects. After selecting the move tool, click the element you want to move, then drag it.
The initial challenge with moving an object in Sketchup comes from Sketchup not seeing the object as a single, movable entity. Instead, Sketchup sees a collection of edges and faces, each of which you can select and move individually. To move the whole object, first select all its parts by right-clicking the object and selecting “Select all connected faces.” Right-click the selection, then choose “Make component.” Now you can select and move the object as a single unit.
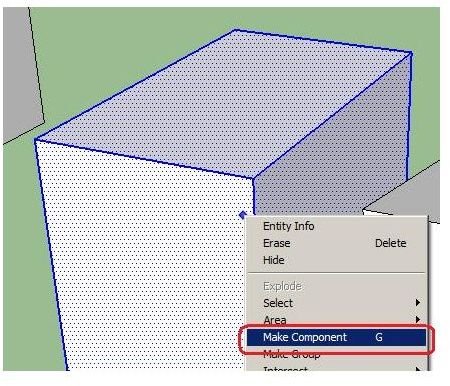
Making a component from connected elements
Read more about components here .
Shaping objects
You can easily shape objects in Sketchup by carving into them. Begin by drawing Sketchup’s Rectangle or Circle tools on an existing object. Or, draw polygons from individual edges. Then, push on the outline with the Push/Pull tool to remove the outlined surface.
Try this exercise to better understand this process:
Create a box by drawing a rectangle, then pull it up from the ground with the Push/Pull tool. Draw another rectangle onto one of the box’s faces, then use the Push/Pull tool again to push out the area inside the rectangle. When the cursor reaches the opposite end of the box, release the mouse button.
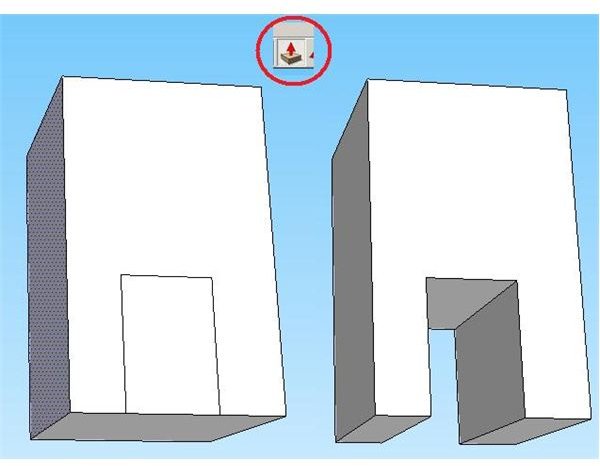
Carving out objects with the push/pull tool
Measure twice, cut once
You can use Sketchup’s tape measure tool to draw objects with precision. Create a rectangle and pull it up with the Push/Pull tool to make a basic table. Click the tape measure tool, then click an edge of the table and drag away from it. Type in “10,” and then a double-quotation mark, to specify 10 inches from the edge. Press “Enter,” to make Sketchup install a guideline at the place you specified. You can now snap to that guideline when drawing edges or rectangles.
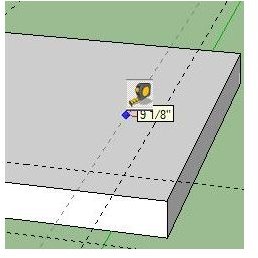
Sketchup’s Tape Measure tool
Learn more about the Tape Measure tool here.
Use components to save time
You can use Sketchup components to save time by cloning them. When you make components that are part of a group of objects and then clone (AKA copy) them, the cloned parts will change whenever you change the original. Try this example to see this feature:
Make a simple box using the previous instructions in this article. Right-click the box, double-click it to select it, then right-click it and choose “Make Group.” Draw a rectangle atop the box, double-click it, then right-click and choose “Make component.” Name the component, then use the Move tool, while pressing “Control,” to drag and simultaneously clone this component. Double-click the original component, then pull it up with the push/pull tool. The clone will pull up also.
Cloning components in Sketchup
Use the Rotate tool
Click the button with the top and bottom curved arrows to use the Sketchup Rotate tool. To watch this tool in action, try the following:
Select the Rotate tool as just described, then click inside an existing rectangle, at the point around which you’d like to rotate the rectangle. Drag a line to define the circle’s radius, then click to begin the rotation. Move the mouse to rotate the rectangle, then click again to end the rotation.
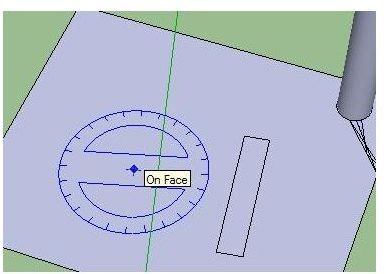
The Rotate tool in action
More about the Rotate tool can be found here.
Use the Freehand tool
Use the Draw menu’s Freehand tool to create shapes free of the restrictions of straight edges. But, keep in mind the guideline that applies to all of Sketchup shapes: don’t cross over edges. Also, be sure that your shape’s ending point meets the start point, if you want to eventually pull a 3d surface out from the shape.
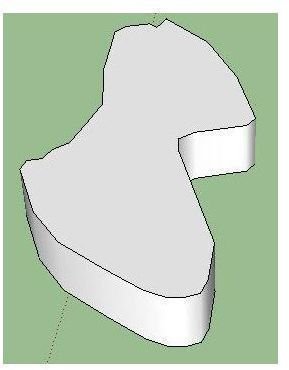
Shape made with the freehand tool
Read more about Sketchup’s Freehand tool here .
Making Lathes with the Follow Me Tool
A common 3D modeling technique for creating “spun” objects like vases and related shapes is lathing. Essentially, making a lathed object involves drawing a 2D cross section, then spinning or revolving it around an axis.
Sketchup’s Follow Me tool can make lathed objects, among many other shapes. Try the following exercise to lathe with Follow Me:
Open a new document in Sketchup and draw any polygon in the X-Z plane that’s clearly visible in front view. Right under that shape, draw a circle in the X-Y plane in top view, then double-click the circle to select it. Press “Tools → Follow Me”, then click the first shape you drew. Sketchup will revolve the shape around the circle, creating a new, 3D object.
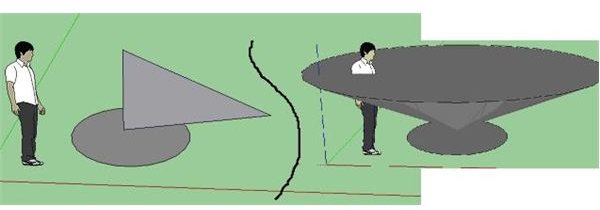
The Follow Me tool, before and after
Learn more about the Follow Me tool here .
Your recipe for effective modeling with Sketchup is clear: read more tutorials for Sketchup, including reviewing this Sketchup user guide. Then, review other Sketchup tutorials as needed.


