With Calendars and Mobile Setup tabs, you control calendar sharing, notifications, SMS settings, for all your calendars quickly and easily. You can even delete and hide calendars with one click.
Calendars and Mobile Setup Controls
If your calendar holds the legend to your life, then you need to have complete control of it. That means being about to change how you’re notified about appointments, or even how you can access your calendar when you’re on the go. With the Google Calendars and Mobile Setup tabs, you have complete control of all your calendars, on one page.
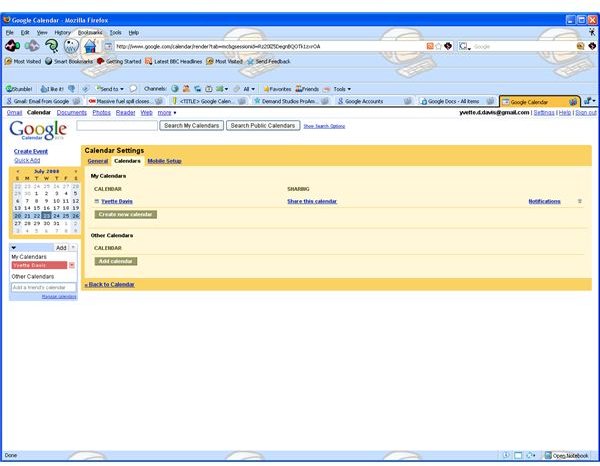
The Calendars setting:
1. Log into Google Calendar.
2. From your main Google Calendar screen, click the Settings link at the top.
3. At the top of the yellow box, under the words Calendar Settings, click the Calendars tab. This is where you share calendars, select notifications types, hide and delete calendars. The controls are split in two categories. My Calendars controls calendars you create. Other Calendars control calendars other people have shared with you.
My Calendar Controls:
On the far left of the box, you will see the heading CALENDAR. Beneath that heading, all your calendars will be listed in alphabetical order.
The next column is SHARING. This is where you set sharing properties for each calendar. You can also set sharing properties from the calendar box on the left hand side of every screen by clicking on the arrow, and selecting Share this calendar.
The third column is NOTIFICATIONS. This is where you set the type of notification you prefer for each calendar. You can also change notification settings from the calendar box on the left side of every screen, by clicking the arrow and selecting Notifications.
Next to notifications is the word Hide, click this if you’d like to hide the calendar from view. You can also hide calendars from the calendar box on the left hand side of each screen.
Finally, you will see a trash can icon. This will delete the specified calendar. At the end of your calendar list, there is a button which allows you to create a new calendar.
Other Calendar Controls:
In this section you can control notification settings, hide or show, and delete calendars.
When you’re finished, click Save to save your settings and return to the default calendar view.
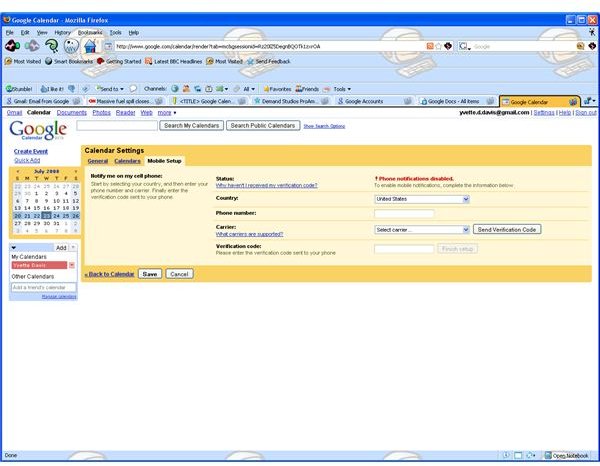
Mobile Setup
1. Log into Google Calendar
2. Click on Settings
3. Under Calendar Settings, Click the Mobile Setup tab.
Status - This indicates if SMS service has been verified. Click on the link, Why haven’t I received my verification code?, If you need to troubleshoot the SMS system.
Country - Select your country from the drop down menu.
Phone number - Type in your the phone number of the telephone you wish to have SMS messages sent to. Remember, you must have an SMS capable phone installed to your home line, if you send SMS messages to your home phone.
Carrier - Select your phone carrier, or company from the drop down menu.
After you’ve entered this information, the Send Verification Code button will activate. Click on it, and Google Calendar will send a numeric code to your phone as an SMS message.
Verification code - Enter the code exactly as you received it.
Click Finish setup. If you entered everything correctly, your SMS notifications will be ready to go.
Images