
Need to keep everyone in the loop? Google makes it simple. Learn how to establish and run your own group mailing list.
Benefits of a Group List
You have decided that creating a mailing list will be useful for your group, team or classroom, but are looking for the best means to do so. Establishing a list (or moving your current list) using Google Groups offers several advantages. First and perhaps foremost, the service is free. In addition, you get loads of storage space, the interface supports most browsers and is available in dozens of languages, and you can customize your pages. As it is a free service, you will have to put up with advertising. Only relevant text ads are used, however, as opposed to annoying pop-ups or banners. Finally, making a list is easy. All you need to get started is a Google account.
Creating Your List
To begin, go to the Google Groups homepage and click Sign In to log in to your Google account. If you do not yet have a Google account or wish to create a new one strictly for your group, click on the Create an Account on the sign in page. Follow the steps to create a new user account and then log in.
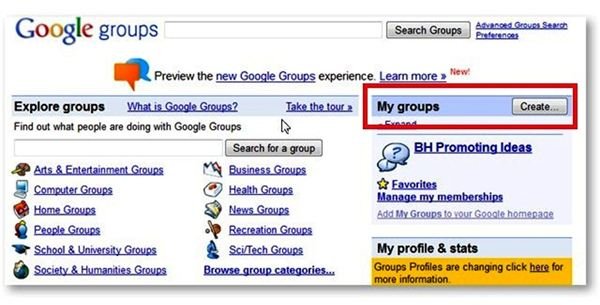
Once you are signed in to Google, click the Create a Group button next to My Groups. The Create a Group page opens.
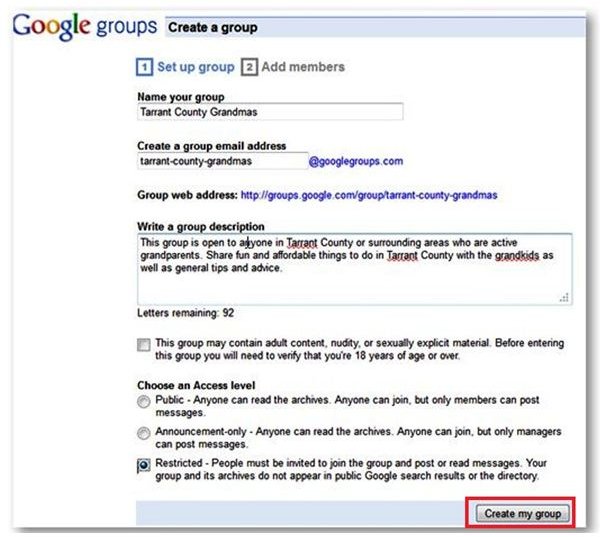
Enter a name for your mailing list group in the Name Your Group box. By default, this name is entered as your desired email address for the mailing list in the Create a Group Email Address box, with dashes used to denote spaces. You can choose to modify or complete change the email address if you choose to do so. As the suffix of this address will be @googlegroups.com, you only need to come up with a prefix for the email address. Choose something that pertains to your mailing list and avoid the urge to abbreviate or shorten the name, so that users will recognize the name when they receive messages and not mistake them for spam. In fact, using the default group name as your mailing list address might be your best bet.
Next, enter a description for the group. Potential new members will read this description as they search or browse groups on Google, and recipients that you invite to join your mailing list will view it as well. Include details about the purpose of the group as well as other helpful information, such as your primary website or the number of email messages members might expect to receive on a daily, weekly or monthly basis.
You have the option of restricting the group to those age 18 or older, if you choose. Finally, select an Access Level. If you select Public, anyone can read archived messages and anyone may join the list, although only members may post new messages to the list. Select Announcement Only if you wish to create a mailing list to send announcements to subscribers. With this option, anyone can join the mailing list, but only those you give management rights to may post new messages. Your last option is Restricted, which limits all access to only members that you have invited.
When you have completed this page, click Create My Group.
Adding Members
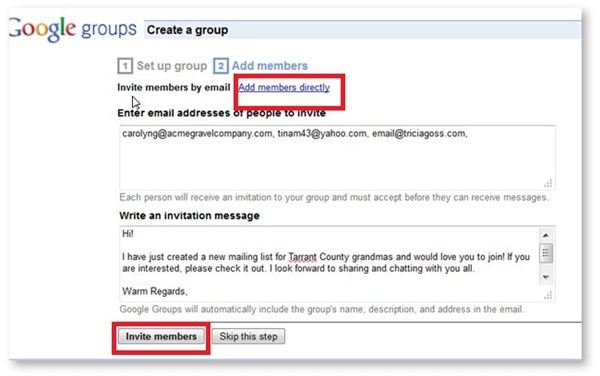
Now that you have established your group, you can immediately begin to add members to your mailing list. You have two options: invite members via email or add them directly.
If you decide to go the first route, type in the email addresses of those you wish to invite in the Enter Email Addresses of People to Invite box and then enter a message for these recipients in the Write an Invitation Message box. Click Invite Members to send the invitation email and wait for them to join.
Click the Add Members Directly link to use this method. Similar to the first approach, enter the email addresses of those you wish to add and type a Welcome Message. Choose an email subscription option, such as Web Only or One Summary Email a Day and click Add Members. Those you have added will receive your welcome message via email notifying them that they have been added to the group.
Manage Your Group

You can customize and manage your mailing list from the group’s home page. In the main body of the page, you will find options such as Start a New Discussion Topic or Invite or Add Members . Clicking on any of these options takes you to the corresponding settings interface. To customize your group, choose Tune Your Group’s Settings. On this page, you can view your group’s web address, modify access settings, change the appearance, and more.
Other management tools are available in the task pane on the right side of your group’s home page. Select Management Tasks to review pending members and messages, set membership and delivery types, check for bounced messages, and more.
References and Resources
Resources:
Google Groups Home Page: https://groups.google.com
References:
Google Groups Help: Getting Started; https://groups.google.com/support/bin/topic.py?topic=9216
Images:
Thumbs Up: sxc.hu/Thiago Felipe Festa
Screenshots provided by the writer


