Are you a do-it-yourself aficionado wondering how to make your own DIY solar pool heater? Read this easy guide about how to make your own solar pool heater and add it to the many of your simple, economical solar projects.
Introduction
Forcing yourself to stay away from the swimming pool because the thought of taking a dip in the swimming pool is accompanied by the horrifying images of the electricity bill that you might get by heating the water in the pool? Worry no more. Learn how to build a solar water pool heater and soon enough, pool heating electricity bills will be a thing of the past and you can take a dip in the swimming pool whenever your heart desires.
Benefits of Making Your Own Solar Pool Heater
I agree that the things required to build a solar pool heater involve a fair amount of money, but look at the brighter side of things. First and foremost, in a year or two, depending on your geographical location, the money you invested to install the solar pool heater will be returned in the form of savings that you would have paid in electricity bills. Tax benefits (depending on the country you reside in) and rebates (depending on the country you reside in) are other benefits.
Another main benefit is you are more environmentally friendly as your ecological footprint is smaller since you are using renewable energy.
How to Make a Solar Pool Heater
Requirements to Build a Solar Pool Heater
- A pump or a motor (If you are already using one with a filter and chlorination system, it may be powerful enough to run your solar heater, too. So don’t bother to buy a new one until you’ve tried the one you have.)
-
200 or 300 feet of 1/4 inch hose - the length of the hose is left for your choice. What should be taken care of is the placement of the solar pool heater assembly and the height at which it is kept. If the length of the hose is more and the height of the solar pool heater assembly is more, it should be made sure that the power of the pump is enough to pump water the full length of the hose and return.
Advertisement -
3/4 inch plywood plank
-
Black paint
Advertisement -
A few clamps
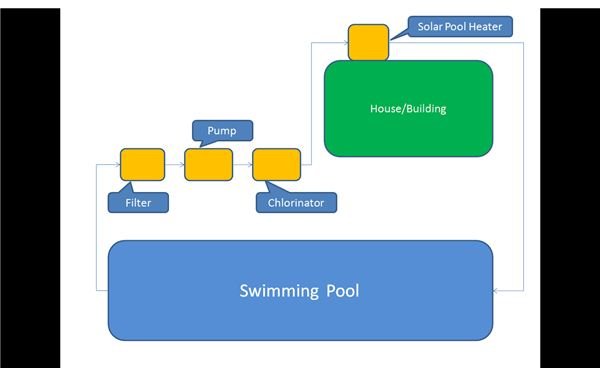
For those who have a swimming pool with an existing plumbing system, the pump, filter, and chlorinator will be arranged in series and in the same order. The outlet of the chlorinator is let out in the pool. The solar pool heater assembly is to be included after the chlorinator and the outlet directed into the pool.
Step by Step Guide to Build a Solar Pool Heater
There are many variations in building a solar pool heater. We’ll take the easiest variation in which the solar pool heater is built.
-
The area of the solar panels should be at least 50% of the surface area of the pool. In other words, if the surface area of the pool is 100 square meters (1,036 sq ft), the solar panel assembly should be at least 50 square meters (538 sq ft). If the surface area is less than that, the heat loss will be faster and the temperature of the water in the pool will be lower than your requirement.
Advertisement -
Take a plywood plank of the required size, paint it black, and let it dry.
-
Once the plank is dry, take the hose and wound it into a coil. Use clamps to fix it on the base. This can be a little tricky and can take some time, but make sure you clamp the hose properly after every coil. This will prevent the hose from moving out of its place.
Advertisement -
Place the assembly near the pool if there is enough space, or place in on top of a nearby structure. Position it at a slant angle such that it faces the southwest or the northwest direction so that it gets exposed to the sun for a longer time.
- Connect the outlet of the chlorinator to the solar pool heater assembly and then let the outlet of the solar pool heater assembly be directed into the pool. Make sure water from the solar pool heater does not run along the walls of the swimming pool thereby losing heat.
Now we have our own solar pool heater and no second thoughts about running up the electricity bill.
Other Variations in Building a Solar Pool Heater
-
As an alternate to using a plywood base, you can place the coiled hose on a cement surface so that the heat reflected by the surface is absorbed by the hose and the heat energy is used to heat the water in the hose. This will not be as convenient to fasten, of course.
-
If using a second water pump, you can also use a Solar PV (Photo Voltaic) panel to run it. The advantage of this PV panel is that it is automatic; if there’s no sunlight, the system will automatically turn off.
Advertisement
Things to Keep in Mind:
-
If you want the water to be warmer, increase the number of plywood “cells” and connect them in series.
-
Before you get into the pool make sure you touch the water and feel its temperature. If you feel it to be too hot, just disconnect the pipe going to the solar pool heater assembly from the chlorinator and let the water flow into the pool until you feel the temperature is right.
Advertisement


