Are you interested in learning how to build a simple greenhouse to extend your growing season or to protect weather sensitive potted plants? These instructions make it easy to design and build simple greenhouse plans in a single weekend, with a variety of reclaimed materials.
Options, Options, Options
Greenhouses are one of the most versatile and beneficial structures to add to your farm or urban homestead. You can even build simple greenhouse options for your apartment balcony with a few pieces of wood and an old window. All you need is a sturdy frame and a way to let in plenty of sunlight while controlling inside temperature, humidity, and airflow.
Greenhouses can be built in a hoop style with nothing more than PVC piping, a few pieces of lumber, and some 6 mil plastic sheeting. Hoop houses are perfect structures for temporary storage of weather-sensitive plants or in areas where snow and high winds are not a factor. You can even build indoor greenhouses , if you are really tight on space. For the industrious builders who want a larger greenhouse, or those who need to consider severe weather factors, a wood or metal frame greenhouse with heavy gauge double wall plastic is better. You can also use old reclaimed windows and doors instead of plastic sheeting.
Start Simple and Experiment
If this is your first foray into greenhouse building, simplicity is often best. To build a simple greenhouse, you usually only need basic carpentry skills and relatively inexpensive building supplies. You can experiment as you gain more experience. The following plans are intended to provide a sturdy structure for nearly any climate, use as much reclaimed material as possible, and provide easy ventilation.
For this build, you will need the following major materials:
- A long pole or 2x4 for measuring
- Several lengths of 2x4s (reclaimed wood is well-aged, and therefore well suited for such structures, especially redwood)
- One 2x6 the length of your planned greenhouse
- 6 mil or heavier plastic sheeting
- As many reclaimed doors and windows as you can find
- Wood lathe strips or other small, thin strips of wood
- Galvanized Hurricane ties (found at your local hardware store, used to secure roof rafters to beams)
- Galvanized Framing angles (usually found in the same isle as hurricane ties)
- Weather resistant glue
- Galvanized screws and nails
- Weather resistant outdoor caulking
- Staples and staple gun
- Heavy gauge baling or barbless wire (optional)
- Old reclaimed rain gutters (optional)
- Circular saw
- Drill
- Measuring tape
Determine the Size for Your A Frame
A frame structures are some of the easiest structures for the novice to build. There are no complicated trusses, roof pitches, or angle computations to consider. All you need to know is how much floor space and headroom you need. Since the roof and walls form an “A,” you will need to consider the slope in your height and floor space requirements, but this isn’t difficult. All you need is a measuring tape and a long 2x4 or pole.
Start by deciding how much growing floor space you need. Presumably, you will want enough room for planting beds 2-4 feet wide on either sidewall, with a walkway in the middle of at least 3 feet. That means 10 feet or more for your width. Adding length to your design provides more space, if needed. Mark out one line equal to the width of your floor space. You can do this with garden stakes.
Stand in the exact center of your marked line with your 2x4 or pole. Mark a comfortable stand up height on your pole. This should be a least a foot taller than the tallest person who will be using the greenhouse. Have a helper hold the pole or 2x4 while you measure from the mark on the pole to either end of your marked line. This gives you the length of either side of your “A.” You will need to cut your lumber for the side frames to this length later, but for now, it just helps you determine how much lumber you will need.
Continue to Page 2 for Foundation and Framing Instructions
The Foundation
To build simple greenhouse options, unlike living quarters, you will not need quite as complex a foundation. Your foundation can be as simple as a 2x4 box secured with short wooden posts driven into the ground a few feet, or as complicated as poured concrete with expansion joints. The primary thing to consider is maintaining the structural integrity of your wooden frame. Time can warp and bow wood frames. Wind can lift unsecured structures. Critters can dig through dirt to get into your greenhouse. Think about what it would take to secure your structure, keep it in place, resist warping or bowing, and keep out the critters.
The easiest foundation for a novice is to drive posts into the ground at each corner of the floor and at 2-3 foot intervals along the sides of your build. Simple greenhouse designs really do not need super foundations like houses, so exacting science is not necessary. Finish by nailing 2x4s to the posts to create a box, anchored to the ground by the posts. You can use galvanized framing angles to help secure corners and prevent them from bowing and separating.
Building the Frame
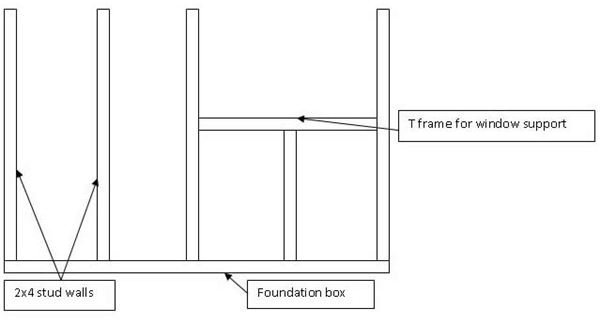
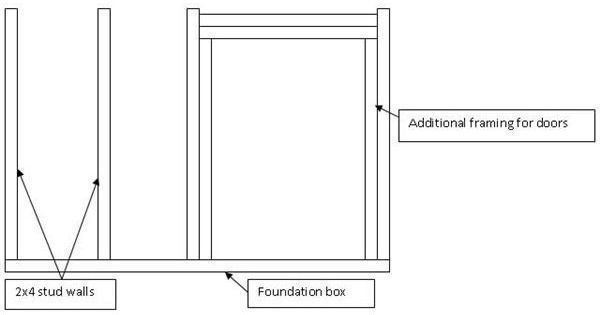
Cut your 2x4s to the length you measured in the beginning. Cut your 2x6 center beam to the length of your greenhouse. How far apart you space studs will depend on the windows and doors you have on hand. General framing should be between 16 and 24 inches from the center of one 2x4 to the center of the next. However, you can alter framing to match the width of your doors and windows, as needed. If the space is wider than 24 inches, you will need to build a T frame out of 2x4s to brace underneath the windows. Doors require additional framing between studs to brace the larger gap. Any wall space that does not include a window or door should remain in the 16-24 inch spacing.
Cut the ends of your wall studs at an angle so that, while the studs lean towards the center beam, the cuts form perpendicular lines with the beam and foundation box. Generally, this will be a 45 degree angle, but you may need to adjust, depending on the width of your foundation and planned height of your center beam. Mark your center beam where studs should be anchored. Likewise, mark your foundation where studs are to be anchored.
Start with the outer most studs, securing one stud on either side of the center beam, at either end. Do not worry about securing the A frame to the foundation just yet. First, you must give your A frame legs to stand on its own so it can hold up the center beam. Once you have all the corner “legs” attached, ask a helper to assist you in positioning your A frame skeleton onto your foundation.
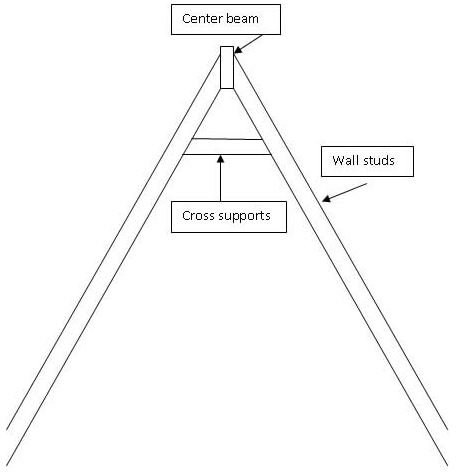
Once the skeleton is in place, start securing studs in the center of your greenhouse to prevent the center beam from bowing during construction. Continue nailing in your remaining studs and any additional framing for doors and windows. Secure tops of studs to center beam using hurricane ties. Secure bottoms of studs to the foundation with framing angles. Brace the top of the A with cross beams attached to either wall stud, approximately 1-2 feet down from the peak.
Continue to Page 3 to Finish Closing in Your Greenhouse
Closing Everything In
While building your frame, you should have determined where your doors and windows will go. Keep in mind, the idea is to build simple greenhouse structures, so don’t get too carried away. The easiest option for doors is in the sidewalls. Otherwise, you will need to do some additional framing on either end of your greenhouse to accommodate doors there. If you have never framed a door in an open space like the ends of your greenhouse, you might want to save that lesson for a different project.
How you secure your windows and doors will depend on what type of material you are working with. Most windows and doors have framing intended for securing the unit to the wall framing. However, using reclaimed materials, you might have to get a little creative. This is where a little ingenuity, glue, screws, and caulking come into play. Your primary concern should be sturdy installation with a good seal. Doors and windows should open easily. Doors should be squared to maintain structural integrity.
Any areas not already covered by windows or doors require plastic sheeting. For the greenhouse ends, additional wood strips nailed across from one wall to the next will help secure plastic. Any seams in the plastic should overlap. For example, when closing in either short end of your greenhouse, the plastic should be stretched in one sheet from end to end. Wrap plastic ends around the first wall studs and staple on the inside of the greenhouse wall. When you start stretching the plastic over the long sidewalls, make sure it overlaps the plastic from the short sidewalls.
To reinforce the tops and bottoms of plastic sheets, wrap the plastic ends around wood lathe strips, then nail or screw strips to studs or the foundation. A dab of weather resistant glue around the nail or screw head will help prevent premature tearing. Where plastic meets window or door frames, you can also wrap the plastic end around lathe strips and nail in place. Seal the seam with a little caulking. If you truly want to build simple greenhouse options, you can always omit the windows and simply wrap the entire greenhouse (save the doors) in plastic. However, that means more work to set up ventilation for managing airflow and temperature.
Notes, Suggestions, and Things to Consider
You will need to heat your greenhouse in the winter. Consider how you will address that before starting your build. Simple propane or oil space heaters will work, but you will need to allow for airflow to maintain consistent temperature throughout the greenhouse. You will also need ventilation, which means leaving windows open slightly to allow fresh air to come in without dropping the temperature. Experts recommend using heaters and fans to circulate both fresh and warm air in an oval path around the greenhouse.
If you need more space than just what the floor of your greenhouse offers, here’s a simple solution you can build. Simple greenhouses normally just have planting beds in the floor. However, you can add to your usable space by hanging old rain gutters from the ceiling using heavy gauged baling wire or barbless wire. If you have enough gutters, you can suspend them close enough to lay seeding trays across them. If not, you can string more wire in several strands from one gutter to the next to give you shelving space with excellent drainage.
When choosing the site for your greenhouse, consider things such as sun exposure, wind protection, and shading. Southern sun exposure, especially in the mornings, provides the greatest growth potential. Position your greenhouse to take advantage of wind protection from other buildings, trees, or similar wind breaks. However, keep in mind these obstructions could cast long shadows during the winter months when the sun is lower on the horizon.
References and Resources
Greenhouse Plans with Illustrations https://www.floridagardener.com/greenhouse/greenhousematerials.htm
Hoop House Greenhouse for Under $200 https://doorgarden.com/10/50-dollar-hoop-house-green-house#more-44
West Virginia University Extension Service, Planning and Building a Greenhouse https://www.wvu.edu/~agexten/hortcult/greenhou/building.htm
Images courtesy of SJohnson


