Mac OS X boasts a number of features, but some programs are still being designed for Windows only. If you have a copy of Windows 7 and Boot Camp support on your Mac, you can run both OS X and Windows on the same computer. You’ll then have the choice of Windows or OS X when you boot your Mac.
Windows 7 and Boot Camp
Windows 7, as its name suggests, is the seventh version of the Windows operating system from Microsoft. Many consider Windows 7 to have fixed a number of the problems associated with its predecessor, Windows Vista. This has caused Windows 7 to see a relatively wide adoption in both home and business. Even some Mac OS X users install Windows 7 as a secondary operating system so that their computers can utilize both Mac and Windows software.
Installing Windows on a Mac isn’t quite as straightforward as installing it on a PC, but thanks to the OS X component known as Boot Camp it doesn’t have to be difficult. Boot Camp allows them to install Windows 7 as a virtualized operating system, meaning that Windows will function normally but will be running as a part of OS X instead of being its own operating system. Mac users won’t have to deal with dual-boot installations or hardware incompatibility with Windows 7, and Boot Camp support ensures that their hardware will function normally regardless of the operating system they’re using at the time.
Installing Windows 7 on a Mac
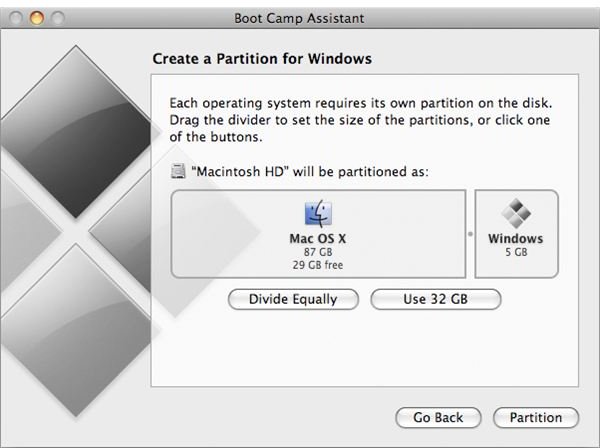
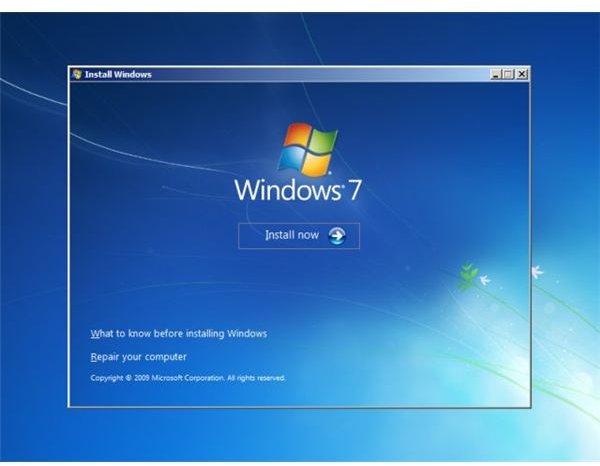
Installing Windows 7 on a Mac isn’t difficult. You must have an installation disc for Windows 7 and Boot Camp support enabled in the version of Mac OS X you’re using. Launch the Boot Camp Assistant from the “Utilities” submenu under “Applications” in Finder. Follow the prompts to create a Windows partition, giving it at least 10 GB of space or up to 20 GB (or more) if you can spare it. Place the Windows 7 DVD in your computer’s drive and click the “Start Installation” button once the partition is created. Let your Mac reboot, then follow the on-screen prompts to start installing Windows. Select and format the Boot Camp partition, then wait while Windows 7 is installed.
Once Windows finishes installing, use Windows Update to download and install the drivers it needs to use your Mac hardware properly. Place your OS X installation disc into your computer’s drive, then choose the “Open Folder to View Files” option when AutoRun launches. Navigate to the Boot Camp folder and run “setup.exe” to launch the Boot Camp Assistant in Windows, following its prompts to install missing drivers and components that will help Windows to update correctly.
When you’ve finished installing Windows 7 and Boot Camp support for Windows, reboot the computer. Hold down the “Option” key when booting your Mac to choose the operating system you’d like to use; both Windows 7 and OS X will appear as options.
Common Problems
One of the most common problems with installing Windows 7 on a Mac comes from attempting to install a 64-bit version of the operating system. Older versions of Boot Camp can’t handle the installation of a 64-bit OS, so if you encounter problems then you need to update your Boot Camp installation to 2.1 or later. You should also make sure that all of your Mac’s firmware has been updated, as out-of-date firmware can cause installation problems or hardware incompatibility once Windows 7 is installed. Close all of the programs you have running to avoid conflicts during the installation process. When installation starts you will have the opportunity to download updated installation files; these files can help prevent additional installation errors that might be caused by older files.
Image Credits: Mac and OS X images copyright Apple; Windows 7 images copyright Microsoft


