This article shows you how to create an RMI application. There are altogether eight steps in the RMI application development process. Clear instructions and complete Java programming code are provided to ensure you know how to create your own RMI application and get it executed on your computer.
To illustrate the concept of RMI, we will develop AddServer as a remote object. An AddServer object has an add() method that takes in two double numbers and returns the sum value of the two numbers as its result. The AddServer object does not remember any value returned to the client and it can be called by any client.
Altogether there are eight steps in the RMI application development process:
-
Define the remote interface for the AddServer object
-
Implement the remote interface with AddServerImpl class
Advertisement -
Write a server application to start the remote object
-
Generate stub and skeleton
Advertisement -
Start the RMI registry
-
Run the server application
Advertisement -
Write a client application to invoke the add() method of the AddServer object
-
Run the client application
Advertisement
Define the remote interface for the AddServer object
The remote interface of the AddServer object is given in Code 3.1.
Code 3.1: Remote interface of AddServer object
1. package addRmi;
2. import java.rmi.Remote;
3. import java.rmi.RemoteException;
4. public interface AddServer extends Remote {
-
// this method is invoked by remote clients.
Advertisement -
// it is implemented by the remote object
-
double add(double n1, double n2) throws RemoteException;
Advertisement
8. }
Implement the remote interface with AddServerImpl class
The implementation of the add() method is provided by the implementing class AddServerImpl whose code is given in Code 3.2.
Code 3.2: Implementing class AddServerImpl
1. package addRmi;
2. import java.rmi.RemoteException;
3. import java.rmi.server.UnicastRemoteObject;
4. public class AddServerImpl extends UnicastRemoteObject
implements AddServer {
-
public AddServerImpl() throws RemoteException {}
-
// implementation of the add() method
-
public double add(double n1, double n2) throws RemoteException {
-
System.out.println(“Number added are " + n1 + " " + n2);
-
System.out.println(“Total is " + (n1+n2));
11. return n1 + n2;
- }
13. }
Write a server application to start the remote object
We write a server application to start the remote object. The code for the server application is given in Code 3.3. Note that the AddServer object is added into an RMI registry in Line 8 of Code 3.3. This is to allow the client to locate the remote object. The registry enables client objects to look up remote objects using a String name.
Code 3.3: Server application AddServerApp
1. package addRmi;
2. import java.rmi.Naming;
3. public class AddServerApp {
-
public static void main(String args[]) {
-
try {
-
AddServerImpl addServerImpl;
-
addServerImpl = new AddServerImpl();
8. Naming.rebind(“AddServer”, addServerImpl);
-
System.out.println(“AddServer Started \n”);
-
}
-
catch (Exception ex) {
-
ex.printStackTrace();
-
}
- }
15. }
Generate stub and skeleton
Once the remote interface (AddServer) and its accompanying implementation (AddServerImpl) have been defined, they are compiled. Two additional classes – stub and skeleton – have to be generated to facilitate the communication process. These two classes behave as proxies for the remote object. The stub will be placed at the client side while the skeleton will be placed at the server side.
To generate the stub and skeleton, we use the rmic tool available in the Java Development Kit /bin directory:
rmic addRmi.AddServerImpl
By default, rmic generates stub classes that use the 1.2 JRMP stub protocol version only. Only stubs are produced. No skeleton classes are generated because skeleton classes are not used with the 1.2 stub protocol version.
The following .java and .class files should be visible in the directory after the above process is completed:
AddServerApp.java
AddServerApp.class
AddServer.java
AddServer.class
AddServerImpl.java
AddServerImpl.class
AddServerImpl_Skel.class (this is not produced if 1.2 JRMP stub protocol is used)
AddServerImpl_Stub.class
Start the RMI registry
Before we run our server application, we need to start the RMI registry:
- Open a new command prompt.
- Enter “start rmiregistry” at the command prompt.
· Ensure the registry is started at the directory level the AddServerApp will be started.
· If all goes well, a new window opens and the registry is started. Do not close this window as closing it stops the registry.
Run the Server Application
To run the server application:
-
Open a new command prompt.
-
Enter “java addRmi.AddServerApp” at the command prompt.
· Ensure the AddServerApp is started at the same directory level as the registry.
· If all goes well, the line “AddServer Started” is displayed.
Write a client application to invoke the add() method of the AddServer object
To test the RMI application, we will produce a client application to get a reference of the remote object, invokes the latter’s add() method and displays the return value. The client application is given in Code 3.4.
Code 3.4: Client application AddClientApp
1. package addRmi;
2. import java.rmi.*;
3. public class AddClientApp {
-
public static void main(String args[]) {
-
try {
-
// Make rmi URL to name AddServer
7. String addServerURL;
8. addServerURL = “rmi://” + args[0] + “/AddServer”;
- // Obtain a reference to that remote object
10. AddServer addServer;
11. addServer = (AddServer) Naming.lookup(addServerURL);
-
// Display numbers
-
System.out.println(“First number is: " + args[1]);
14. double n1 = Double.valueOf(args[1]).doubleValue();
- System.out.println(“Second number is: " + args[2]);
16. double n2 = Double.valueOf(args[2]).doubleValue();
- // Invoke remote method and display result
18. double result = addServer.add(n1, n2);
-
System.out.println(“Result is: " + result);
-
}
-
catch (Exception ex) {
-
ex.printStackTrace();
-
}
-
}
25. }
Note that clients always interact with the interface, and never with the object implementation in RMI.
Run the client application
To test the server, we run the client application:
-
Open a new command prompt.
-
Enter “java addRmi.AddClientApp 127.0.0.1 3 4”.
· 127.0.0.1 refers to the localhost. This works if the client application is run on the same computer as the server application.
· To demonstrate the concept of remoteness, you might want to run your client application in a separate computer. In that case, enter “java addRmi.AddClientApp
· How do we get the IP address of a computer? In Windows, enter ipconfig/all and check out the value for “IP Address”. That is the value of the computer’s IP address.
· The following output is displayed if all goes well:
First number is: 3
Second number is: 4
Result is: 7.0
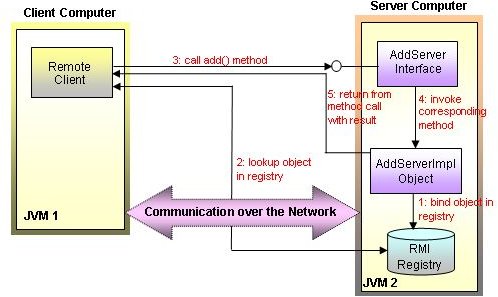
If all goes well, you have just successfully implemented your first RMI application. Figure 3.1 shows the entire RMI communication process.
RMI Communication Process
In our next article “Client/Server Computing Part 4: Java Naming and Directory Interface (JNDI)”, we will introduce JNDI, a common interface for Java-based clients to access any naming and directory services.
This post is part of the series: Client/Server Computing
Programs have often been written to run on one computer. What if there are more than one computers available? Can we have a software program to run on more than one computers? How do we maximize the performance of these machines? How does Client/Server Computing address this need?


