
In this article, we show you how to get your recording to play as soon as the slide comes up and, if you need to, how to get it to continue playing even when you go to the next slide.
How To Play Voice Automatically
In the previous article , we showed you how to record your voice and play it back on a slide by clicking on it. Now we show you how to get the recording to play as soon as the slide comes up and, if you need to, how to get it to continue playing even when you go to the next slide.
We assume the sound icon (shown below) is displayed on the slide:
Right-click on the icon and choose “Custom Animation…” (You can also choose it from the Slide Show menu.) This will bring up the following box on the right of your screen (the name displayed in the box may be different from “Media 4”):
(To see a larger view of any image, click on the image.)
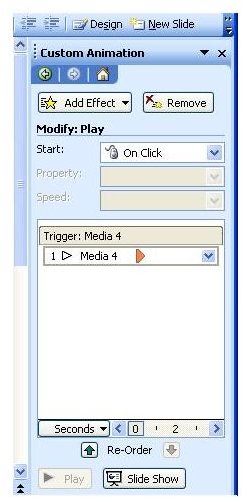
Media 4 refers to the recording. Note the information that the recording will start to play On Click.
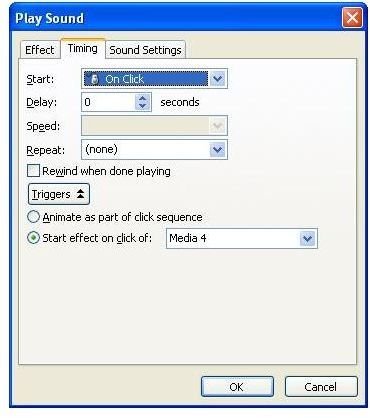
Click on the drop-down arrow in the box with the recording name and choose Timing… from the options that appear. This brings up the following:
Click on the drop-down arrow in the box next to Start and select After Previous. This will change the above box into:
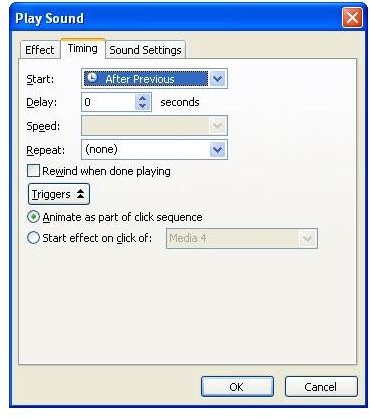
The radio button Animate as part of click sequence should be selected. If it is not, click on it to select it.
If you click OK and view the presentation (press F5 or select Slide Show > View Show from the menu bar), the recording will start to play as soon as the slide comes up.
If you do not want the recording to start immediately, you can use the Delay box to specify how long to wait before the recording starts to play. For example, if you set the delay to 5 seconds, the recording will start to play 5 seconds after the slide comes up. The Delay box can be used to give you tighter control over when the recording is played.
How to Play Recording Across Two or More Slides
When you voice slides automatically, it is sometimes necessary for the recording to cover two or more slides. In this case, you don’t want the recording to stop when you click the mouse to go to the next slide. To achieve this, click on the Effect tab in the above box. This brings up:
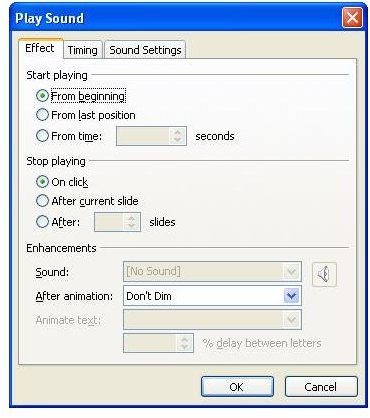
Suppose you want the recording to span 3 slides. Select the radio button next to After and use the “up” arrow so that the box reads “3”. (You could also type ‘3’ in the box.)
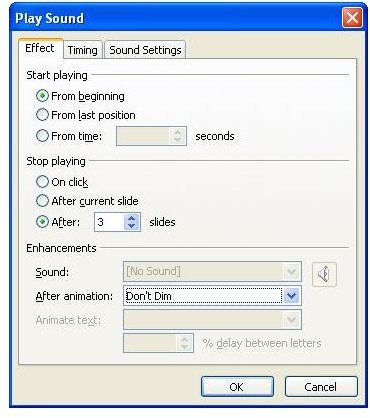
Now the recording will start on the slide in which it resides and will continue playing even when you go to the next two. It will stop playing when you leave the third slide or the recording ends, whichever comes first.
Additional Resources: Interested in more tips? Be sure to take a look at the other items in Bright Hub’s collection of Microsoft PowerPoint user guides and tutorials . New and updated articles are added on a regular basis, so bookmark us and check back often.
This post is part of the series: How To Add Audio To PowerPoint 2000/2003 Presentations
Ever wondered how to get your presentations to talk and sing? Welcome to a series of articles on how to add “audio” (music or speech) to your presentations. These articles are designed primarily for those who use PowerPoint 2000/2003 but the principles are all applicable to other versions.
- Getting Started With PowerPoint 2003 Audio
- Adding CD Audio to PowerPoint 2000/2003 Presentations
- Adding File Audio to PowerPoint 2000/2003 Presentations
- How to ‘Voice’ Your PowerPoint Slides with a Recording
- Play Voice Recordings Automatically and Across Slides in PowerPoint
- How To Create A Self-Running Presentation in PowerPoint 2000/2003
- How To Control When Elements Appear In PowerPoint 2000/2003


