Corrupt or lost Microsoft Excel files can be retrieved using basic tools included in Windows 7 and Excel itself.
Lost an Excel Spreadsheet?
Losing data in Microsoft Excel can be potentially business-threatening, and certainly very frustrating. Your Excel file might have been corrupted following a power outage or hardware failure, or you may simply have made changes, saved them – and then lost the document.
As Excel (and other Microsoft Office apps) has a regular auto-save function setup, there is every chance that a version of the document might be available once you are able to restart your computer.
Excel file recovery can be performed both via the application itself and in Windows Explorer . Tips for retrieving at least some of your data follow…
Explaining File Corruption
There are several reasons why you might lose a vital file:
- Power outage might corrupt the file you are working on when the PC shuts down.
- (Non-disk) Hardware failure might corrupt the open document.
- Hard disk failure can corrupt the open document.
- You might accidentally save the document in a temporary file, for instance if it was opened directly from an email.
If you have simply lost the file, this Explorer tip is pretty useful – check your temporary folders for the document! We’ve covered this previously on BrightHub and this article about Word document recovery explains how to find such missing documents. Although written with Word in mind, the same principle applies in finding lost documents in temporary files.
Meanwhile, to get your corrupted Excel data back from the brink, you should first try opening it in a newer version of the spreadsheet application. Each successive version features better tools for dealing with damaged files, so this is the best “on-board” fix.
Excel File Recovery
Other Explorer tips and tricks you might try to recover your Excel file include:
Rename the file so that it changes from yourfile.xls to yourfile.txt – with this done, attempt to open it in Notepad. Go to Format > WordWrap in order to see the contents of the file; you should scroll to the end, where the data will probably stop to be replaced by squares and possibly other symbols. Delete all of this information and attempt to open the file in Excel.
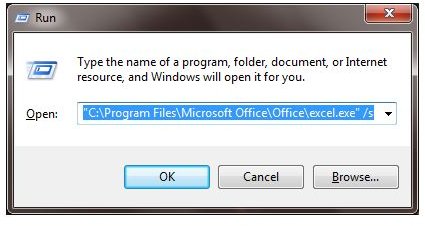
You should also try and run Excel in Safe Mode – to do this, go to Start > Run (or in Windows Vista/7, Start > Search box) and enter:
“C:\Program Files\Microsoft Office\Office\excel.exe” /s
Make sure you include the quote marks in this command; the “/s” portion ensures that Excel launches in Safe Mode. You should then try to open the document from within Excel.
Don’t Let it Happen Again!
One way to prevent this sort of thing from happening again is to use a built-in Excel function to automatically create back-ups.
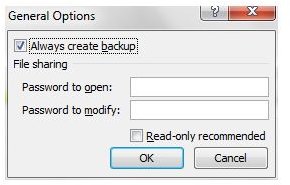
Go to File > Save As and click Tools. In General Options, choose the Always create backup check box. Now whenever a save is made, the backup will also be taken, a useful insurance.
You might also consider instructing Excel to create a recovery file. This file will be used to recover your document in the event of another crash or outage. To create this, go to File > Save As and open Tools. In Options, go to the Save tab and mark the Save AutoRecover info every check box, adding a value at the end.
This value will be in minutes, so you could set the autorecover to take place every 5 minutes, for example. Meanwhile, in the event of your PC having a corrupt or suspect disk, use the AutoRecover save location box to enter a file path for saving your recovery files.


