To add a network printer on Windows 7 is easy when all the computers on the network are running Windows 7. However, not all networks are totally Windows 7 based. This article explains how to add a network printer on Windows 7 network as well as on a hybrid network.
Printers on a Windows 7 Network
Before proceeding with how to add a network printer on Windows 7, you need to setup the printer on the main machine (computer). You will then use the “Printer Sharing” to allow other computers on the network to use the printer. Let us check out how to add a network printer on Windows 7:
- Connect the Printer to the main computer in your network.
- Turn on the printer and let the main computer find it.
- If the computer detects your printer, configure the printer settings and set up a sharing using the home-group network. For the printer to be usable from other computers on the network, you need to have a home-group setup where you allow the printer sharing. See step 5 onwards to set up sharing.
- If the computer does not detect your printer, you can use the disk provided by your printer manufacturer to install the printer drivers. Once the printer is visible in the main computer’s Devices and Printers window (Control Panel), you can set up sharing as explained in the next steps.
- Click on the Start menu and select Control Panel.
- Double click on Printers and Devices to open the Window that displays the devices attached to the main computer.
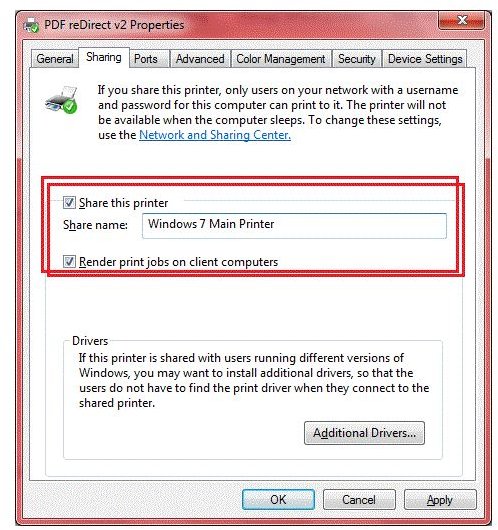
- Right click on the printer that you wish to share and select Printer Properties. Select Sharing tab as shown in the image.
- Click to select Share this Printer. Type a name for the printer so that you can identify it when using other computers.
- If you want the printing process to complete faster, enable the option that says Render Print Jobs on Client Computers (see image).
- Click on OK to close the dialog box.
- You should now be able to use the printer using any of the other computers in the network.
This is how to add a network printer on Windows 7 network. Sometimes, the network may contain computers that carry other Windows operating systems, such as Windows XP or Vista. In such cases, you need to perform some additional steps to let these computers find the printer as these operating systems won’t support the home-group option.
Setting up Network Printer on a Windows 7 Hybrid Network
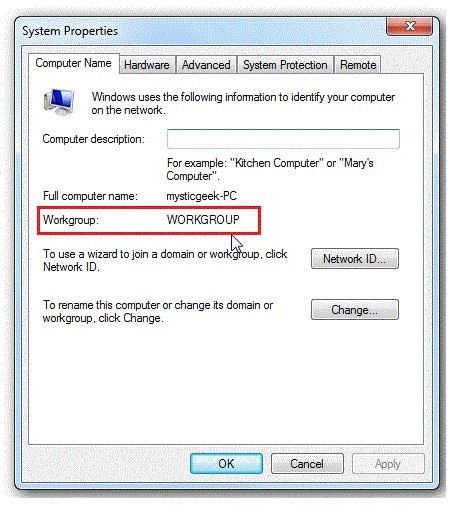
In case where you are using XP or Vista on some of the computers of a Windows 7 network, where the printer is on a computer running Windows 7, you need to make sure that all the computers are in the same workgroup. To check this, right click on the My Computer icon in XP and select Properties. Select the Computer Name tab and see if the Workgroup is same. If not, change it by clicking on the Change button (see image to the right).
In Vista and Windows 7, right click on Computer and in the window that opens, click on Advanced System Settings and select Computer tab. You will get the dialog box similar to that of Windows XP where you can view the workgroup and change it if required.
On the main computer that is running on Windows 7, open Control Panel and select Network and Sharing Center. Click on Change Advanced Sharing Settings. See if the following settings are selected as in the image below.
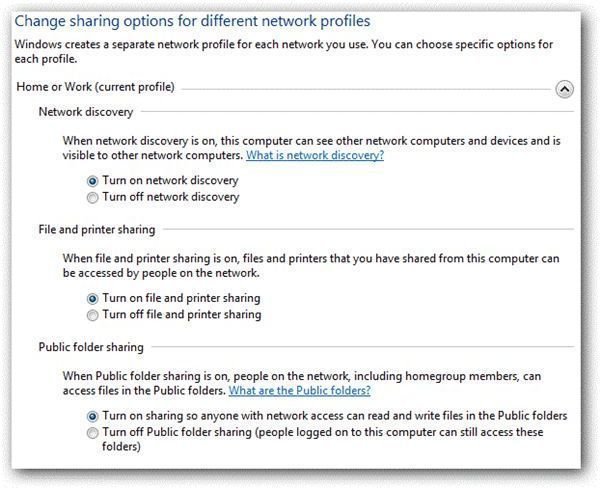
Once you have the settings tuned as shown in the above image, all you have to do is to enable sharing on the printer. This can be achieved as explained in the step 5 above.
Please note that this article covers how to add a network printer on Windows 7 where the main computer on your network is running Windows 7 and has the printer that you want to share. Steps for other configurations may be different.


