This guide to setting up a USB flash drive to install Windows 7 includes instructions for configuring under both Windows Vista and Windows XP.
Installing Windows 7 From a USB Stick - A Warning
Whether you’re using a computer with no DVD drive or just fancy a challenge, installing Windows 7 from a USB device is pretty cool way to install the latest version of the Microsoft OS.
All you need to do this is a suitably-sized USB flash or HDD device (at least 4GB), a suitably-specced computer, and a Windows 7 DVD or ISO file.
However, before we proceed, a word of warning that you won’t get anywhere else.
As effective as this process is, if your PC or laptop BIOS and/or motherboard won’t accept booting from USB, you simply will not be able to install Windows 7 in this manner. There are plenty of Pentium 4 PCs that have the CPU speed, required RAM, video RAM and HDD space to run Windows 7 – but without the motherboard allowing booting from USB, an installation by this means will not be possible. Before proceeding, to avoid disappointment and frustration, check your motherboard manual for USB booting information!
Depending on your Windows version, setting up the USB stick can be performed either in command prompt or using additional software.
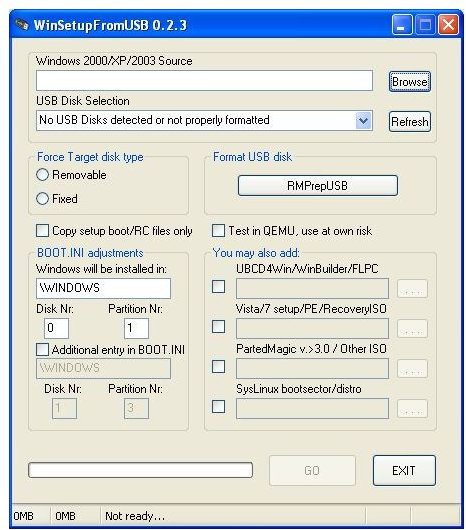
Prepping Your USB Stick in Windows XP
In order to prep your USB stick so that it will be bootable, you will need to use a dedicated USB stick prepping utility. My tool of choice is WinSetupFromUSB, available from www.netbookfiles.com . A small download, it is used to format and configure your Windows 7 installation device.
Once downloaded, install the software, and then run. On the main screen, look for USB Disk Selection and make sure that your intended USB device is selected. Also check the device for files that you might want to backup – they’re soon to be deleted, so take the appropriate steps.
The RMPrepUSB button takes you to a second screen – here, select NTFS under FILESYSTEM and OVERRIDES, and under BOOT OPTIONS look for and select WinPE/Vista v2 bootable (BOOTMGR) (CC4). The light blue Prepare Drive button should then be selected – wait a few moments for this to complete.
Copying Windows 7 to USB
Once this process has completed, Exit the RMPrepUSB screen – you’ll be back in the main view. Under the section labeled You may also add: tick the box beside Vista/7 setup/PE/RecoveryISO and then click the ellipses “…” button to browse for the ISO file. Note that this method does require an ISO of your Windows 7 disc, mounted in a program such as MagicISO – see this article on using Virtual Drive Software for more information.
Finally, click Go in the main window – this should take 5-10 minutes. When the setup is complete, your Windows 7 installation USB disk is ready to be used! All that is left now is for you to remove the device (safely, using the System Tray), and boot the PC or laptop you intend to install Windows 7 from, using the BIOS boot menu to select the USB disk as the boot device.
You’ll soon be in the Windows 7 setup – for more information on how to proceed here, see our Windows Installation Guide .
Prepping Your USB Stick in Windows Vista
However if you’re setting up your USB stick with Windows Vista, you don’t need additional software – all you need are your Windows 7 disc and the USB device.
Open the command prompt by typing cmd in the Start menu Search box and press CTRL+SHIFT+ENTER to run command prompt with full administrative privileges.
In the command prompt, enter DISKPART - once this is running, insert your USB disk and in the box type LIST DISK. A list of attached devices will be displayed and you should be able to identify your USB device via its size.
We’ll assume your USB device is Disk 1; next, enter the following commands one at a time
SELECT DISK 1
CLEAN
CREATE PARTITION PRIMARY
SELECT PARTITION 1
ACTIVE
FORMAT FS=NTFS
ASSIGN
The message “DiskPart successfully formatted the volume” will appear when the process is complete. Next, type EXIT and then minimize the command prompt as we will be using it again shortly.
Configuring USB Stick as a Boot Device
Next, insert your Windows 7 DVD – open My Computer to confirm the drive letters of your DVD drive and of the USB device. We’ll assume this time that the DVD is drive D: and the USB device drive E:
Back in the command prompt, enter one at a time:
D: CD BOOT
CD BOOT
BOOTSECT.EXE /NT60 E:
This message:
“Target volumes will be updated with BOOTMGR compatible bootcode”
will then be displayed, followed by (if successful)
“Successfully updated NTFS filesystem bootcode”.
This prepares the USB device as a bootable disk from which you can install Windows 7.
All that is needed to be done now is for you to copy the contents of your Windows 7 DVD to the USB device. Following this, safely remove your USB drive from the computer, and prepare the target PC or laptop by setting its BIOS or boot options to start from USB.
For more information on how to proceed with the Windows 7 installation, see our Windows Installation Guide .


