Struggling in dark with Windows 7 Bluetooth configuration? Despair not! Read on and find out how to connect your Bluetooth headset with your Windows in a few easy steps.
Windows 7 Bluetooth Configuration
Bluetooth headsets are a popular accessory for cell phones because they enable us to keep our hands free to perform other tasks while talking. Apart from cell phones, Bluetooth headsets can also be connected to Windows so that you can do a variety of things such as make calls on Skype with Windows , VoIP calls , listen to the radio, your audio files, etc.
Windows 7 Bluetooth configuration to connect a Bluetooth headset to your Windows 7 is very easy and can be done in a few simple steps. The basic requirements are that your PC must have the Bluetooth capability or alternatively you must have a Bluetooth dongle plugged into the computer and your Bluetooth headset is charged and turned on.
Connect Your Bluetooth Headset To Windows 7
First off, turn on Bluetooth in your Windows 7. The way to do so is to go to “Device and Printers” from the Windows Start menu (or by using the “control” shortcut in the RUN window), select the Bluetooth built in module, right click on it and select “Bluetooth settings”. When the Bluetooth options settings window opens, select the option that says “Allow Bluetooth Devices to Find This Computer” and finally click the “OK” button to save the setting and close the window.
If you have a USB Bluetooth dongle that you want to use, connect it to one of your computer’s USB ports and install the drivers that came with it. It is possible that you will not need to manually install the drivers as Windows automatically does it for you for most of the devices.
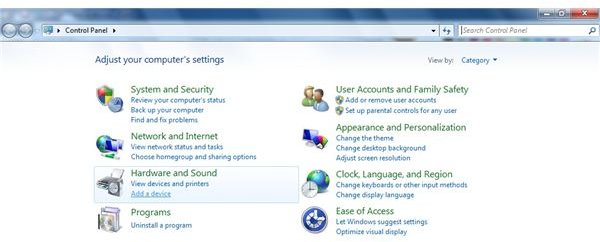
The next thing to do is to get your Windows 7 to search for your Bluetooth headset, but before
e Windows can do it, you need to go to the Control Panel and click on the “Add a device” under “Hardware and Sound”. Once you are there and clicked on it, your Windows will begin to look for Bluetooth devices and display them in the window, once found.
Now turn on your Bluetooth headset. Look at the top of your headset for the main function button. Press it and hold for a few seconds. The majority of the Bluetooth headsets begin to blink once turned on. Once you see it blinking, your Bluetooth headset will become discoverable by your Windows 7.
Shortly after turning on your Bluetooth headset, Windows 7 will detect and pair the Bluetooth headset with Windows and show it in the list of available Bluetooth devices. Once you see the name of your Bluetooth headset on the screen, select it with your mouse and then click the “Next” button. Windows 7 will now ask you for a passkey. Enter the passkey, which is almost always “0000” In case it is not accepted, you might find the right passkey in your headset manual that came with it.
Once you have successfully completed the above Windows 7 Bluetooth configuration process, your Bluetooth headset will connect to your Windows and you will be able to use it to make VoIP calls, listen to the music or FM radio through your Windows 7.
Note that after connecting your Bluetooth headset with your Windows 7, you should not need to follow the above steps again unless you deliberately unpair your headset, uninstall the Bluetooth adapter or reformat your drive.
Have a nice time using your headset with Windows 7!


