Windows Defender is an excellent free tool by Microsoft to get rid of spyware and viruses on your computer. In this guide, I will show you how to use the Windows Defender Command Line Utility, the geekier way to obliterate the spyware and viruses on your PC.
Guide to Windows Defender
Windows Defender is an anti-spyware software tool by Microsoft which protects your PC from spyware and other malicious elements which attempt to intrude into your PC.
It is a very nice tool which is offered free by Microsoft with Windows Vista and Windows 7. It offers advanced features like auto start, custom configuration, Internet Explorer integration etc. You can access it on your Windows PC by going to the Control Panel and clicking on the Windows Defender Icon. If you are using Windows XP, you can download Windows Defender for Free .
Using the graphical interface of Windows Defender, you can easily scan your PC for viruses and spyware by pressing the Scan button and selecting a Quick, Full or Custom scan. You can also check for virus definitions and updates and download them through the internet.
Windows Defender Command Line Utility Tools
Windows Defender can also be used via command line by using the Windows Defender Command Line tools.
To use Windows Defender using the command line utility, you need to run Command Prompt as an Administrator and run some commands.
Click on Start > All programs > Accessories and right click on the Command Prompt and select Run as Administrator.
Click Yes if a User Access Control box pops up and allow it to launch an elevated command prompt.
In the command prompt, type this command to browse to the Windows Defender directory.
“cd C:\Program Files\Windows Defender\ “
Now just type
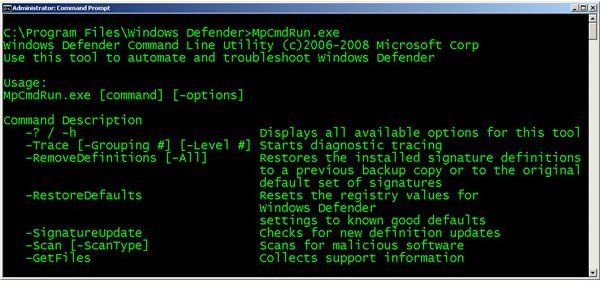
“MpCmdRun.exe “
and press Enter. It will give you a list of all the command parameters you can use with Windows Defender.
You can use the command with the parameters in the following format:
“MpCmdRun.exe -parameter “
I will explain some of the common ones. The parameters enclosed in square brackets [parameters] are optional.
“MpCmdRun.exe -h “
This will display a list of help options for the parameters. It will tell you what any of the command parameters will do.
“MpCmdRun.exe -Scan [-Scantype] “
This will start scanning your PC with the Windows Defender tool.
[-ScanType] Options:
- 0: Default scan, according to your configuration
- 1: Quick scan
- 2: Full system scan
“MpCmdRun.exe -Trace [-Grouping value] [-Level value] “
This will start tracing the actions of Windows Defender. You can specify the components for which the tracing will be enabled as well as the levels. The default value is all components at the error, warning and informational levels. THe log files are stored in the CURRENT directory.
[-Grouping value] options
- 0x1: Service
- 0x2: Malware Protection Engine
- 0x4: User Interface
- 0x8: Real-Time Protection
- 0x10: Scheduled actions
[-Level value] options
- 0x1: Errors
- 0x2: Warnings
- 0x4: Informational messages
- 0x8: Function calls
- 0x10: Verbose
“MpCmdRun.exe -GetFiles “
This will collect all the log files together and compress them together in the SUPPORT directory.
“MpCmdRun.exe -RemoveDefinitions “
This will restore the last set of signature definitions.
If you sue the [-All] parameter, it will remove all signatures and go back to the original signatures.
“MpCmdRun.exe -RestoreDefaults “
This will restore all the configuration options to their default values.
“MpCmdRun.exe -SignatureUpdate “
This will search for updated spyware signatures and download them.
This is a list of the various commands you can use with the Windows Defender Command Line tool.
To just scan your PC for spyware, run “MpCmdRun.exe -Scan “.


