With Windows 7, you are no longer relegated to boring, static desktop backgrounds. You can create a slideshow using images provided by Windows or your own digital pictures. Learn how to create and edit a Windows 7 background slideshow.
Overview
Windows 7 offers many cool, new features . One such feature is the Windows 7 background slideshow. Using this setting, you can quickly and easily create an interesting wallpaper slideshow using your favorite pictures, a Windows 7 theme or images provided by Windows. Read on to learn two ways to make a Windows 7 background slideshow as well as how to make changes to an existing slideshow.
Selecting a Windows 7 Background Slideshow
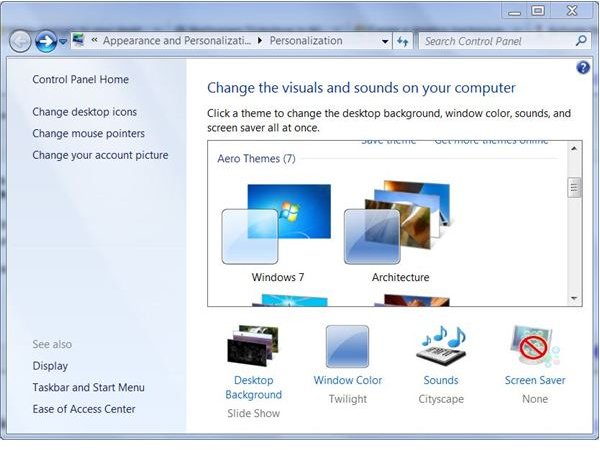
One way to quickly create a Windows 7 background slideshow is directly from the desktop. Right-click any blank area of the desktop and select Personalize. This opens the Personalization window.
If you want to use the pictures in a Windows 7 theme , select an option under Aero Themes. All of these options except for the Windows 7 theme include a Windows 7 background slideshow.
You can also create a custom Windows 7 background slideshow. Click the Desktop Background link near the bottom of the Personalization window. Click the Browse button next to Picture Location. Browse to the folder containing pictures you want to use to make your Windows 7 background slideshow and click OK. Click the check boxes for all of the pictures you want to include in your slideshow and click OK.
All of the pictures must be in the same folder in order to use them for a Windows 7 background slideshow.
Create a Windows 7 Background Slideshow from a Folder
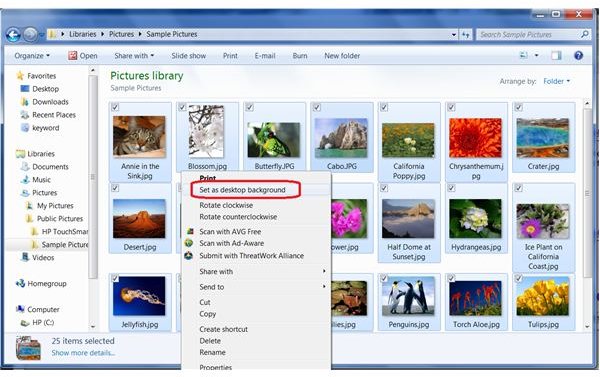
Another way that you can quickly create a custom Windows 7 background slideshow is directly from within the folder containing the pictures you wish to use. In the folder containing these pictures, press and hold the Ctrl key while you click on each of the photos or images that you want to include in the slideshow. If you want to use all of the images in the folder, you can simply press Ctrl+A to select all of the pictures.
Once you have selected the pictures you want to use, right-click anywhere on your selection. Select Set as Desktop Background from the contextual menu. Windows 7 will automatically create a background slideshow using the selected images.
Again, all of the pictures must be in the same folder in order to use them for a Windows 7 background slideshow.
Make Changes to a Windows 7 Background Slideshow
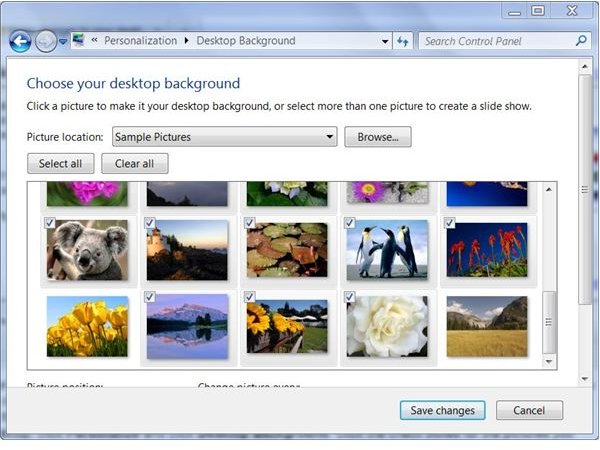
There are other changes that you can make to a Windows 7 background slideshow. To add pictures to the current slideshow, first make sure that the pictures you want to add are in the same folder as the rest of your slideshow images. You can move them quickly by copying them from their original location and paste them into the slideshow folder, or simply drag them there. Once you have all the pictures you want to use in one location, right-click the desktop, click Personalize and click Desktop Background. Click the check boxes for the pictures you want to add and click Save Changes. You can remove pictures as well by clearing the check boxes of the images you do not want to include in the slideshow.
You can change the picture position by selecting stretch , tile or another option in the Picture Position list. Select an option in the Change Picture Every box to determine how long you want Windows to wait before moving to the next image in the slideshow. You can also select the Shuffle check box if you want the images to appear in random order.
Finally, if you are looking at your desktop and bored with the current background, right-click a blank area and select Next Desktop Background to move on to the next image in the Windows 7 background slideshow.


