One of the many innovative and neat tools with the latest Microsoft Word has to be the method in which images are inserted into your documents. This guide will show you how to get the most out of this fun tool.
Inserting images into documents are a great way to give your documents a bit of personality. While previous versions of Word only allowed basic image manipulation options, Word 2007 steps up its game with how you can make images appear within your document.
To help you with this guide, there are some screenshots included. To expand on them at any time, click on them to open them in a new browser window.
1.) Inserting an image
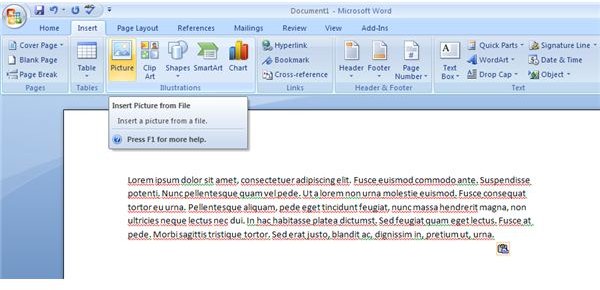
On the top of the window, you’ll notice a series of tabs. Most likely when you’re starting a new document, the tab will be at “Home” by default. For a new image, you’ll want to select “Insert." Notice how you can still type your document even with the new tab selected.
From there, choose “Picture."
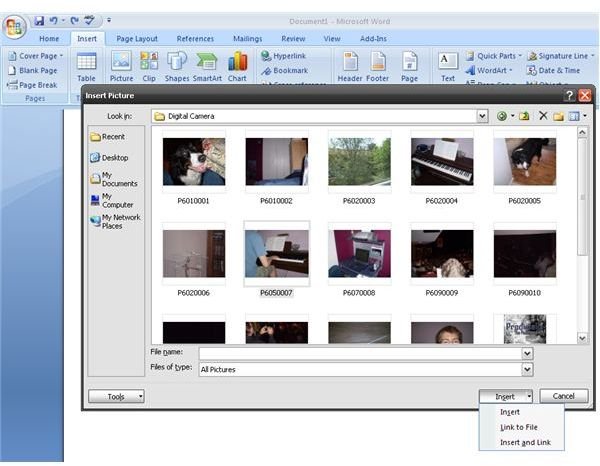
Select any image you want. If the picture you want to insert has dimensions larger than the page size, Word will automatically reduce the image so that it fits not only on the page, but within the printable margins, ensuring that no part of your picture will be cut-off when the document is printed. When you find the picture you want, click “Insert”. There is a drop-down menu on the button, as you’ve probably noticed. For now, don’t worry about it and just insert the picture as normal.
2.) Modifying your image

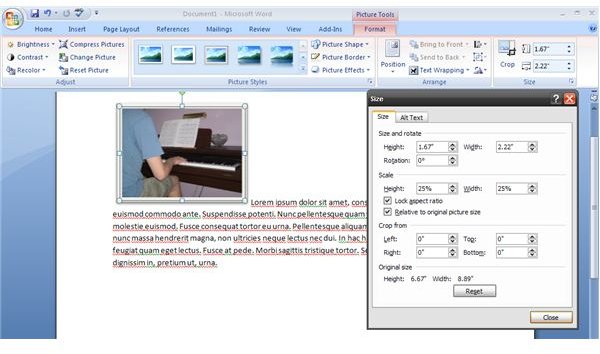
Immediately after inserting the image, you’ll notice a new tab appear on the top of the window. This is your toolbar which will allow you to edit your image as you see fit. For this exercise, we’re going to resize the image so that it fits better with the text on the screen. On the far right of the toolbar, there’s a “Size” option. Click the small icon on the bottom-right to open an options window.
Personally, I find resizing an image by percentage to be the easiest method of changing the dimensions of a picture. Word will show you the results as you are inputting new options so you don’t always have to go back and forth from the document to the options window. If you’re having a hard time and want to reset the image to its original size, click on the “Reset” button.
3.) Lining your images with text
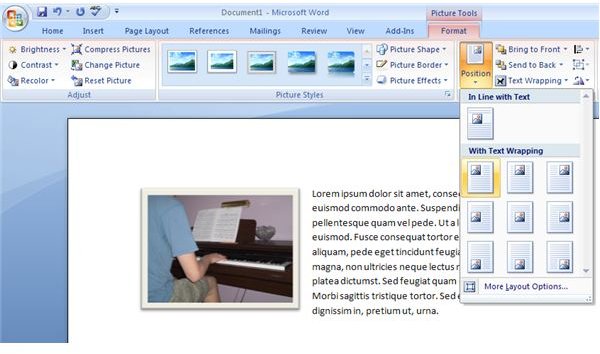
Chances are you won’t want the image to line up with inserted text by default. It doesn’t look particularly pleasing. There is a way to position the image to work with the text as you see fit. You’ll find these in the “Arrange” toolbar. The big icon, “Position” is the one that you want for this. There are different places that you can place the image in your document, and the inserted text will wrap around it neatly. There are, of course, more ways for the image placement to work. In this case, you can select “More Layout Options” if you want. For this exercise, I’m going to have the image appear on the top-left of the document.
4.) Styling your image
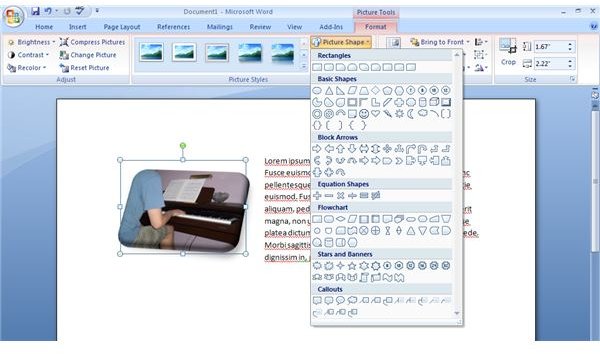
The “Picture Styles” toolbar allows you to make any stylistic changes to your image as you see fit. There are some contemporary designs, some ambient designs, and, of course, some really fun ones. You can play around with this menu and manipulate the shape, border and effects of the image. In the “Adjust” toolbar on the far left, you can change the brightness and color of your image as you see fit.
As you can see, there are many different ways for an image to appear in your document. These options will give your documents – and your images – a lot of personality. Of course, not every image-editing option has been shown in this guide. So feel free to explore all the many different options available to give a unique and fun flair to your documents.
Related Reading
- Applying File Protection to Office 2007 files
- Use Microsoft 2007 Files as Web Pages
- Five Reasons you need Office 2007 for your Home Office
- Office 2007 - What is XML?


