Like Windows 7 but not the Start Menu? There are a couple of ways that you can get the classic Start Menu back in Windows 7. For this tutorial, we will be covering two methods. The first involves configuring Windows 7 settings and the other uses an app to create a Windows 7 classic Start menu.
Windows 7 Classic Start Menu - Adjusting Windows 7 Settings
We will start with the easiest method of getting the Windows 7 Classic Start Menu. To start, right click in any blank space on your desktop. This should bring up the menu. Select the option labeled Personalize. After the Control Panel > Personalization window opens, you should see several themes to choose from. Scroll all the way down to the bottom of the theme viewer. You should reach a section titled Basic and High Contrast Themes. Click the theme that is labeled Windows Classic. From there, a Please Wait prompt will appear on your screen, and the colors will fade out. After this screen disappears, which should happen within a couple of seconds, you will have the Windows 7 Classic Start Menu. Click the Start button and try it out.
Now, you may have also noticed that this changed a couple of other things, such as your wallpaper. To customize these items, simply right-click on a blank space on your desktop, and select Personalize from the menu. Click the icon labeled Desktop Background. From here, you can reselect your old desktop background. After you have done that, click the icon labeled Window Color.
Within Window Color, you can use the first drop down box (Item:), to select different Windows 7 components to customize. Scroll through the list and adjust to your liking.
Windows 7 Classic Start Menu - Using a Customization App
Some people may not prefer the method listed above, because it changes the look of Windows 7 windows to classic as well. If you strictly want only the Windows 7 Start Menu to revert to Classic, and nothing else, the easiest way to achieve this effect is to use an app called CSMenu . Once you have CSMenu downloaded, install it. After CSMenu completes installation, it will display a prompt saying something like “Please wait, speeding up CSMenu. After this process completes, log out of Windows and log back in, or restart your computer.
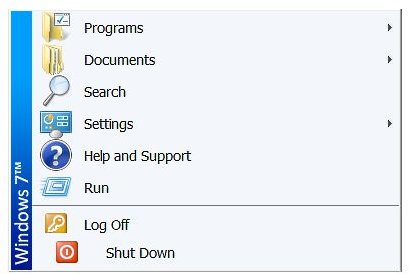
Upon logging back into Windows, click the Start Menu to open it and find CSMenu. Right-click on the CSMenu app shortcut and pin it to the taskbar. Upon doing so, you will see a new Start Menu in the taskbar, slightly smaller than the default Windows Start Menu. Click the new Start Menu to view. You should now see the Windows 7 Classic Start Menu.
Now, you may not want two Start Menus, which would be kind of weird. To get rid of the default Windows 7 Start Menu, you need to download the app Start Killer . Upon download and install, Start Killer and let it install. If you are presented with the option to start automatically after install completes, choose it.
Now, the Windows 7 default Start Menu should be gone, and you should have your modified Start Menu only. Find the taskbar icon for Start Killer and right-click on it. You will be presented with a couple of options. Make sure that the option Load on System Startup is selected.
That is all there is to it. You now have a Windows 7 Classic Start Menu.
More Tutorials
Enjoy this article? You may also be interested in:
Installing Windows 7 Without a DVD
Making Your Copy of Windows 7 Genuine
What is Windows Anytime Upgrade


