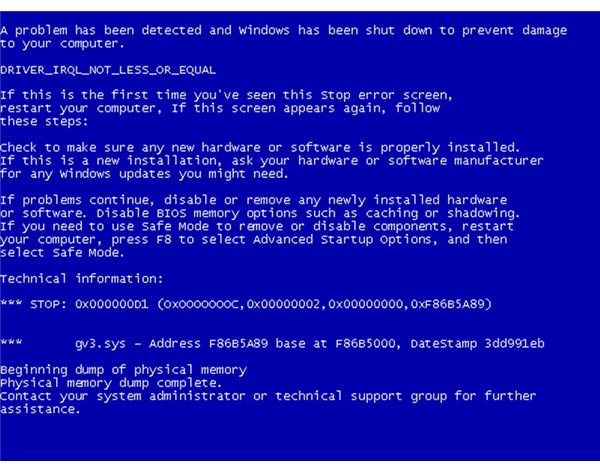
A Blue Screen of Death indicates a system error which causes the computer to crash. Depending on the severity of the error, it may crash again on rebooting and end up in what is known as a “boot loop.” This can be fixed by a procedure known as a “repair install” from your Windows installation disc.
The Blue Screen of Death
The “Blue Screen of Death ,” also known as a BSOD, has become an icon of computer failure and system crashes. A BSOD occurs when the system becomes unstable, providing information about the cause of the instability and automatically rebooting the computer. Unfortunately, major system problems can result in multiple “Blue Screens” because the error cannot be solved by a simple system reboot. When this happens the system has to be shut down manually because the Blue Screen of Death will reappear as soon as Windows starts booting again. The user is then unable to boot Windows because of the “Blue Screen of Death” which occurs again with each cycle of the boot loop.
Performing a Repair Install
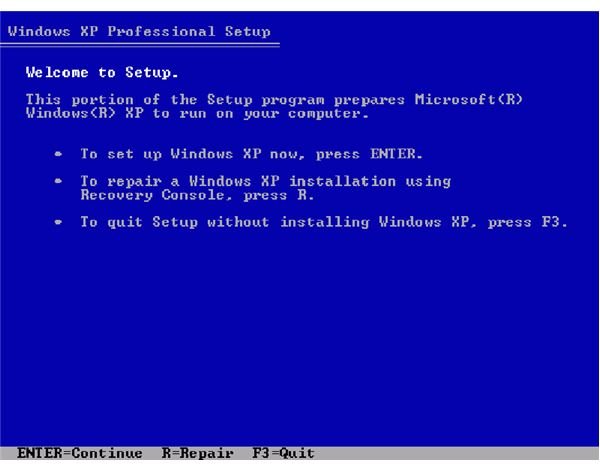
In order to fix a boot loop without losing all of your information, a repair install can be performed. Unlike the repairs which are performed by the Windows recovery console, a repair install actually goes through the entire installation process and overwrites all of the Windows system files (including those which are causing the “Blue Screen of Death.” ) A repair install is performed by inserting your Windows installation disc into your computer’s optical drive and rebooting the computer; if your computer asks whether you wish to boot from the installation CD or DVD you should press the indicated key. If you aren’t prompted, reboot the computer again and press the indicated key on your BIOS screen in order to select the drive containing the installation disc.
Begin your installation be pressing “Enter” to set up Windows (instead of pressing “R” to launch the recovery console), then press the indicated key to accept the licensing agreement. Continue through Windows setup until you are presented with a list of existing installations; select the Windows installation that you wish to repair, then press the “R” key to begin the repair install process.
Finishing the Repair Install
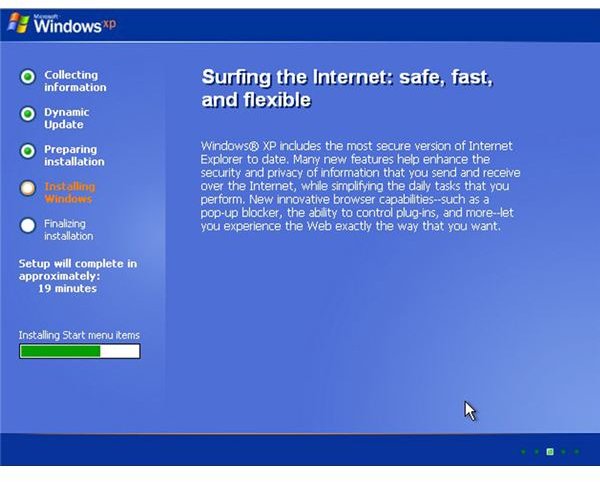
Once you have begun the repair install process you will have to wait while the installer overwrites the existing Windows files. First it will copy temporary files to your hard drive so that it can boot up a basic version of Windows, then it will start installing new copies of the Windows system files over the existing ones. The entire process will take approximately an hour, during which you may be asked to re-enter some information such as your regional settings and registration info.
After the repair install is complete, any software or files that you had before you began the process should still be on your computer. Any Windows Service Packs or updates that you had installed will need to be reinstalled, however, since your system files will have reverted to the unupdated versions on your installation disc.
Windows Vista and Windows 7
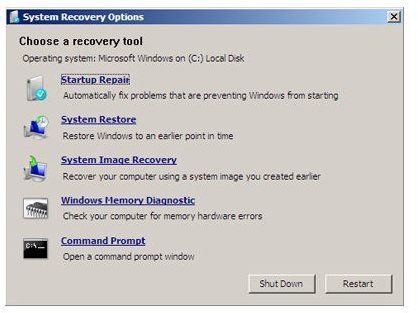
The process for stoping a boot cycle in Windows Vista and Windows 7 is slightly different. Instead of performing a repair install for these operating systems, the Windows Recovery Console is used to roll back the files and settings on the computer to a time before the “Blue Screen of Death” began. When you boot your computer from your Windows Vista or Windows 7 installation disc, choose your language option and then click the “Repair Your Computer” link. Choose the “System Restore” option, then follow the on-screen prompts to roll back the computer to an earlier point in time before the “Blue Screen of Death” started appearing.
Image Credits: Windows installation images copyright Microsoft


