Have you ever wished you could reach out and move or change things on your computer screen? If you have Windows 7 and a touch screen computer, you can! Learn how to use Windows 7 touch screen features.
Overview
One of the cool new features available in Windows 7 is Windows Touch. If you have the right monitor (you can find a list of Touch-compatible hardware here ), you can achieve pretty much anything a mouse or keyboard can do using your bare hands. To understand how to use Windows 7 touch screen features, find out what those features include and the proper gestures to use.
Windows 7 Touch Features
The first thing you will want to know when learning how to use Windows 7 touch screen features is what exactly those features are.
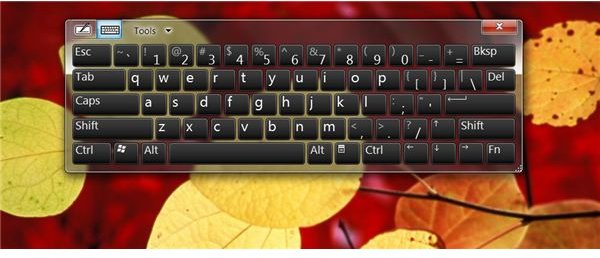
Touch Keyboard
You can type into any application without a physical keyboard by using the onscreen touch keyboard. To open the keyboard, click the Start button and type tablet into the Instant Search box at the bottom of the Start menu. Select Tablet PC Input Panel. Select the keyboard from the toolbar and type away. You can dock the keyboard by going to the Tools menu, pointing to Docking and selecting an option.
Writing Pad
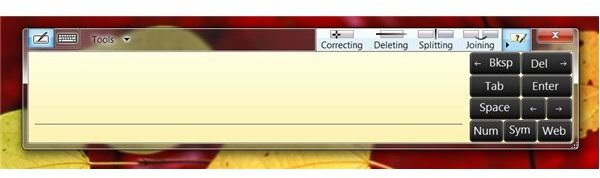
Another feature of the Tablet PC Input Panel is the Writing Pad. Click the Writing Pad button on the Input Panel toolbar to open the pad. You can write freehand style or input text character by character and even teach it your handwriting style.
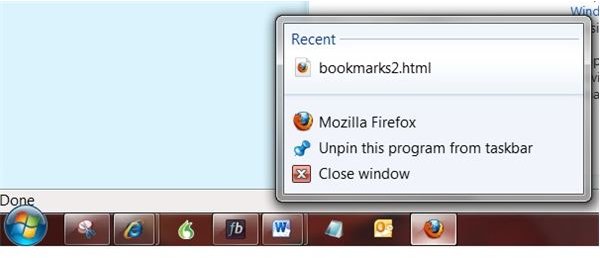
Jump Lists
Jump Lists are those little menus that pop up if you right-click an icon in the taskbar. Jump lists give you options to which you can “jump” for programs you are currently using or have pinned to the task bar. While you can certainly utilize Jump Lists with your mouse, you can just as easily get to them with your fingers when you know how to use Windows 7 touch screen features. Read on to learn about which gestures you can use with Jump Lists and other applications and features.
Windows 7 Touch Gestures
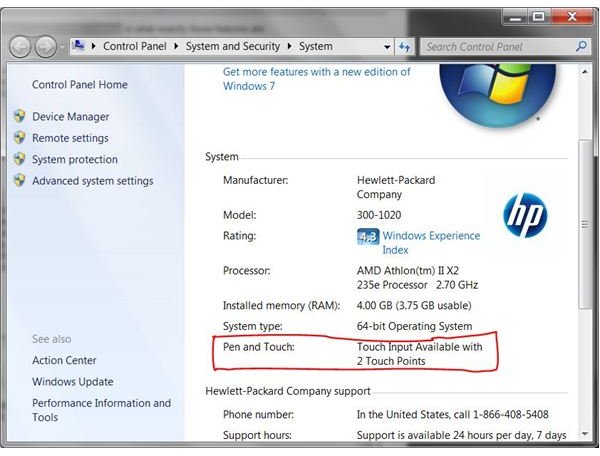
Another important consideration when learning how to use Windows 7 touch screen features is whether your computer is a touchscreen that can recognize at least two touch points. To find out, click the Start button and right-click Computer. Look for Pen and Touch under System to confirm that you have at least two touch points.
Once you know that your computer is able to use Windows 7 touch screen features, you can begin to learn how to use the gestures.
Flicks
Flicks are precisely what they sound like. You can flick the screen up, down, right or left if you want to scroll. You can customize how flicks work on your computer or even practice using flicks. Go to the Start menu and type pen into the Instant Search field. Select Pen and Touch and go to the Flicks tab. Change options as desired or click Practice Using Flicks.
Press and Hold
Press and Hold is the touch screen equivalent to right-clicking. To use Press and Hold, press the item for which you want to open a contextual menu. Hold your finger there until you see a circle around the item you are pressing. When you remove your finger, the right-click menu will appear.
Press and Tap
Press and tap has the same effect as Press and Hold. Press the item for which you want to open the shortcut menu and then tap it quickly with another finger.
Pan
Panning is the gesture of dragging your finger and works much like dragging with your mouse. Touch the screen where you want to move a window or scroll on a page and drag it across the screen.
Zoom
Use two fingers to zoom. To zoom in, place your fingers apart on a window and drag them together in a pinching motion. To zoom out, place your fingers closer together on a window and drag them apart.
Rotate

Related Articles
To learn more about the many features of Windows 7, read Top 7 Differences Between Windows 7 and Vista , Restoring Gadgets in Windows 7 and Wallpapers in Windows 7 .


