To reformat a drive in Windows 7 is pretty straightforward once you know it. This article describes in detail how to format the drive from within Windows. Have your new drives up and running in moments after reading this!
Need to Format a Hard Drive?
Reformatting a hard drive in Windows 7 is a pretty straightforward task. We’re going to assume you want to format a secondary or external hard drive, and not the one that Windows is installed on. If you want to do that ready for a new install you need to load the Windows 7 install DVD and do it from there.
Otherwise, right click on My Computer and select Manage. This will bring up the Computer Management console, which is a pretty powerful tool for managing many aspects of your machine. It’s a good idea to familiarize yourself with this tool as it can come in handy sometimes. Especially Task Scheduler, Event Viewer and Disk Management.
Disk Management is the go-to place for any disk related issues, formatting, partitioning and checking drive letters. Sometimes when you add a new drive, Windows doesn’t recognize it or assign a drive letter. This is where you come to manually assign one
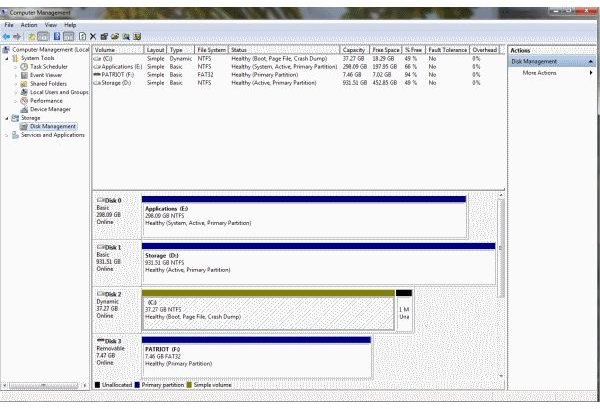
To reformat a drive, you open Disk Management, wait a few moments for it to collate the information and then you should see something like this. (Click any image for a larger view.)
Highlight the disk you want to format in the top half of the window and right click. You should see Format in the menu. Select this, acknowledge the warning about losing data and select the file type you want. If you’re using XP or above, I suggest using NTFS as it’s more flexible and uses space more efficiently than FAT or FAT32.
You can also use the command line to achieve the same result in less time. Type CMD into the run box in the Start Menu. When the window is up type format then the drive letter.
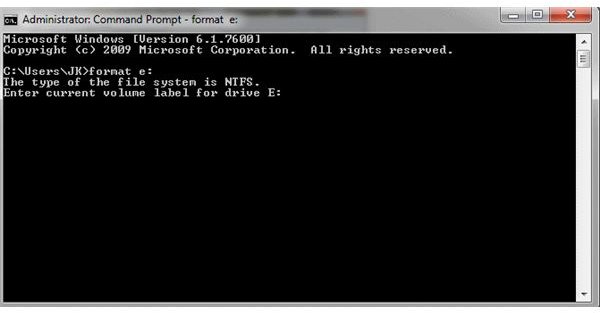
It does exactly the same thing as using Disk Management but isn’t as pretty to look at. The volume label is what you name the disk. It’s good to assign a meaningful name to each drive to aid identification. I use “System” for my C: drive, “Applications” for my D: drive, and “Stuff” for E:.
I install Windows on my System drive, all my applications on D: and games and everything else on E:. That way if a drive fails I only lose a certain amount of data. If my C: drive fails I only have to install Windows and not everything else. Well, except those programs that need an installed hook into the Windows registry.
You will then be prompted for the file system type, FAT32 or NTFS and the disk will be formatted.
It’s easy to reformat a drive in Windows 7. It’s also easy to reformat the wrong drive. Before hitting OK to the change, make double sure you’ve selected the right disk.


