This article will help you troubleshoot and repair IE (Internet Explorer) when it is not working properly under Windows XP, Vista and Windows 7.
Troubleshooting Internet Explorer
This article will focus on troubleshooting and repairing Internet Explorer 8 (IE), but most of these steps will also apply to Internet Explorer 7.
The first thing to realize is that most Internet Explorer issues crop up from an incompatible or damaged plug-in. Before we dive into reinstalling Internet Explorer, you will want to try some basic troubleshooting steps first.
If you are unable to open Internet Explorer, continue on to one of the two following sections which will help you reinstall IE. If you are able to open IE, continue below.
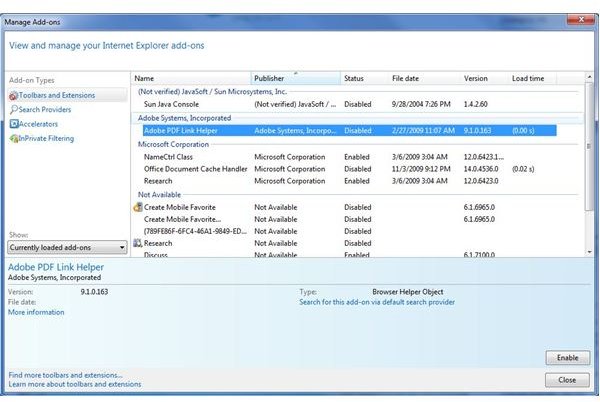
We’ll want to take a look at the add-ins you have installed and start by disabling add-ins you don’t find critical. Open Internet Explorer and start by going to Tools and then “Manage Add-ons.” Click on each add-on and click the Disable button as shown in Figure 1. (Click any image for a larger view.)
The only add-ons you’ll want to keep enabled are those from Microsoft – NameCtrl Class and any Office related add-ons. After you’ve disabled the add-ons, close Internet Explorer and reopen it. If you find the issue has been resolved, you don’t need to do anything further. You can start re-enabling add-ons one by one until you determine which was causing the issue.
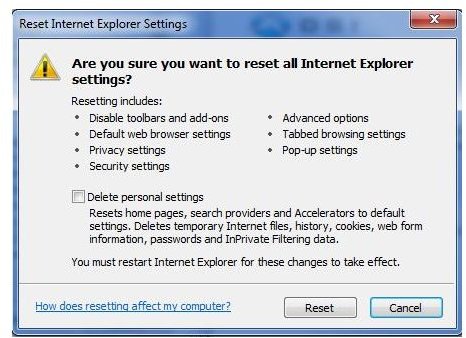
If after disabling the add-ons you are still experiencing issues, you’ll want to reset IE back to default settings. In IE, click on Tools, Internet Options and then the Advanced Tab. Click the Reset button. A warning like that pictured in Figure 2 will appear. I would start by leaving “Delete personal settings” unchecked. Just click the Reset button and restart IE. If the issue is still not resolved, you’ll want to perform a reinstall. Reinstalling Internet Explorer will keep personal settings such as bookmarks, but it would still be a good idea to perform a quick backup before you go any further.
Windows XP or Vista – Reinstall
Reinstalling Internet Explorer for Windows XP and Vista is pretty straightforward.
-
Before you uninstall, be sure you grab a copy of IE 8 either by using a different browser, or by using a different computer and storing the file on a flash drive. Download the appropriate version of IE 8 from here .
-
Go to the Start menu and then Control Panel.
Advertisement -
Click on Add or Remove Programs (XP) or Uninstall a Program (Vista).
-
Make sure the checkbox to view installed updates is checked. Scroll down to Windows Internet Explorer 8 and click Remove (XP) or double-click and confirm the request by clicking Yes (Vista).
Advertisement
-
After IE has been removed, restart your computer.
-
Reinstall Internet Explorer by double clicking the installer obtained in step 1 and following the on-screen prompts.
Advertisement
Be sure to restart your computer after the installation completes.
Windows 7 - Reinstall
To reinstall Internet Explorer for Windows 7, follow these steps:
- Go to the Start menu and then Control Panel.
-
Click on Programs and Features.
-
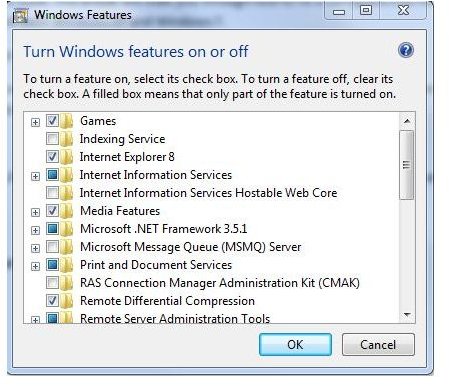
Click the link to “Turn Windows features on or off.”
Advertisement -
Scroll through the Windows components and deselect Internet Explorer 8 (Figure 3). A warning message may appear. Click Yes on the message, then click OK on the Windows features window.
-
Reboot your computer. When Windows has started again, follow steps 1-3 again but this time, make sure to check the Internet Explorer 8 checkbox. Restart your computer and IE should be repaired.
Advertisement
Additional information can be found in another article on Bright Hub called Internet Explorer 8 Problems: How to Fix and Repair IE 8 When it Hangs or Freezes by Arun Kumar.


