Where would the graphical user interface be without icons? We navigate folders with icons, launch programs with icons, and visually identify programs with icons. By learning how to manage PC icons, you can personalize and make improvements to your computing environment. Here’s a simple how-to guide.
Viewing Options
Let’s begin by taking a look at the options available in Windows Vista. Although earlier versions of Windows have fewer options, the processes for managing folder and icon views have remained relatively consistent. First, we’ll consider the “View” (or “Views”) menu option that can be accessed from any open folder’s explorer window. This menu allows you to control the size of the icons, from small, to medium, large, and extra large. Icons can be set as small as 16 pixels or as large as 256 pixels. The “List” and “Details” options use small icons, and the “Tiles” option uses medium icons.
There is, however, a shortcut method of changing your icon display; If you hold down the CTRL key in any explorer window, you can use your mouse’s scroll wheel to scroll through the icon options and actually view the icons’ changing configurations as you scroll.
Folder Options
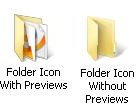
If you open the “Folder Options” applet, located in the Control Panel, and access the “View” tab, you’ll see a list of checkbox items. In Vista, the first checkbox item, “Always show icons, never thumbnails,” controls how your icons are displayed. If the box is unchecked, the icons for image files will be displayed as thumbnails, or previews of the images, as long as the size of the icons are set to “medium” or larger. In addition, your folder icons will display previews of some of the folder’s contents, as shown in the illustration.
If the “Always show icons, never thumbnails” box is checked, previews of images will not appear in place of their associated program’s icons, and your folder icons will not display previews. This option is worth considering because, while being a quick and convenient way to preview an image folder’s contents, generating thumbnails takes time and system resources, and may slow your computer down, especially if you’ve set that folder’s icon view to large or extra large.
Changing Icons in Vista
Any folder’s icon can be changed to just about any appearance that suits you. All you need to do is right-click the folder, select Properties from the pop-up menu, select the Customize tab and click on the “Change Icon” button. A window will open up containing a variety of icons to choose from. In addition, you can browse your system for other available icons. If you want a comprehensive look at all icon files on your system, just search for all files with the “.ico” file extension.
Downloading Icons
The standard set of PC desktop symbols is sufficient for some, but there is a whole world of them to explore online. You could probably find an ideal custom icon for any folder or shortcut you’d like to personalize. You can even replace the system desktop icons such as My Computer and Recycle Bin.
A great place to start is https://www.vistaicons.com . All you need to do is chose an icon pack, download it as a zip file, and extract the “ICO” folder to a location of your choice. Then, right-click your Vista desktop, select “Personalize” from the popup menu, and then select “Change Desktop Icons” from the Personalization window. From there you can select which desktop icons you want to change, and browse to the extracted “ICO” folder and take your pick.
Make Your Own Icons Online
If you want to get creative and make your own icons, there is a simple online tool which you can use to create small, 16x16 pixel graphics and save them on your computer as “.ico” files. It’s not a particularly sophisticated tool, but it’s free, fun, and easy to use.
Now that you’ve read this guide for PC desktop icons, you have greater flexibility in personalizing your Vista computing environment. The possibilities are worth taking some time to explore.


