Looking for an easy way to make a backup copy of Windows 7, or burn a downloaded copy of Windows 7 to disc? The process is extremely simple. Using the method provided in this tutorial, you will also be able to copy Windows 7 to a flash drive, if you so choose.
Windows 7
Windows is a fairly large file, approximately 3.25 GB. This makes it an ideal fit for a standard DVD-R disc (4.7 GB). No CDs. So, before you even get started, you first need to make sure that your computer has a DVD burner, and that you have some blank DVDs. After you are positive that your computer can burn DVDs, proceed on.
Burning Software
There are a variety of different burning programs out there that will allow you to make backup discs: Nero, Easy CD Creator, Deep Burner, etc… If you already have one of these software, it’s fine that you use it to burn your backup copy of Windows 7. Many of these DVD burning programs have direct data copying capabilities which should work. But, make sure that you burn the disc as a bootable ISO.
Luckily for everyone else, Microsoft has a free application designed specifically for burning Windows 7 to disc. It’s called Windows 7 USB DVD Download Tool. Download it , and install it onto your computer. The overall install process actually takes less than a minute.
Now that you have a computer with a DVD burner, some blank DVDs, and Microsoft Windows 7 USB DVD Download Tool, it’s time to get started learning how to burn Windows 7.
Using Windows 7 USB DVD Download Tool
Before using the tool, you will have to purchase the Windows 7 ISO Download from the Microsoft store and download it to your hard drive. This is what you will be making a copy of.
The Windows 7 USB DVD Download Tool is by far one of the most user friendly, easiest applications to work with. To start, go ahead and launch the application by using the desktop shortcut, or navigating to it using the path: Start > All Programs > Windows 7 USB DVD Download Tool.
Upon startup, the first screen will simply ask you to choose an ISO file. Click the Browse button and navigate to your Windows 7 ISO file that you want to copy. After you have done that, click the Next button.
The next step, step 2/4, prompts you to choose a media type. For this tutorial, you should pick DVD. However, you can pick USB device just as easily, if you wish to backup Windows 7 to a USB flash drive instead. Click the Next button to proceed.
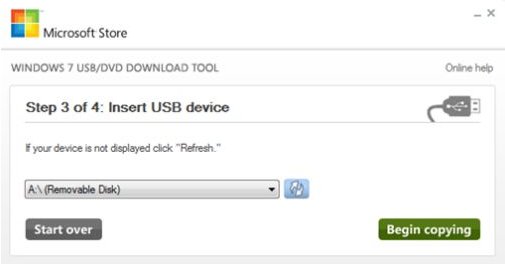
Step 3/4 prompts you to ready your media. If you are using a DVD, make sure that you insert it into your computer’s DVD drive. If you decided to copy to a flash drive, connect it to an available USB port on your computer. After you have done that, click the Begin copying button.
Upon doing so, Windows will copy Windows 7 and burn it to the DVD disc, or transfer it to flash drive, depending on the option that you chose. After it completes, you will have a fully usable backup copy of Windows 7.


