Having trouble getting a background color to print in a Word 2007 document? We’ll take a look at how to change the background color of pages in Word as well as how to make sure that new color appears when the document is printed.
Page Background Colors
Although the options are a bit hidden away, it is possible to change the background color of pages in a Word 2007 document. However, simply changing the option so that a new color appears on a page when creating a document doesn’t guarantee that the document will be printed with that color added.
In order for the new color to show up on the printed version of the file, you’ll have to perform an additional step. Also, you’ll need to make sure that your printer supports borderless printing or you’ll be left with a document that has margins without color.
This guide will describe how to do the following three things in Word 2007:
- Change the background color of pages in a document.
- Print a document with a new background color.
- Check to see if your printer supports borderless printing.
Changing the Background Color
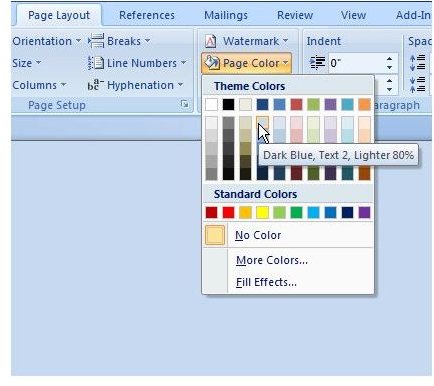
The option for changing the background color of pages in a Word 2007 document is found on the Page Layout tab of the ribbon. Go to this tab and click on Page Color in the Page Background section. (Click any image for a larger view.)
Select the new color that you want and click on it to apply it to the page. Note that hovering your cursor over any of the selections will give you a preview of that change in the document before you apply it.
Also, if you want to change the background to a custom color not available from the initial selection, you can click on More Colors to either choose a new color or manually input the RGB values for the color you want to use. Clicking on the Fill Effects option will allow even more choices, including background textures and gradients.
As mentioned earlier, making this change will only cause a new background color to appear on your computer screen. If you want this color to be printed as well, there is another item you need to check.
Getting the Background Color to Print
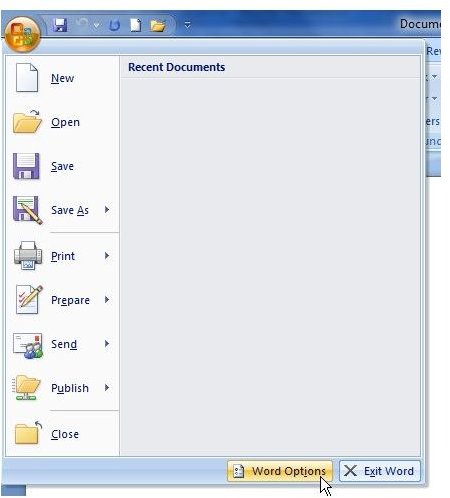
In order to have the new background color apply to the printed version of your Word 2007 document, you’ll need to make a change to Word’s default printing options. To do this, first click on the Office button and then click Word Options.
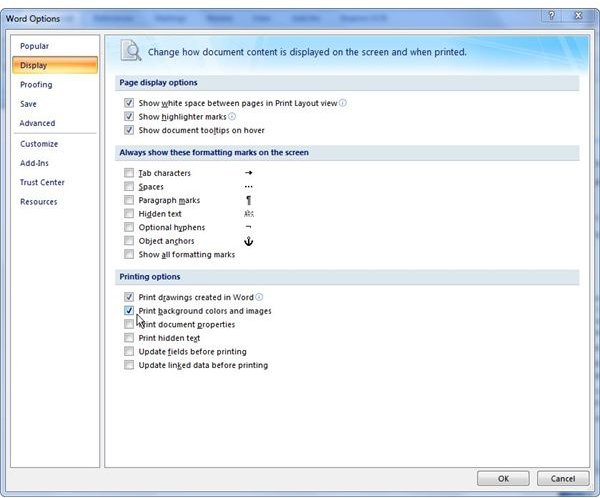
Next, select Display from the menu in the left pane. Under Printing options, make sure there is a check in the box next to Print background colors and images.
Just to make sure that everything needed has been changed, look at the Print Preview for the document before you actually send it to the printer. You can view this by clicking on the Office button, selecting Print and then Print Preview.
Background Color Not Covering the Entire Page?
When you look at the Print Preview for the document, it’s possible that your new background color may not be covering the entire page. If this is the case, you’ll first want to make sure that your printer supports borderless printing. Many printers, especially inexpensive home models, do not support this feature so you won’t be able to make the new background color print from edge to edge unless you switch to a different printer.
However, it’s also possible that your printer does support borderless printing, but this option has not been enabled. To correct this, you’ll need to check the printer’s properties. Click on the Office button and select Print. Instead of printing the document, click on the Properties button in this window. Depending on the type of device you have, the “borderless” option may appear in different places so you may need to look through the different tabs. A common location is on the Paper/Quality tab under Paper Options.
Even though the Borderless Printing option may be grayed out for some paper sizes, it could be available for others. So, before you give up entirely on your printer, look at the different paper sizes available and see if any of the other choices support this option.


