A common question regarding music formatting is how to take your M4A file and convert it to another format, usually MP3. There are a couple of different methods of getting around this, but they will require a little work. Here we’ll show you how.
iTunes
One thing you’ll notice with iTunes, is that when you right-click on an M4A track in your playlist, there’s the option Create MP3 Version. Alas, when choosing that option, you will often get this message:
“[Song Title]” could not be converted because protected files cannot be converted into other formats.
So, what do you do?
Obtaining Additional Software
One method is using free software, Free M4a to MP3 Converter . You just choose the tracks you want to convert into MP3, or other formats, then click Convert.
This is probably the quickest method if you don’t mind obtaining additional software. Whether you have a large library or just want a few files, it should do the trick. However, because some M4A files are copy-protected, you may run into the same problems as trying to convert using iTunes. So that often leaves the following option.
Creating an Audio CD
If using the above software doesn’t interest you, or doesn’t convert the files you want, is it still possible to obtain MP3 versions? Yes, but it does require some work. It can all be done using iTunes, so make sure you have some blank CDs handy. To help with this next section, I’ve added a series of screenshots. You can enlarge them by clicking on them at any point.
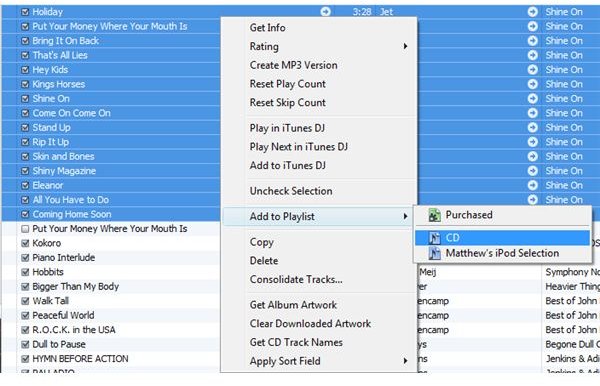
First thing you want to do is to create a new playlist for your CD. From File, choose New Playlist. Give a name to your playlist, and then start selecting some files you want to burn. You can do this by holding on to the Control key while clicking tracks. Or, if you have a series of tracks in a row, you can highlight them by holding Shift and pressing either the Up or Down key, depending on the direction you want to go (after clicking the first in a series of tracks you want to highlight). Once you’ve chosen the files you want, right-click on one of the highlighted tracks, and highlight Add to Playlist, then choose the playlist you’ve recently made.
Go to your playlist, and check that all the files you want are there. You’ll now notice that on the bottom-right of the window, there’s an option that says Burn. Click that to open up another window. From here, be sure that the Audio CD option is checked before continuing. You can also modify the writing speed, as well as other options, such as the length of gaps between tracks. Then choose Burn.

After your CD is burned, go to Edit, and then Preferences.
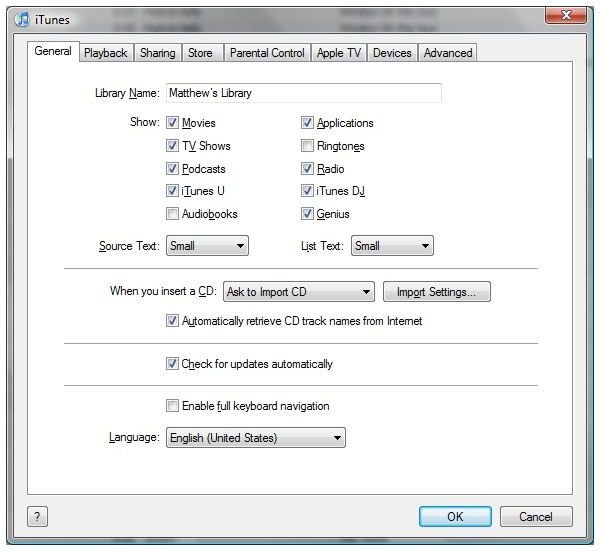
Make sure that the first tab on the left, General, is selected. Now, go down to the area that says When You Insert a CD. To the right of your option, there’s a button called Import Settings. Give that a click.
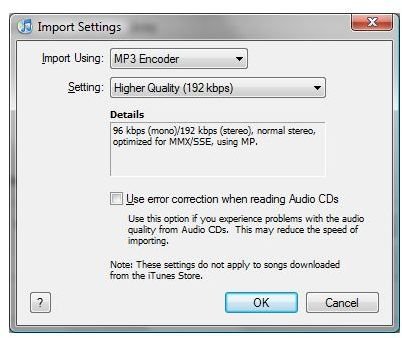
The top option, Import Using: choose MP3 Encoder. You can then choose the appropriate bit rate in Setting. Then click OK.
Ripping Your New CD
On the column to the left, you’ll notice your new CD under Devices. iTunes may have automatically taken you there after burning the CD, but if it hasn’t, go there now. You’ll then notice two options on the bottom-right of the screen: Import Settings and Import CD. Since we’ve already set our import settings, go ahead and choose Import CD. As soon as it’s finished, you will now have MP3 copies of your M4A files!
Notice
It is very, very important that you do not get rid of your M4A files, especially if you’ve acquired them from the iTunes store. Those are your official legitimate copies of those tracks. These copies are so you can play then using Windows Media Player, Winamp, or other music programs, as well as sync them to MP3 players that do not support M4A format.


