The Sound Recorder that comes with Windows XP is a great tool for basic audio recording and editing. Here’s how to make the most of it.
Sound Recording
Recording audio onto your Windows XP computer is as simple as clicking a few buttons. You can record using a microphone, directly from a CD, and much more. Best of all, this is done using software built right into Windows XP, so you don’t need to buy anything extra other than a microphone or maybe a cable if recording from an outside audio source.
Set the Source and Volume
The first thing you need to do is tell Windows which audio source you wish to record, and then adjust the recording volume in order to get the best quality sound. To adjust the recording volume in Windows XP, you will need to get into your Sound settings. There are several different ways this can be done.
First, you can double-click on the little speaker icon in the taskbar. This will bring up a volume control window for all your audio outputs. From there, click Options and then Properties, then select the Recording button and it will show you a list of all the available recording devices. Check what is needed and click OK. It will now show you volume controls for recording.
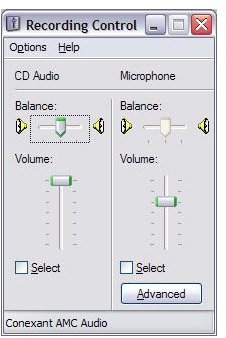
To record from a device, such as Microphone or CD Audio, you will need to check the Select box underneath. You will see a slider for adjusting the volume and another for the balance. Underneath the Microphone option, there is an Advanced button that will take you to another menu for adding a boost to the recording volume. Some sound cards also let you adjust the bass and treble of the recording, but if these sliders are grayed out then it means your sound card won’t support them.
Another way of getting into the Sound settings is to click on Start - Settings - Control Panel - Sound and Audio Devices. This will give you more options than when you just double-click on the speaker icon. If you click on the Audio tab, you will see where you can adjust the recording volume, if needed. You can also select the recording device there.
Using the Sound Recorder
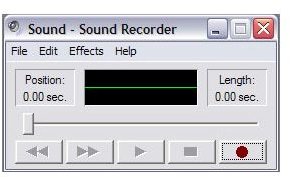
Now that you’ve got your recording source and volume set, it’s time to make your first recording. To access the Sound Recorder built right into Windows XP, click on Start - Programs - Accessories - Entertainment - Sound Recorder. You’ll also see a Volume Control icon in that same folder, and it’s another way to get into the volume controls.
Believe it or not, the Sound Recorder in Windows XP is far superior to the one found in Windows Vista. The XP Sound Recorder offers a few options for editing the audio after it is recorded, which is something Microsoft decided to take away in Vista. If you are going to do some serious recording on your PC, then you should invest in extra software to do so, but you’ll have some fun getting started with the Sound Recorder.
Click the big red button in the Sound Recorder and it will immediately start recording. How long it can record for depends on your computer’s memory and hard drive space, so watch to make sure it doesn’t stop while you are still talking. Be sure to test your equipment a few times to make sure the recording volume is set at the correct level, otherwise you might not like the way it sounds when finished. I recommend you read aloud a few sentences to catch the rises and falls in your voice.
Save Your Recording

When finished, click on File - Save As and you can save your recording. When you save the file, you will also see a Change button at the bottom of the screen, and this will give you a bunch of options for changing the type and quality of your audio file. Just remember that the maximum quality of your recording depends on the recording itself, so you aren’t really going to improve the sound by saving it using the max settings - you’ll just make a bigger file. The best way to get a good clean recording is to prep before you record anything. It’s much easier than trying to clean up the sound afterward.


