Windows Vista comes with utilities for recording audio on your computer, and they are very easy to use. This guide covers recording with a microphone or from an outside source, and gives some tips on how to make the best sounding recordings.
Audio Recording
Recording audio onto your Windows Vista computer is quite an easy task and only requires some extra cheap hardware to make it happen. If you want to record some dictation, all you need is a basic microphone. If you want to do something more complicated like transfer audio from a home video, you can do that pretty easily, too. In this article, I’ll tell you how to record audio on your computer and also how to make sure it sounds good.
Hardware and Software
The first thing you need to record audio is a sound device on your PC, and most computers have one already built into their system. If your computer has a headphone or microphone jack, then it can play and record sound. Unless you are dealing with a very old computer, chances are you will have sound capability on your computer. Be it a desktop or notebook PC, it will most likely have a sound device built in if it was made in the last ten years.
To record the audio, you can use the free Sound Recorder utility that comes built into Windows. It can be found by clicking on Start – Programs – Accessories in Vista. This very basic program will record audio and let you save it as a .WAV file. The Sound Recorder is very basic and won’t let you do any editing, but it’s great for quick audio recording jobs. If you have an aftermarket sound card in your PC, it may come with recording software that has a lot more features. For the purposes of this article, I will stick to the basics and use only the Sound Recorder utility since everyone using Windows Vista will already have it.
Microphone Recording
The easiest way to record sound is with a microphone connected to the microphone jack on your computer. This is great for recording dialogue, such as dictating your class notes or sending recorded messages to friends. It’s also good for recording acoustic guitar. Microphones vary greatly in price and quality, and most of the time you get what you pay for. That $10 desktop microphone is great for basic voice recording, but you’ll need something of much higher quality if you are doing any kind of professional work.
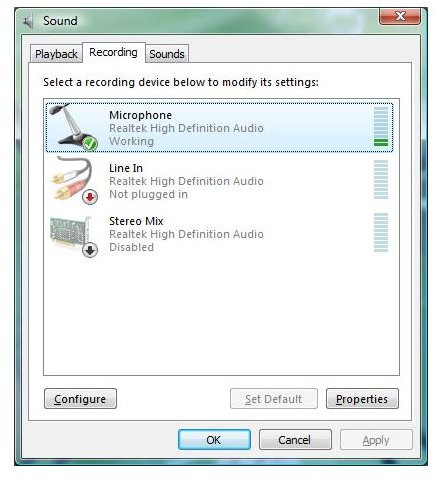
Before you use the Sound Recorder to record anything from the microphone, you may need to double check your sound settings to make sure the microphone is set as the recording device. To do this, go into the Control Panel and open Sound. Click on the Recording tab in the Sound window, and it will list the recording devices available on your system. Make sure that Microphone is selected. You will notice a green meter bar on the right and it indicates the input level. You can tap on the end of your microphone and see the meter jump if everything is connected properly.
Volume Control
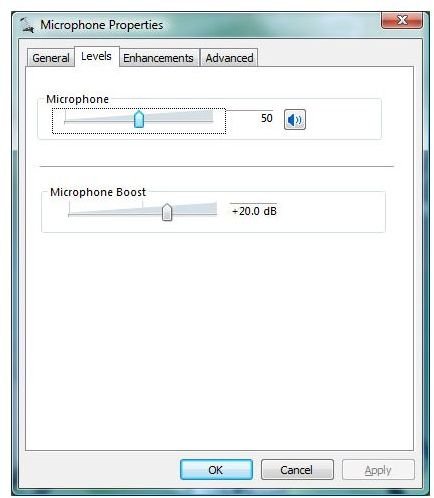
Now that you are ready to record with the microphone, you may want to check the recording volume. If it is set too low, the audio will be hard to hear. If it is set too high, the recording will sound awful and blaring. With Microphone selected, click the Properties button and then select the Levels tab and adjust the recording volume as needed. Since the volume depends greatly on the quality of your microphone and what you are recording, you’ll probably have to do a few test recordings before you get it just right. Start with the recording volume at 50% and then turn it up or down in 10% intervals until you get it where you want. If you find yourself having to turn the volume up too high, try turning up the Microphone Boost first, then adjust the volume.
Using Line In
If you want to record from another source, like a cassette deck or a vinyl LP, then you need to do a direct connection using an audio cable. What you’ll be doing is using this cable to connect to the output on the audio source and then plugging the other end of the cable to the input on your computer. If you are on a desktop PC, then you will most likely have a ‘Line In’ jack on the back of the PC. This functions sort of like a microphone jack, but doesn’t have the amplification options. If you are using a laptop, then you’ll most likely just have a microphone jack. Either one is fine, but the Line In jack is preferred.
On the audio source, you may have a headphone jack, or you may only have RCA cables. Either way, you can go to some place like Radio Shack and get the cables and any necessary adapters. Make sure you get the right sizes, as the computer will use 1/8” plugs, but some stereo systems uses ¼” plugs. You can also get an adapter that will take two RCA jacks and adapt the signal to fit a 1/8” plug.
Tweaking the Sound
While you are in the Microphone or Line In Properties window, take some time to look at the Enhancements and Advanced tabs. They offer various ways of customizing the sound when it is recorded, and there’s some fun stuff to play around with in there. Under the Advanced tab, you can change the quality of the recording, but keep in mind that the recording will only be as good as the source material, plus higher quality recordings will take up a lot more hard disk space.
Once you get comfortable recording sound, you may want to look into sound editing software to clean up your recordings, take out mistakes, and so on. There are a variety of commercial and freeware utilities that will let you edit sound files, and it can be a lot of fun.


