We can add graphics to a Microsoft Access form and link the form to a website address, another file or an existing macro that opens another query or report. This article shows how to import the graphic and make it interactive.
Why Make a Graphic Interactive?
We can attach a button to a form to streamline database navigation. Similarly we can import a graphic to a form, click on it and design it to work like a button.
Specifically, we can:
- Import a graphic file (clip art, gif, jpeg, bmp, etc.) directly into the form.
- Attach a link to the graphic that opens a website or other database object.
- Associate the graphic with an existing macro in the database.
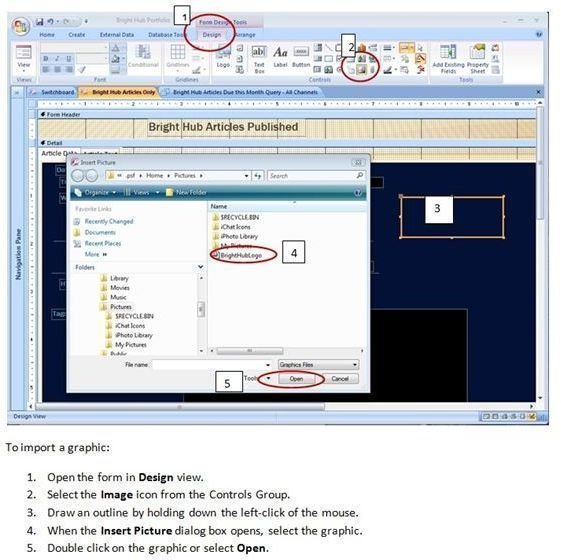
To Import a Graphic to a Form:
♦ Locate and place the graphic file you intend to use. (Hint: Place the image in your Windows Pictures directory. MS Access will default to that directory during the import step described below. )
♦ Open an existing MS Access form in Design view.
♦ In the Controls group (on the ribbon at the top of the window) click on the Image icon (bottom row, just to the left of the paperclip icon.)
♦ The mouse cursor will change to a replica of the Image icon with a plus sign in the upper left. Hold down the left click and draw a shape where you want the imported image to appear.
♦ When the Insert Picture directory opens, click on your graphic and select Open (bottom right of the dialog box). The graphic will now appear in the box you previously drew.
You have completed the first step. The screenshot below illustrates the steps for importing a graphic:
To Adjust the Size and Fit of the Graphic:
While still in Design view:
♦ Double click on the picture or select the picture and click on the Property Sheet icon in the Tools group.
♦ Select the Format tab in the Property Sheet.
♦ In the Size Mode (4th item down) select:
◊ Clip to keep the graphic at its original size
◊ Stretch to enlarge it by dragging the box
◊ Zoom to fit the size of the box you originally drew
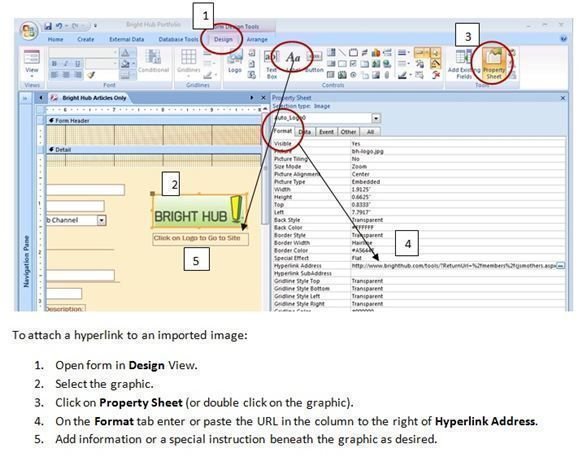
To Link a Graphic to a Web Site:
Make sure the form is in Design view, with the graphic selected, and the Property Sheet visible. Do the following:
♦ Select the Format tab on the Property Sheet.
♦ In the right column next to Hyperlink Address (line 17, just below Special Effect) fill in (or paste) the URL of the web site you want the graphic to link to.
♦ Add any special instructions or information below your newly interactive graphic by drawing and inserting a new Label beneath the graphic. (Click on the Label icon in the Controls group and draw the label box and type the special instructions or information.)
The screenshot below illustrates the steps for linking a graphic to a web site:
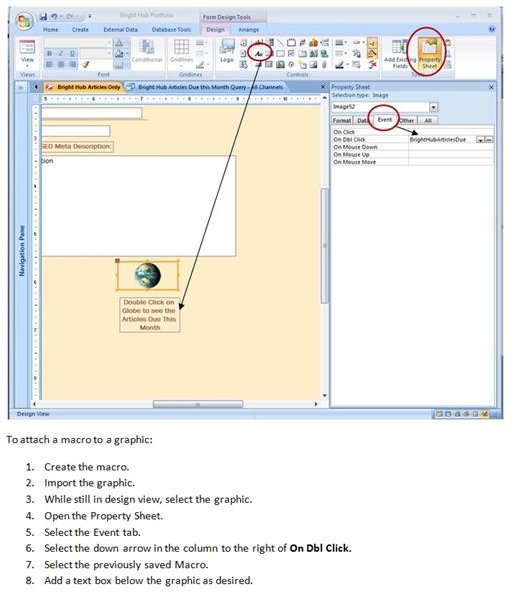
To Link a Graphic to a Macro:
First, create the macro. (See “Creating and Using Macros” linked below.) Do the following:
♦ Import the graphic.
♦ While still in Design view, select the graphic.
♦ Open the Property Sheet and select the Event tab.
♦ In the On Dbl Click tab, select the down arrow and click on the macro that will be associated with the graphic.
♦ Add any special instructions below your newly interactive graphic by drawing a label and adding text.
The screenshot below illustrates the steps for linking a graphic to a macro: