Flow charts are helpful visual tools. You can make one that displays systems such as your payroll procedures, show a process such as troubleshooting a device, or other steps using minimal text and noticeable images. Microsoft Word can help you make an effective flow chart quickly.
Flow Chart Shapes and Connectors for Microsoft Word 2003
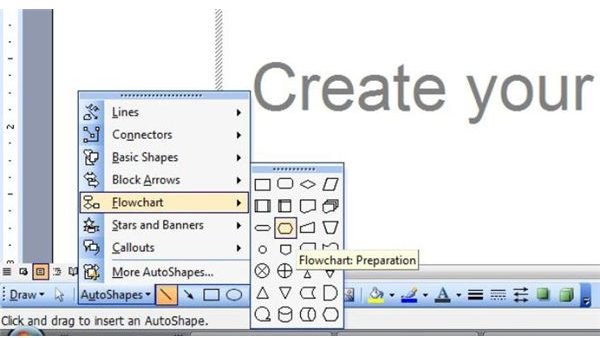
In Microsoft Word 2003, make sure the Drawing toolbar is present. If not, go to the View menu, point to Toolbars and select Drawing. Select Flow Chart on the AutoShapes menu in the Drawing toolbar. Click on the first shape you want to use in your flow chart and click onto the Word document to place it there.
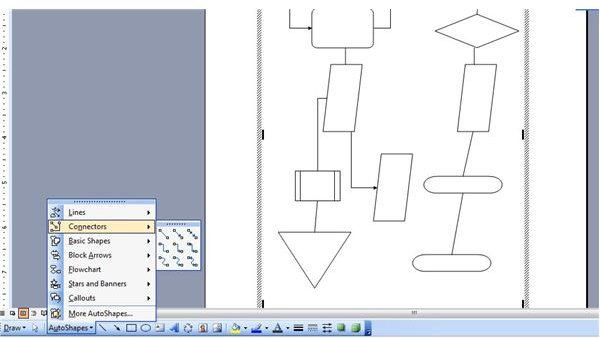
Repeat this process with a shape for each step in the flow chart, selecting the shape you want to use for each part of the process and placing or moving it on the Word document to the proper position. When you have added all the shapes you need, add connectors to show the flow of the process. Go to the AutoShapes menu and point to Connectors. Select the type of connector you want to use. Click on the position on the first shape where you want to add a connector, and then click on the second shape to connect them. Repeat with all of the shapes in the flow chart. If the connectors are “greyed out” or inaccessible, turn on the drawing canvas by pointing to Picture on the Insert menu and selecting New Drawing. The connectors will become accessible.
Flow Chart Shapes and Connectors for Microsoft Word 2007
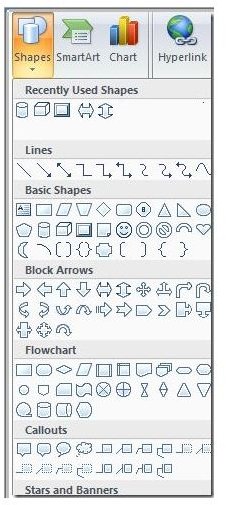
In Microsoft Word 2007, click Shapes in the Illustrations group on the Insert tab. Click on the first shape in the Flow Chart section that you want to use in your flow chart and click onto the Word document to place it there.
Repeat this process with a shape for each step in the flow chart, selecting the shape you want to use for each part of the process and placing or moving it on the Word document to the proper position. When you have added all the shapes you need, add connectors to show the flow of the process. Go to the Shapes menu and select the type of connector you want to use. Click on the position on the first shape where you want to add a connector, and then click on the second shape to connect them. Repeat with all of the shapes in the flow chart
Add Text
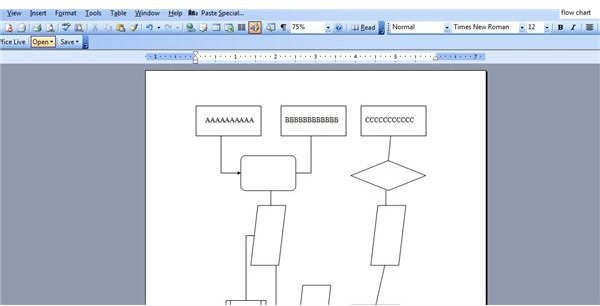
To add text to a shape in your Microsoft Word flow chart, right click a shape and select Add Text. Type the step that the flow chart shape represents, and repeat for the remaining shapes.
Add Color and Other Effects
To make a flow chart really stand out, you can fill the shapes with color and add other visual effects. In Microsoft Word 2003, right click a shape and select Format AutoShape. On the Colors and Lines tab, select a fill color from the Color drop-down, or select Fill Effects in the Color drop-down list to use a gradient, texture or other fill effect. You an also apply a shadow style or 3-D effect from the Drawing toolbar if desired. In Microsoft Word 2007, go to the Format tab of the ribbon to select fill colors, shadows or 3-D effects.

Adding a background color to the Microsoft Word document will help the flow chart stand out even more. Add a background in Microsoft Word 2003 by pointing to Background on the Format menu and selecting a color or fill effect. In Word 2007, go to the Page Layout tab and select a Page Color in the Page Background section.

Find more helpful Microsoft Word tips and tutorials in the Bright Hub collection of Microsoft Word articles .


