Microsoft Access 2007 allows users to add command buttons to forms (by means of a command button wizard), but the wizard will not work on a report. However, there is a “work-around.” By creating a macro and attaching it to a command button, we can add a command button to report.
Why add a command button to a report?
One disadvantage of Microsoft Access reports is that the data in reports is not accessible through the report itself. Reports are the final products of our database, but at best they only provide a convenient view of our data.
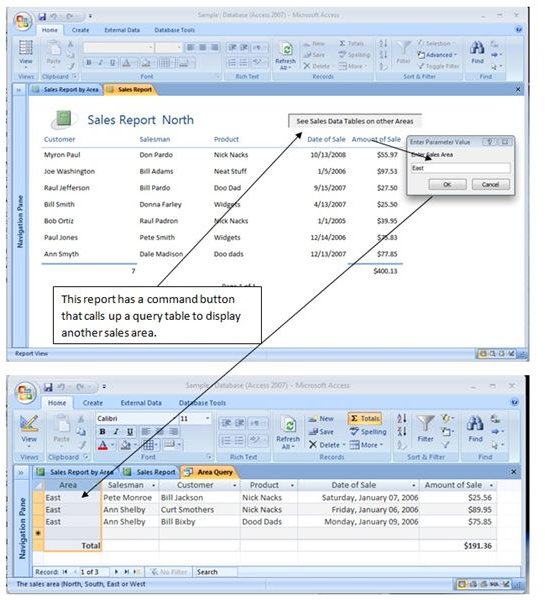
Adding a button to the report will not fully overcome that lack of flexibility, but it is a pretty good “work around.” For example, say we want to look at the database table that produces the report or navigate quickly to a related report. Adding a command button will get us quickly to the underlying or related data.
The screenshot below shows the end result of a button command added to a form:
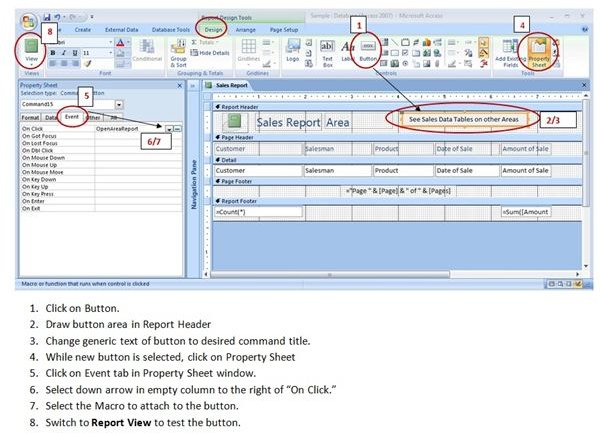
How to Add a Command Button to a Report
Do the following steps:
♦ Create a macro that will do what you want the Command Button to do. In our example, the macro we wrote simply opens a query table to get additional sales information. We named our Macro OpenAreaReport. (See the below link to the Bright Hub Article, “Creating and Using Macros” for more information on creating database macros.)
♦ Open your report in the Design view. (See the below link to the Bright Hub Article, “The Power of Database Reports” for a step-by-step guide in creating reports.)
♦ Click on the Button icon in the Controls group (immediately to the right of the large “Aa” icon) . Your cursor will change to a box with a plus sign in the upper right.
♦ Draw your button outline in the Report Header or Report Footer by tracing its shape holding down the left click button on your mouse. This will result in a new generic button labeled “Command” followed by a number.
♦ Click inside the button and edit the button text with the desired description. (We used “See the below link to Sales Data Tables on other Areas,” and stretched the width of the button by selecting the button and clicking and dragging the middle part of right side of the button when the cursor changes to a horizontal two-headed arrow.)
♦ Make sure the button is still selected. Then click on the Property Sheet icon in the Tools group (second last icon on the upper right.)
♦ While the button is selected, click on the Event tab in the Property Sheet window.
♦ Select the down arrow in the blank column to the right of the On Click row. Any macro already stored in the database will appear in the down arrow list.
♦ Select the name of your macro. Save the form. Your button is ready to use.
To use the button, switch to Report View (not Print View). Click on the button.
Note: The command button will be visible but will not work in the Print View. To keep the button from showing in printed copies of your report, temporarily delete or drag the button out of the printing area in the report Layout View. Print the report, but do not save the changes.
The foregoing steps are illustrated in the screenshot below: